embroidery-render-photoshop
 viral ghelani
Create a adobe photoshop cs6 compatible filter to turn a color shape into embroidery render


Comments (0)
Sign in to leave a comment
System Requirements
System Requirements Document for embroidery-render-photoshop
1. Introduction
embroidery-render-photoshop is a web application for embroidery designers and textile studios who work with very large, layered TIFF files produced by Adobe Photoshop. The product lets a designer load a huge Photoshop TIFF file in the browser, inspect the layers it contains, and turn a color shape into an embroidery render — a stitch-and-thread interpretation of that shape.
The intent is expert craft tooling: precise, fast, and built for dense controls and big data. The application is a browser-delivered web application. It is not an Adobe Photoshop CS6 filter or plugin; the earlier idea of a Photoshop-compatible filter is superseded by the web application, and the embroidery render is produced inside this web application.
Audience: embroidery designers and textile studios who already author artwork as layered Photoshop TIFFs and need to preview how a color shape will read as stitched embroidery before committing to production.
2. System Overview
2a. Product Interpretation and Delivery Boundary
The product is delivered as a first-party web application with a React front end and a shared FastAPI backend. All accepted work happens in the browser: the designer opens the application, loads a large Photoshop TIFF file, sees its layers, and produces an embroidery render from a color shape.
Access is open. The Landing, Workspace, and Embroidery Render surfaces are all reachable without an account; no application-owned identity, sign-in, or account management is part of the accepted scope. There is no requirement for saved projects, shared libraries, or returning-user state, so no identity continuity is introduced.
File loading and layer inspection are the current boundary of the Workspace. Embroidery rendering from a color shape is the current boundary of the Embroidery Render surface. Anything beyond loading, layer inspection, and color-shape-to-embroidery rendering — such as stitch file export, machine formats, or Photoshop plugin packaging — is outside the current scope.
Removed from scope
- Adobe Photoshop CS6 compatible filter (also: Photoshop plugin, Photoshop CS6 filter)
2b. Source Content Inventory
Not applicable — no reference directive supplies a content_source.
2c. Page Content and Component Coverage
Landing
- Information/state: Product name and one-line statement that this is a web tool for loading large Photoshop TIFF files and rendering color shapes as embroidery. A schematic stitch-density diagram as line art. A file-size readout area that becomes live during decode.
- Primary action: Drop or choose a large Photoshop TIFF file to begin; this carries the designer into the Workspace with the file loaded.
- Supporting actions: Navigate to the Workspace without a file; read the short explanation of supported input (layered TIFF authored in Adobe Photoshop).
- Domain entities: TIFF file (name, byte size), layer count.
- Component responsibilities: Oversized headline; wide drop zone with 1px dashed border; tangerine file-size readout in JetBrains Mono that counts up during decode; acid-green stitch line along the bottom edge; stitch-density line-art diagram.
- States:
- Loading: decode in progress, file-size readout counting up, drop zone shows the file name.
- Empty: no file chosen; drop zone invites a file.
- Success: file accepted, transition to Workspace.
- Error: unsupported or unreadable file — plain message naming the file and the reason; the drop zone returns to the empty state so another file can be chosen.
- Recovery: re-drop or re-choose a file at any time.
Workspace
- Information/state: The loaded TIFF's identity (file name, byte size, layer count), a layer tree listing every layer in the file, and a canvas showing the composite or the selected layer.
- Primary action: Select a layer in the layer tree to inspect it on the canvas.
- Supporting actions: Load a different TIFF file; toggle layer visibility for inspection; send the selected layer to the Embroidery Render surface.
- Domain entities: TIFF file, layer (name, position in tree, visibility, thumbnail), color shape (a region of a layer defined by color).
- Component responsibilities: Three-pane split — layer tree (left), canvas (center), render panel (right). Layer rows carry a hairline left rule that turns tangerine on selection. Layer count and file size in JetBrains Mono with tabular numerals. Canvas renders the selected layer at fit-to-pane scale.
- States:
- Loading: decode and layer extraction in progress with a stepped progress indicator; layer tree fills in as layers are read.
- Empty: no file loaded — prompt to load a TIFF.
- Success: layer tree populated, first layer selected, canvas showing it.
- Error: file fails to decode or contains no readable layers — message naming the failure; the previously loaded file, if any, remains available.
- Recovery: load another file; retry the failed load.
Embroidery Render
- Information/state: The color shape chosen from the Workspace, the resulting embroidery render with stitch direction and thread texture, and a stitch-density diagram.
- Primary action: Render the selected color shape as embroidery.
- Supporting actions: Adjust render parameters exposed by the render panel; return to the Workspace to choose a different layer or color shape.
- Domain entities: Color shape, embroidery render (stitch pattern, thread texture, stitch density).
- Component responsibilities: Render panel with parameter controls; canvas showing the embroidery render; acid-green stitch-density diagram that draws itself; stepped whole-number progress bar during rendering.
- States:
- Loading: render in progress, progress bar stepping in whole numbers, stitch-density diagram drawing itself.
- Empty: no color shape selected — prompt to choose one in the Workspace.
- Success: embroidery render displayed with stitch direction and thread texture.
- Error: render fails — message naming the failure; the selected color shape and parameters remain so the render can be retried.
- Recovery: retry the render; change parameters; return to the Workspace.
3. Functional Requirements
FR-1 — Load a huge, big, or large TIFF file (explicit) As an Embroidery designer, I should load a huge, big, or large TIFF file into the web application so that I can work with my artwork in the browser.
- Trigger/input: the designer drops or chooses a TIFF file on the Landing drop zone or in the Workspace.
- Observable result: the file is accepted, its byte size is shown, and decode progress is visible.
- Access state: no account required.
- Failure/recovery: an unsupported or unreadable file produces a message naming the file and reason; the designer can choose another file.
- Continuation: on success the designer proceeds to layer inspection in the Workspace.
FR-2 — Load the layers of the TIFF file (explicit) As an Embroidery designer, I should see the layers contained in the TIFF file so that I can inspect and choose the artwork I need.
- Trigger/input: a successfully loaded TIFF file.
- Observable result: a layer tree lists every layer in the file with name, position, visibility, and thumbnail; the layer count is shown.
- Access state: no account required.
- Failure/recovery: a file with no readable layers reports that outcome and leaves any previously loaded file available.
- Continuation: the designer selects a layer to inspect it on the canvas.
FR-3 — Support TIFF files created by Adobe Photoshop (explicit) As an Embroidery designer, I should load TIFF files authored in Adobe Photoshop so that my existing Photoshop artwork works without conversion.
- Trigger/input: a TIFF file produced by Adobe Photoshop, including its layer structure.
- Observable result: the file loads and its Photoshop layer structure appears in the layer tree.
- Access state: no account required.
- Failure/recovery: a TIFF that is not readable as a Photoshop-authored layered file reports the specific failure; the designer can choose another file.
- Continuation: layer inspection and color-shape selection proceed as in FR-2.
FR-4 — Turn a color shape into an embroidery render (explicit) As an Embroidery designer, I should turn a color shape into an embroidery render so that I can see how the shape reads as stitched embroidery.
- Trigger/input: a color shape selected from a layer in the Workspace, sent to the Embroidery Render surface, with render parameters set in the render panel.
- Observable result: an embroidery render of the shape is displayed with stitch direction and thread texture, alongside a stitch-density diagram.
- Access state: no account required.
- Failure/recovery: a failed render reports the failure and preserves the selected shape and parameters so the render can be retried or adjusted.
- Continuation: the designer adjusts parameters and re-renders, or returns to the Workspace to choose another layer or color shape.
FR-5 — Load a large Photoshop TIFF file in the browser (required_inference) As an Embroidery designer, I should load a large Photoshop TIFF file directly in the browser so that the accepted load-and-inspect journey is executable without desktop tooling.
- Trigger/input: file selection on the Landing drop zone or in the Workspace.
- Observable result: decode progress and a live file-size readout are visible while the file is read; the Workspace opens with the file loaded.
- Access state: no account required.
- Failure/recovery: decode failure is reported with the file name and reason; the designer can retry or choose another file.
- Continuation: the designer inspects layers and proceeds to rendering.
4. User Personas
Embroidery designer
- Product context: Works in a textile or embroidery studio, authors artwork as layered Photoshop TIFF files, and needs to judge how a color shape will read once stitched. Files are large, so load speed and clear progress feedback matter.
- Primary goal: Load a large Photoshop TIFF, see its layers, and produce an embroidery render of a chosen color shape.
- Distinct accepted responsibilities: Choosing and loading the TIFF file; reading decode progress and file size; inspecting the layer tree and selecting a layer; selecting a color shape; setting render parameters; reading the embroidery render and stitch-density diagram.
- Relevant inputs or decisions: Which file to load; which layer to inspect; which color shape to render; which render parameters to apply.
- Interactions with other accepted participants: None beyond the designer — the accepted scope has a single active human role, and no handoff to another human participant is required.
- Observable success: The layer tree shows every layer of the loaded Photoshop TIFF, and the Embroidery Render surface shows a stitched render of the chosen color shape with visible stitch direction, thread texture, and stitch density.
5. Core User Flows
Flow A — Load a large Photoshop TIFF and inspect its layers
- The designer opens the Landing page. The oversized headline, drop zone, and stitch line are visible; no file is loaded.
- The designer drops a large layered TIFF authored in Adobe Photoshop onto the drop zone (or chooses it via the file picker).
- The Landing page shows the file name and a tangerine file-size readout in JetBrains Mono that counts up as the file decodes.
- On successful decode, the application moves the designer into the Workspace with the file loaded.
- The Workspace shows the file name, byte size, and layer count, and fills the layer tree with every layer in the file; the first layer is selected and shown on the canvas.
- The designer selects another layer in the layer tree; its hairline left rule turns tangerine and the canvas shows that layer.
- Failure/recovery: if the file cannot be decoded or contains no readable layers, the application reports the file name and the reason, and the designer can choose another file. A previously loaded file, if any, remains available in the Workspace.
- Continuation: the designer either loads a different file or proceeds to Flow B.
Flow B — Turn a color shape into an embroidery render
- From the Workspace, with a layer selected, the designer identifies a color shape in that layer and sends it to the Embroidery Render surface.
- The Embroidery Render surface shows the chosen color shape and the render panel with its parameter controls.
- The designer sets the render parameters and starts the render.
- The render panel shows a progress bar stepping in whole numbers while the acid-green stitch-density diagram draws itself.
- On success, the surface displays the embroidery render of the shape with stitch direction and thread texture, alongside the completed stitch-density diagram.
- Failure/recovery: if the render fails, the application reports the failure and keeps the selected color shape and parameters so the designer can retry or adjust them.
- Continuation: the designer adjusts parameters and re-renders, or returns to the Workspace to choose a different layer or color shape and repeat Flow B.
Flow C — Start from the Workspace without a file
- The designer navigates from the Landing page to the Workspace without choosing a file.
- The Workspace shows its empty state prompting the designer to load a TIFF.
- The designer loads a file from the Workspace and continues from step 4 of Flow A.
6. Visuals Colors and Theme
Muse: Rasmus Andersson. Headline: Systematic product craft on a graphite ground.
Mode: dark.
Colour tokens (exact):
- Background:
#141517— graphite ground covering most of the screen. - Surface:
#1D1F22— panels, layer tree, render panel. - Text:
#F2EFE9— primary readable text. - Primary:
#FF6B2C— tangerine; marks the main action only (drop zone call to action, selected layer rule, active render button). - Accent:
#C8F04A— acid green; marks stitch previews, the stitch line, the stitch-density diagram, and layer counts. - Muted:
#8A8F98— secondary labels and metadata. - Hairline border:
#2A2D31at 1px.
Typography:
- Headings: Space Grotesk, medium weight, tight tracking, sentence case, very large scale contrast against small labels.
- Body: Inter Tight.
- Numerals: JetBrains Mono with tabular numerals for file sizes and layer counts.
- Scale (1.25 modular): 96 / 64 / 40 / 24 / 16 / 14 px. Oversized headline uses
clamp(40px, 9vw, 128px).
Shape language: sharp 4px and 8px radii on controls only. Hairline 1px borders in #2A2D31. No shadows. No pills.
Layout: strict 12-column grid on a 4/8-pt scale. The Workspace is a three-pane split: layer tree, canvas, render panel.
Imagery: the interface is the image — file metadata, layer thumbnails, and a stitch-density diagram rendered as schematic line art.
Avoid: blue or indigo accents on white; Inter, Roboto, or system-ui fonts; rounded pill buttons and card grids with hover lift; gradient blob heroes; decorative shadows on panels.
Readability: headlines, labels, numbers, and controls stay whole inside the viewport and their containers at 375px, 768px, and 1280px, wrapping or scaling to fit; no element covers readable text or controls.
7. Signature Design Concept
The Landing page is a full-width graphite stage (#141517). An oversized Space Grotesk headline spans the viewport at clamp(40px, 9vw, 128px), stating the product's purpose in sentence case. Beneath it sits a wide drop zone with a 1px dashed #2A2D31 border and a large tangerine file-size readout in JetBrains Mono that counts up during decode. A thin acid-green (#C8F04A) stitch line runs across the bottom edge of the stage, and a schematic stitch-density diagram in line art sits to one side. When a file is dropped, the readout becomes live and the stitch line advances with decode progress — the interface itself is the hero, with no decorative imagery beyond the schematic line art.
8. Interaction Model & Motion Direction
Interaction Model: Animated Motion Tempo: restrained Hero Dimensionality: flat
Landing Hero Motion Brief
- Focal subject: the drop zone and its tangerine file-size readout, framed by the oversized headline and the acid-green stitch line.
- Thesis: input (a large Photoshop TIFF is dropped) → transformation (the file-size readout counts up in JetBrains Mono while decode proceeds and the stitch line advances) → outcome (the Workspace opens with the layer tree populated).
- Motion vocabulary: fast 120–200ms functional transitions; layer rows highlight on hover; the render progress bar steps in whole numbers; the stitch-density diagram draws itself in the render panel.
- Composed first frame: graphite ground, oversized headline spanning the viewport, dashed drop zone centered beneath it, tangerine readout at rest showing the drop prompt, acid-green stitch line along the bottom edge.
- Reduced-motion state: the readout updates in discrete steps without counting animation, the stitch line is drawn statically at full width, and the stitch-density diagram appears complete rather than drawing itself.
9. Non-Functional Requirements
- NFR-1 — Large-file handling (explicit): the application must load huge, big, or large TIFF files without requiring the designer to pre-split or downscale them. Rationale: the source explicitly names large files as the input class.
- NFR-2 — Photoshop TIFF compatibility (explicit): the TIFF reader must accept files created by Adobe Photoshop, including their layer structure. Rationale: source-stated compatibility requirement.
- NFR-3 — Browser delivery (explicit): the product is a web application, not an Adobe Photoshop CS6 filter or plugin. Rationale: explicit hard constraint.
- NFR-4 — Progress feedback (required_inference): decode and render operations must expose visible progress so the designer can tell a large file is being processed rather than stalled. Rationale: necessary for the accepted large-file journey to be usable.
- NFR-5 — Readable layout at all viewports (explicit, from creative direction): headlines, labels, numbers, and controls remain whole and uncovered at 375px, 768px, and 1280px.
- NFR-6 — Reduced motion (explicit, from creative direction): with
prefers-reduced-motion, a usable static arrangement is provided.
10. Tech Stack
- Frontend: React application UI, served as the browser client for Landing, Workspace, and Embroidery Render.
- Backend: shared FastAPI process for application APIs and domain modules, including TIFF decode support and embroidery render generation.
- Database: MariaDB for application-owned persistent data.
- Containerization: Docker / docker-compose with the
frontend,backend, anddatabaseservices.
11. Assumptions and Constraints
- Constraint (explicit): the product is a web application; it is not an Adobe Photoshop CS6 filter or plugin.
- Assumption: "huge/big/large" TIFF files are handled by the browser client with backend support for decode and render; no specific file-size ceiling is stated by the source.
- Assumption: the accepted scope has one active human role, the Embroidery designer; no additional personas are introduced.
- Assumption: no account, sign-in, or saved-project state is required; all three surfaces are openly reachable.
- Assumption: stitch file export, machine formats, and Photoshop plugin packaging are outside the current scope.
12. Glossary
- TIFF — Tagged Image File Format; here, a layered image file authored in Adobe Photoshop.
- Layer — a named, individually selectable component of a TIFF file's image structure.
- Color shape — a region of a layer defined by color, used as the input to embroidery rendering.
- Embroidery render — a stitched interpretation of a color shape showing stitch direction, thread texture, and stitch density.
- Stitch density — the concentration of stitches in an embroidery render, shown as a schematic diagram.
- Workspace — the three-pane surface (layer tree, canvas, render panel) where a loaded TIFF's layers are inspected.
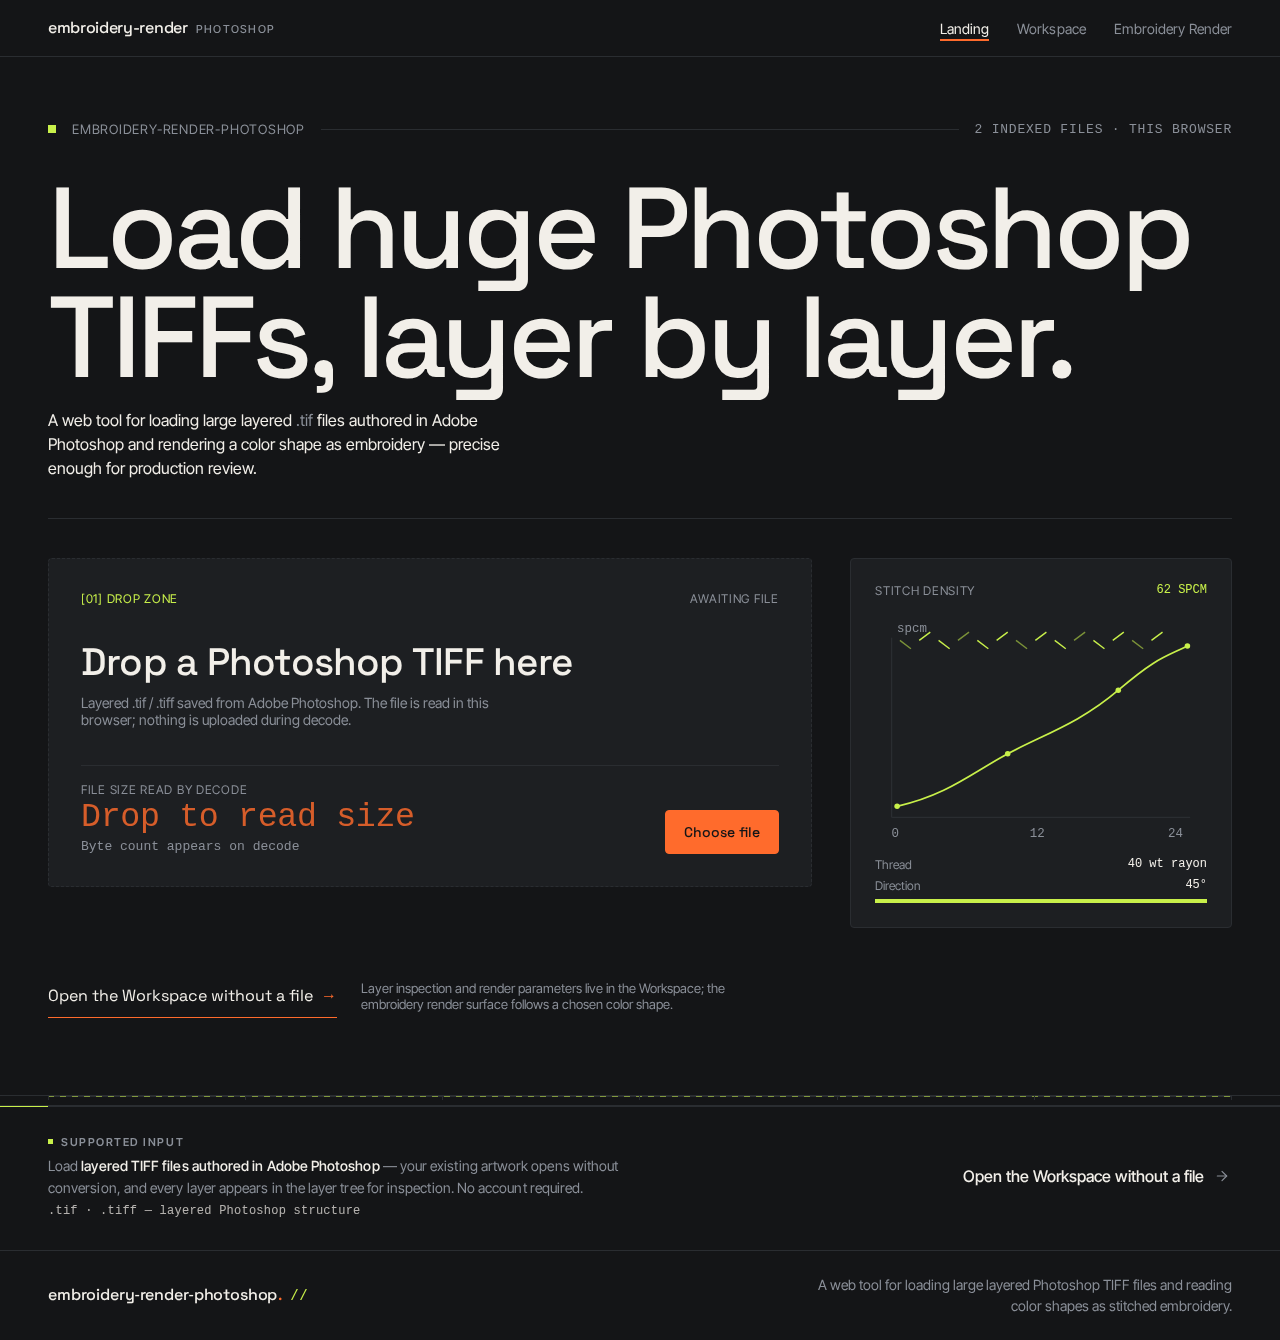
Load huge Photoshop TIFFs, layer by layer.
A web tool for loading large layered .tif files authored in Adobe Photoshop and rendering a color shape as embroidery — precise enough for production review.
Layer inspection and render parameters live in the Workspace; the embroidery render surface follows a chosen color shape.
Load layered TIFF files authored in Adobe Photoshop — your existing artwork opens without conversion, and every layer appears in the layer tree for inspection. No account required.
Load huge Photoshop TIFFs, layer by layer.
A web tool for loading large layered .tif files authored in Adobe Photoshop and rendering a color shape as embroidery — precise enough for production review.
Layer inspection and render parameters live in the Workspace; the embroidery render surface follows a chosen color shape.
Load layered TIFF files authored in Adobe Photoshop — your existing artwork opens without conversion, and every layer appears in the layer tree for inspection. No account required.
No comments yet. Be the first!