Admin
Role 01- AccessEvery module: Dashboard, Inventory, Orders, Production and Reports.
- User managementHandled through seed data or pgAdmin.
- Inventory and ordersItem details, stock changes with reasons, order creation and production.
 Rafa Mariyam


Sign in to leave a comment
TranZact-style ERP Group Project | Person 1 – UI/UX Designer and Documentation Lead
Page 1 of 13
TranZact-style manufacturing ERP · Team work guide · Version 2
TranZact-style ERP Group Project | Person 1 – UI/UX Designer and Documentation Lead
Page 2 of 13
TranZact-style manufacturing ERP · Team work guide · Version 2
TranZact-style ERP Group Project | Person 1 – UI/UX Designer and Documentation Lead
Page 3 of 13
TranZact-style manufacturing ERP · Team work guide · Version 2
TranZact-style ERP Group Project | Person 1 – UI/UX Designer and Documentation Lead
Page 4 of 13
TranZact-style manufacturing ERP · Team work guide · Version 2
TranZact-style ERP Group Project | Person 1 – UI/UX Designer and Documentation Lead
Page 5 of 13
TranZact-style manufacturing ERP · Team work guide · Version 2
TranZact-style ERP Group Project | Person 1 – UI/UX Designer and Documentation Lead
Page 7 of 13
TranZact-style manufacturing ERP · Team work guide · Version 2
TranZact-style ERP Group Project | Person 1 – UI/UX Designer and Documentation Lead
Page 8 of 13
TranZact-style manufacturing ERP · Team work guide · Version 2
TranZact-style ERP Group Project | Person 1 – UI/UX Designer and Documentation Lead
Page 9 of 13
TranZact-style manufacturing ERP · Team work guide · Version 2
TranZact-style ERP Group Project | Person 1 – UI/UX Designer and Documentation Lead
Page 10 of 13
TranZact-style manufacturing ERP · Team work guide · Version 2
TranZact-style ERP Group Project | Person 1 – UI/UX Designer and Documentation Lead
Page 13 of 13
TranZact-style manufacturing ERP · Team work guide · Version 2
What is new in this version
TranZact-style ERP Group Project | Person 2 – Frontend Developer – Inventory
Page 1 of 13
TranZact-style manufacturing ERP · Team work guide · Version 2
TranZact-style ERP Group Project | Person 2 – Frontend Developer – Inventory
Page 2 of 13
TranZact-style manufacturing ERP · Team work guide · Version 2
TranZact-style ERP Group Project | Person 2 – Frontend Developer – Inventory
Page 3 of 13
TranZact-style manufacturing ERP · Team work guide · Version 2
TranZact-style ERP Group Project | Person 2 – Frontend Developer – Inventory
Page 4 of 13
TranZact-style manufacturing ERP · Team work guide · Version 2
TranZact-style ERP Group Project | Person 2 – Frontend Developer – Inventory
Page 5 of 13
TranZact-style manufacturing ERP · Team work guide · Version 2
Page 6 of 13
TranZact-style ERP Group Project | Person 2 – Frontend Developer – Inventory
Page 7 of 13
TranZact-style manufacturing ERP · Team work guide · Version 2
TranZact-style ERP Group Project | Person 2 – Frontend Developer – Inventory
Page 8 of 13
TranZact-style manufacturing ERP · Team work guide · Version 2
TranZact-style ERP Group Project | Person 2 – Frontend Developer – Inventory
Page 9 of 13
TranZact-style ERP Group Project | Person 2 – Frontend Developer – Inventory
Page 10 of 13
TranZact-style ERP Group Project | Person 2 – Frontend Developer – Inventory
Page 11 of 13
TranZact-style manufacturing ERP · Team work guide · Version 2
TranZact-style ERP Group Project | Person 2 – Frontend Developer – Inventory
Page 12 of 13
TranZact-style manufacturing ERP · Team work guide · Version 2
TranZact-style ERP Group Project | Person 2 – Frontend Developer – Inventory
Page 13 of 13
TranZact-style manufacturing ERP · Team work guide · Version 2
The project in one line: We are building a small version of TranZact: a web app where a factory
can see its stock, track what it is making, follow its orders, and read simple reports, all in one
place.
TranZact-style ERP Group Project | Person 3 – Frontend Developer – Orders and Production
Page 1 of 13
TranZact-style manufacturing ERP · Team work guide · Version 2
TranZact-style ERP Group Project | Person 3 – Frontend Developer – Orders and Production
Page 2 of 13
TranZact-style manufacturing ERP · Team work guide · Version 2
C. Save and share your work (every day)
TranZact-style ERP Group Project | Person 3 – Frontend Developer – Orders and Production
Page 3 of 13
TranZact-style manufacturing ERP · Team work guide · Version 2
TranZact-style ERP Group Project | Person 3 – Frontend Developer – Orders and Production
Page 4 of 13
TranZact-style manufacturing ERP · Team work guide · Version 2
TranZact-style ERP Group Project | Person 3 – Frontend Developer – Orders and Production
Page 5 of 13
TranZact-style manufacturing ERP · Team work guide · Version 2
5
6
7–8
TranZact-style ERP Group Project | Person 3 – Frontend Developer – Orders and Production
Page 6 of 13
TranZact-style manufacturing ERP · Team work guide · Version 2
TranZact-style ERP Group Project | Person 3 – Frontend Developer – Orders and Production
Page 8 of 13
TranZact-style manufacturing ERP · Team work guide · Version 2
TranZact-style ERP Group Project | Person 3 – Frontend Developer – Orders and Production
Page 9 of 13
TranZact-style manufacturing ERP · Team work guide · Version 2
TranZact-style ERP Group Project | Person 3 – Frontend Developer – Orders and Production
Page 10 of 13
TranZact-style manufacturing ERP · Team work guide · Version 2
TranZact-style ERP Group Project | Person 3 – Frontend Developer – Orders and Production
Page 11 of 13
TranZact-style manufacturing ERP · Team work guide · Version 2
Page 13 of 13
Person 5
Your work guide, explained simply
Your
TranZact-style ERP Group Project | Person 5 – Database, Login/Security and Roles
Page 1 of 15
TranZact-style manufacturing ERP · Team work guide · Version 2
TranZact-style ERP Group Project | Person 5 – Database, Login/Security and Roles
TranZact-style ERP Group Project | Person 5 – Database, Login/Security and Roles
Page 3 of 15
TranZact-style manufacturing ERP · Team work guide · Version 2
TranZact-style ERP Group Project | Person 5 – Database, Login/Security and Roles
Page 4 of 15
TranZact-style manufacturing ERP · Team work guide · Version 2
Step 3: Decide the columns for each table (Week 2)
Person 4's guide).
TranZact-style ERP Group Project | Person 5 – Database, Login/Security and Roles
Page 5 of 15
TranZact-style manufacturing ERP · Team work guide · Version 2
TranZact-style ERP Group Project | Person 5 – Database, Login/Security and Roles
Page 6 of 15
TranZact-style manufacturing ERP · Team work guide · Version 2
TranZact-style ERP Group Project | Person 5 – Database, Login/Security and Roles
Page 7 of 15
TranZact-style manufacturing ERP · Team work guide · Version 2
• ER diagram
• database/schema.sql
Who you will work with
Handy tips
TranZact-style ERP Group Project | Person 5 – Database, Login/Security and Roles
Page 8 of 15
TranZact-style manufacturing ERP · Team work guide · Version 2
TranZact-style ERP Group Project | Person 5 – Database, Login/Security and Roles
Page 9 of 15
TranZact-style manufacturing ERP · Team work guide · Version 2
TranZact-style ERP Group Project | Person 5 – Database, Login/Security and Roles
Page 10 of 15
TranZact-style manufacturing ERP · Team work guide · Version 2
TranZact-style ERP Group Project | Person 5 – Database, Login/Security and Roles
Page 11 of 15
TranZact-style manufacturing ERP · Team work guide · Version 2
TranZact-style ERP Group Project | Person 5 – Database, Login/Security and Roles
Page 12 of 15
TranZact-style manufacturing ERP · Team work guide · Version 2
TranZact-style ERP Group Project | Person 5 – Database, Login/Security and Roles
Page 13 of 15
TranZact-style manufacturing ERP · Team work guide · Version 2
Page 15 of 15
TranZact-style ERP Group Project | Person 4 – Backend Developer – APIs
Page 1 of 16
TranZact-style manufacturing ERP · Team work guide · Version 2
TranZact-style ERP Group Project | Person 4 – Backend Developer – APIs
Page 2 of 16
TranZact-style manufacturing ERP · Team work guide · Version 2
TranZact-style ERP Group Project | Person 4 – Backend Developer – APIs
Page 4 of 16
TranZact-style manufacturing ERP · Team work guide · Version 2
TranZact-style ERP Group Project | Person 4 – Backend Developer – APIs
Page 5 of 16
TranZact-style manufacturing ERP · Team work guide · Version 2
TranZact-style ERP Group Project | Person 4 – Backend Developer – APIs
TranZact-style ERP Group Project | Person 4 – Backend Developer – APIs
Page 7 of 16
TranZact-style manufacturing ERP · Team work guide · Version 2
Page 8 of 16
TranZact-style manufacturing ERP · Team work guide · Version 2
Page 9 of 16
TranZact-style manufacturing ERP · Team work guide · Version 2
TranZact-style ERP Group Project | Person 4 – Backend Developer – APIs
Page 10 of 16
TranZact-style manufacturing ERP · Team work guide · Version 2
Team cheat-sheet (same for everyone)
TranZact-style ERP Group Project | Person 4 – Backend Developer – APIs
TranZact-style ERP Group Project | Person 4 – Backend Developer – APIs
Page 14 of 16
TranZact-style manufacturing ERP · Team work guide · Version 2
Roles and permissions (enforced in the backend)
TranZact-style ERP Group Project | Person 4 – Backend Developer – APIs
Page 15 of 16
TranZact-style manufacturing ERP · Team work guide · Version 2
TranZact-style ERP Group Project | Person 4 – Backend Developer – APIs
Page 16 of 16
TranZact-style manufacturing ERP · Team work guide · Version 2
The project name is topaz-infini.
The project in one line: We are building a small version of TranZact: a web app where a factory
can see its stock, track what it is making, follow its orders, and read simple reports, all in one
place.
• Same navigation everywhere: a left menu with Dashboard, Inventory, Orders, Production,
Reports in this order on every screen. Highlight the current page. Top bar: page title, user name,
role and Logout.
• frontend/ (Persons 2, 3, 6) is the React app the user sees. backend/ (Persons 4, 5) is the Express
server. They are separate parts of the same application and talk to each other only through APIs
• frontend/ (Persons 2, 3, 6) is the React app the user sees. backend/ (Persons 4, 5) is the Express
server. They are separate parts of the same application and talk to each other only through APIs
(the frontend sends a request with Axios, the backend replies with JSON).
List the 'things' (called entities) in our app.
• Users and their roles.
• Items — both raw materials (RAW) and finished goods (FINISHED).
• Stock history (every change in quantity).
• Orders and order items (the lines of an order).
• Production orders, and BOM lines (the 'recipe': which raw materials make one finished item).
Remember: Do not copy the whole of TranZact. A smaller working app (Inventory + Orders +
Production + Dashboard/Reports) is better than a big app that is half finished.
<!-- planning-notes:v1:start -->Planning resolved these page and owner names itself instead of stopping. Review them before building.
Name changes
A. One-time setup (Day 1)
1
Install Git: https://git-scm.com/ (keep the default options while installing).
2
Install VS Code: https://code.visualstudio.com/
3
Accept the GitHub collaboration invitation (check your email or github.com/notifications). The
4
Open VS Code.
5
Press Cmd + Shift + P on Mac or Ctrl + Shift + P on Windows.
6
Search for Git: Clone and select it. If VS Code asks you to sign in to GitHub, allow it.
7
Paste the existing repository URL (the project lead shares it in the team group).
git commit -m "update project
workflow doc"
git push -u origin
feature/ui-documentation
Send your branch to GitHub for the first time. -u origin links
your laptop branch to the GitHub branch.
git push
Every push after the first one. Git already remembers where to
send it.
D. Ask for your work to be added to main (Pull Request)
1
Open the GitHub repository in your browser.
2
Go to the Pull requests tab.
3
Click New pull request.
4
Choose base: main and compare: feature/ui-documentation.
5
Write a short title and description (what you did, how to test it), then click Create pull request.
6
The project lead/repository owner reviews it and merges it. If they ask for changes, fix them on
your branch and push again — the Pull Request updates by itself.
E. Before you start new work: get the latest main
Other people's work keeps getting merged into main. Bring it into your branch so you do not fall
behind. First commit your own changes (step C), then:
git switch main
git pull origin main
git switch feature/ui-documentation
git merge main
• Line 1: go to main. Line 2: download the newest main from GitHub.
• Line 3: go back to your branch. Line 4: mix the newest main into your branch.
• If Git says CONFLICT, do not panic and do not delete anything. Message the person who changed
the same file, or ask the project lead to help.
Step 1: Understand the product (Week 1)
Before you draw, you must know what you are drawing.
• Re-read the TranZact Product Tour PDF slide by slide.
• Make a list of the screens we need (see Step 4).
• Write one sentence for each screen: who uses it (Admin, Manager or Worker) and what for.
Step 2: Set up the team's tools (Day 1–2)
The team needs a shared place to work.
• Create a free Trello board with 3 columns: To Do, Doing, Done. Add a card for every task in the
8-week plan.
• Create a WhatsApp group and a shared Google Drive folder named after the project.
• The GitHub repository is already created by the project lead. Check that all six members have
accepted the invitation and cloned it (Section 3). Do not create another repository.
• Write a short Team Rules page: when we meet, how we name files and branches, who to ask for
what. Save it as docs/project-workflow.md.
Dashboard (KPI cards, 3 charts, low-stock and late-orders lists)
Admin, Manager
3
Inventory list (with Add/Edit Item and Change Stock pop-ups)
Everyone (Worker: no Add/Edit)
4
Stock history pop-up
Everyone
5
Orders list (sales + purchase, with Create Order form)
Admin, Manager
6
Order details and timeline (invoice, partial dispatch)
Admin, Manager
7
Production list (with Create Production Order form)
Everyone (Worker: no Create)
8
Production details (stages, progress, raw materials, cost)
Everyone
9
Reports (4 reports, filters, CSV download)
Admin, Manager
Everything: Dashboard, Inventory, Orders,
Production, Reports
Manager
Dashboard, Inventory, Orders, Production,
Reports
Nothing important.
Worker
Inventory and Production only. After login,
the Worker lands on Inventory.
Add Item, Edit Item, Create Order, Create
Production Order buttons. Worker keeps Change
Stock and Update Production Status.
Step 7: Design the 'in-between' moments (UI states, forms, confirmations)
Real apps are not always full of data. Design what the user sees while waiting, when there is nothing,
and when something fails.
State
What it looks like (example)
Error
A red banner: 'Could not load orders. Please try again.' with a Retry button.
Step 7: Design the 'in-between' moments (UI states, forms, confirmations)
Real apps are not always full of data. Design what the user sees while waiting, when there is nothing,
and when something fails.
State
What it looks like (example)
Success
A short green message (toast) in a corner: 'Stock updated'.
Step 7: Design the 'in-between' moments (UI states, forms, confirmations)
• Form validation: show a red border and a message under the wrong field, e.g. 'Item name is
required', 'Quantity must be a number', 'Quantity cannot be negative'. Show the Save button as
disabled ('Saving...') while saving.
• Confirmation dialogs for important actions: changing stock, creating an invoice, dispatching or
receiving goods, and completing production. Example: 'Complete production order #12? 10 Globe
Valves will be added to stock and the raw materials will be used. This cannot be undone.' Buttons:
Cancel and Confirm.
• Sit with Person 6 to place the dashboard's 4–6 KPI cards, 3 charts (orders per month, stock by
item, production status), the low-stock list and the late-orders list.
• Take final screenshots of the finished app for the report.
Step 10: Build the final presentation (Week 8)
Tell the story clearly in 10–12 slides.
• Slides: Problem, Our solution, Features, Tools used, Architecture, Demo, Testing, Team roles,
Future work, Thank you.
• Decide who speaks on each slide so all 6 members talk.
• Do two practice rounds with a timer.
• Figma designs and clickable prototype (8–10 screens, laptop + phone versions of the main screens,
role differences, UI states page)
• Design system / style guide
• Use case diagram
• Flowchart
• System architecture diagram
• docs/architecture.md and docs/project-workflow.md, and a tidy docs/ folder
• Trello board kept up to date
• Full project report
• Final presentation slides
Final report, slides, two timed practice rounds
• frontend/ (Persons 2, 3, 6) is the React app the user sees. backend/ (Persons 4, 5) is the Express
server. They are separate parts of the same application and talk to each other only through APIs
(the frontend sends a request with Axios, the backend replies with JSON).
User accounts
No public registration page. Starting accounts (one Admin, one Manager, one
Worker) come from seed.sql. Later users are added by the Admin through seed data
or pgAdmin.
API list (all agreed endpoints)
Group
Method
Address
Purpose
Who may call it
Authenticat
ion
POST
/api/auth/login
Log in, get a token
Everyone (no token
needed)
Inventory
GET
/api/items
List all items
Admin, Manager,
Worker
Inventory
POST
/api/items
Add a new item
Admin, Manager
PUT
/api/items/:id
Edit item details (not
quantity)
Admin, Manager
Inventory
PUT
/api/items/:id/stock
Change stock quantity (+/−)
with a reason
Admin, Manager,
Worker
Inventory
GET
/api/items/:id/history
Stock history of one item
Admin, Manager,
Worker
Inventory
GET
/api/items/low-stock
Items below their low-stock
limit
Admin, Manager,
Worker
Orders
GET
/api/orders
List sales and purchase
orders
POST
/api/orders
Create an order with its lines
Admin, Manager
Orders
PUT
/api/orders/:id/status
Create invoice and/or
dispatch/receive goods
(partial allowed)
Admin, Manager
Orders
GET
/api/orders/:id/timelin
e
Dated events of one order
Admin, Manager
Production
GET
/api/production
List production orders with
materials
Admin, Manager,
Worker
Production
POST
/api/production
Create a production order
(starts PLANNED)
Admin, Manager
Production
PUT
/api/production/:id/sta
tus
Move to the next status /
update progress
Admin, Manager,
Worker
Reports
GET
/api/reports/summary
Dashboard numbers and
chart data
Admin, Manager
TranZact-style ERP Group Project | Person 1 – UI/UX Designer and Documentation Lead
Page 11 of 13
TranZact-style manufacturing ERP · Team work guide · Version 2
Roles and permissions (enforced in the backend)
Action
Admin
Manager
Worker
Log in
Yes
TranZact-style ERP Group Project | Person 1 – UI/UX Designer and Documentation Lead
Page 11 of 13
TranZact-style manufacturing ERP · Team work guide · Version 2
Roles and permissions (enforced in the backend)
Action
Admin
Manager
Worker
View items, stock history and low-stock list
Yes
Add or edit item details
Yes
No
Change stock quantity (with a reason)
View orders and order timeline
Create orders, create invoice, dispatch/receive goods
View production orders
Yes
Create production orders
Yes
No
Update production status and progress
Yes
View dashboard and reports
Yes
No
Manage users (add users, change roles)
Yes (through seed data /
pgAdmin in our version)
Hiding a button in the frontend only keeps the screen tidy. The real protection is the backend role
check, which replies 403 Forbidden when a role is not allowed.
Understand the project, finalise scope, everyone clones the existing repository and creates their
branch, Figma sketches, database planning
Finalise designs, database schema and seed data, backend setup, login working, frontend project
set up
Inventory module working end to end (screen + API + database). Testing begins (Week 3)
Orders module working end to end, including partial dispatch and timeline
Production module and Dashboard/Reports working
• You set up the shared frontend project in Week 2, including the Axios file that sends the login
token.
• New: sorting and pagination, form validation, loading/error/empty states, a confirmation before
• New: sorting and pagination, form validation, loading/error/empty states, a confirmation before
stock changes.
• The screen shows a stock change only after the backend confirms it. Fake data is only for the
4
Accept the GitHub collaboration invitation (check your email or github.com/notifications). The
project lead sends it.
5
Open VS Code.
6
Press Cmd + Shift + P on Mac or Ctrl + Shift + P on Windows.
7
Search for Git: Clone and select it. If VS Code asks you to sign in to GitHub, allow it.
8
Paste the existing repository URL (the project lead shares it in the team group).
Then create src/services/api.js. Every page uses this one file to call the backend, and it
automatically adds the login token (agreed with Person 5):
import axios from "axios";
const api = axios.create({ baseURL: import.meta.env.VITE_API_URL });
api.interceptors.request.use((config) => {
const token = localStorage.getItem("token");
if (token) config.headers.Authorization = Bearer ${token};
return config;
});
Step 4: Make reusable parts with Person 3 (Week 2–3)
If you make a good table once, you can use it everywhere.
• Agree the five shared components with Person 3 and split the work so nothing is built twice: you
build Button, Table and SearchBox; Person 3 builds Modal and StatusBadge.
• Put them in src/components/. Follow the colours and fonts from Person 1's style guide.
• Your Table should accept the columns and rows as props, show a header row, and support clicking
a header to sort.
Step 5: Build the Inventory List page (Week 3)
This is the main page, like the first TranZact stock screen.
• Columns: Item Name, Type (Raw/Finished), Current Stock, Unit, Price, Value (stock × price).
• A search box on top that filters items as you type.
• Sorting: click a column header (Name, Current Stock, Value) to sort; click again to reverse.
• Pagination: show 10 rows per page with Previous / Next buttons. Our item list is small, so do
sorting and paging in the browser.
• States: 'Loading items...' while waiting, 'No items yet. Click Add Item.' when empty, a red message
with Retry if loading fails.
Step 6: Build the Add/Edit Item form (Week 3)
A pop-up (Modal) form to create or edit an item.
• Fields: name, type (RAW or FINISHED), unit, price, low-stock limit, and opening quantity (only when
adding).
• Validation before sending:
• Item name cannot be empty.
• Quantity, price and low-stock limit must be valid numbers.
• No negative values.
• Show the message under the wrong field and disable Save while saving.
• Add uses POST /api/items. Edit uses PUT /api/items/:id and changes details only — never the
quantity. Quantity changes always go through Change Stock so that history is recorded.
quantity. Quantity changes always go through Change Stock so that history is recorded.
• Only Admin and Manager see Add Item and Edit.
Step 7: Build Change Stock with a confirmation (Week 3–4)
This is the most important action on your page, so make it careful.
• A 'Change Stock' button opens a small form: change amount (for example +50 or −10) and a
reason (required, e.g. 'Damaged', 'Stock count correction').
• Before sending, show a confirmation: 'Reduce Steel Rod by 10 kg? New stock will be 40 kg.' with
Cancel and Confirm.
• Do not allow a change that would make stock go below zero.
• When the dialog opens, create a unique id with crypto.randomUUID() and send it as request_id.
If the user clicks twice or retries, the same id is sent, and the backend changes stock only once.
• Never assume it worked. Show 'Saving...', wait for the backend reply, and only then update the
number on screen and show 'Stock updated'. If the reply is an error, keep the old number and show
the error message.
Step 8: Add stock value and low-stock alerts (Week 4)
These are the 'smart features' of the tour.
• Show a card at the top: Total Stock Valuation = sum of (quantity × price) for all items.
• If an item's quantity is below its low-stock limit, show its row in light red with a warning icon.
• Show a small 'Low stock' count badge in the top menu using GET /api/items/low-stock.
• Ask Person 6 to check that your valuation number matches the dashboard's number.
Step 9: Build the Stock History pop-up (Week 4)
Shows how the quantity changed over time — who, when, how much and why.
• Clicking an item's row opens a pop-up that calls GET /api/items/:id/history.
• Columns: Date & Time, Changed Via (Manual Adjustment, Purchase Inward, Sales Dispatch, ...),
Change Qty, Balance After, Reason, Changed By (user name).
Step 10: Connect to the real backend (Week 4)
Replace the fake data with the real data.
Item list
GET /api/items
Add item
POST /api/items
Edit item details
PUT /api/items/:id
Change stock
PUT /api/items/:id/stock
Stock history
GET /api/items/:id/history
Low-stock list
GET /api/items/low-stock
• Call them with the shared api from services/api.js inside useEffect (for loading) or a click
handler (for saving).
• Delete the fake data file once everything works with the real API.
• Handle errors properly:
• 400 — show the server's message (for example 'Stock cannot go below zero').
• 401 — the login has expired; send the user to the Login page.
• 403 — 'You do not have permission to do this.'
• No reply / network error — 'Cannot reach the server. Check your connection and try again.'
• Log in as Worker and check Add/Edit are hidden — and that the backend still blocks them if called.
• Raise the Pull Request. When Person 6 logs a bug against Inventory, you fix it on your branch and
tell Person 6 to re-test.
• Inventory list page (search, sorting, pagination, loading/empty/error states)
• Add/Edit item form with validation
• Change Stock with confirmation
• Stock valuation card
• Low-stock alerts
• Stock history pop-up
• Working backend integration
TranZact-style ERP Group Project | Person 2 – Frontend Developer – Inventory
TranZact-style manufacturing ERP · Team work guide · Version 2
• Shared frontend project setup, services/api.js, and the Button, Table and SearchBox
components
Your weekly targets
Week
3
Inventory list, Add/Edit form, Change Stock — working with fake data
4
Everything connected to the real APIs; history pop-up, valuation, low-stock alerts
Database, Login/Security and Roles
feature/database-auth
Dashboard, Reports, Testing and Deployment
feature/dashboard-testing
Production status
PLANNED → PENDING → WIP → IN-TESTING → COMPLETED (one step at a time,
forward only)
API list (all agreed endpoints)
Group
Method
Address
Purpose
Who may call it
Authenticat
ion
POST
/api/auth/login
Log in, get a token
Everyone (no token
needed)
Inventory
GET
/api/items
List all items
Admin, Manager,
Worker
Inventory
Inventory
PUT
/api/items/:id
Edit item details (not
quantity)
Admin, Manager
GET
/api/items/:id/history
Stock history of one item
Admin, Manager,
Worker
Inventory
GET
/api/items/low-stock
Items below their low-stock
limit
Admin, Manager,
Worker
Orders
GET
/api/orders
List sales and purchase
orders
Admin, Manager
Orders
POST
/api/orders
Create an order with its lines
Admin, Manager
Orders
PUT
/api/orders/:id/status
Admin, Manager
Orders
Create invoice and/or
dispatch/receive goods
(partial allowed)
Admin, Manager
Orders
GET
/api/orders/:id/timelin
e
Dated events of one order
Admin, Manager
Production
GET
/api/production
List production orders with
materials
Admin, Manager
Production
PUT
/api/production/:id/sta
tus
Move to the next status /
update progress
Admin, Manager,
Worker
optional filters, for example GET
/api/orders?order_type=SALES&from=2026-09-01&to=2026-09-30&search=valve. Errors always
Manager
Worker
Log in
Manager
Worker
View items, stock history and low-stock list
Manager
Add or edit item details
Manager
Change stock quantity (with a reason)
Yes
No
View production orders
Yes
Create production orders
Yes
No
Update production status and progress
Yes
View dashboard and reports
Yes
No
Manage users (add users, change roles)
Yes (through seed data /
pgAdmin in our version)
No
Delete records
<your-branch>, git merge main.
• First push of a new branch: git push -u origin <your-branch>. After that: git push.
• Open a Pull Request (base: main, compare: your branch). The project lead/repository owner
reviews and merges it.
• Invoice status and goods status are always shown separately. Partially dispatched orders are
• Production statuses always follow PLANNED → PENDING → WIP → IN-TESTING → COMPLETED.
• You also build the Login page and the shared app layout/navigation in Week 2.
You also build the Login page and the menu that every page shares.
• New: raw materials and finished goods on production screens;
loading/error/empty/confirmation states.
You build the pages that show what customers and suppliers have ordered (sales and purchase
orders) and what the factory is making (production), including their statuses, timeline and progress.
Think of it like this: In the canteen, Orders is the notebook that says 'Class 5 ordered 40
samosas: bill made, 30 delivered, 10 still to deliver'. Production is the kitchen board that says
'Samosas: planned / cooking / ready'. You turn those boards into clean web pages.
git status
Show which files you changed. Safe to run any time.
git add .
Put all your changed files in the 'ready to save' basket.
git commit -m "add orders list page"
Save a snapshot on your laptop with a short message saying what
you did.
git push -u origin
feature/orders-production
Send your branch to GitHub for the first time. -u origin links
your laptop branch to the GitHub branch.
D. Ask for your work to be added to main (Pull Request)
1
Open the GitHub repository in your browser.
2
Go to the Pull requests tab.
3
Click New pull request.
4
Choose base: main and compare: feature/orders-production.
5
Write a short title and description (what you did, how to test it), then click Create pull request.
6
The project lead/repository owner reviews it and merges it. If they ask for changes, fix them on
your branch and push again — the Pull Request updates by itself.
E. Before you start new work: get the latest main
Other people's work keeps getting merged into main. Bring it into your branch so you do not fall
behind. First commit your own changes (step C), then:
git switch main
git pull origin main
git switch feature/orders-production
git merge main
• Line 1: go to main. Line 2: download the newest main from GitHub.
• Line 3: go back to your branch. Line 4: mix the newest main into your branch.
• Follow Section 3: install Git, VS Code and Node.js, clone the existing repository, read README.md.
• Create your branch: git switch -c feature/orders-production.
• When Person 2's frontend setup is merged (Week 2), get the latest main (Section 3, part E), then in
the frontend folder run npm install and npm run dev.
Step 3: Login page, app layout and navigation (Week 2)
Every user starts here, and every page shares the same menu.
• Login page (pages/LoginPage.jsx): email and password boxes. It calls POST /api/auth/login.
On success, save token and user in localStorage and open the right first page (Worker →
Inventory, others → Dashboard). On failure show 'Invalid email or password'.
• Routes in App.jsx: /login, /dashboard, /inventory, /orders, /orders/:id, /production,
/reports. If there is no token, send the user to /login.
• Layout: the left menu and top bar from Person 1's design, used by every page. Menu order:
Dashboard, Inventory, Orders, Production, Reports. Show only the items the user's role may use
(see the permissions table). Logout clears localStorage.
• StatusBadge takes an exact word (like 'Partially Dispatched' or 'WIP') and shows a coloured
rounded tag, using the status colours table in the cheat-sheet. Keep the word-to-colour list in this
one file. An unknown word shows grey.
• The Modal is also used for confirmation dialogs: a title, a message, Cancel and Confirm.
Step 5: Build the Orders List page (Week 5)
This is like the 'Order Status' slide in the tour.
• Columns: Order No, Type (Sales/Purchase), Customer/Supplier, Order Date, Due Date, Total,
Invoice Status, Goods Status.
• Always show two separate badges. Invoice: Pending or Created. Goods: Not Dispatched, Partially
Dispatched or Dispatched. Never merge them into one 'status'.
• Search by customer/supplier name. Filters: Sales only, Purchase only, Invoice Pending, Not
Dispatched.
• Clicking a row opens the Order details page.
• States: loading, 'No orders yet. Click Create Order.', and an error message with Retry.
Step 6: Build the Create Order form (Week 5)
So users can add new orders.
• A dropdown to choose Sales or Purchase, customer/supplier name, order date and due date.
• Order lines: pick an item (list from GET /api/items), quantity, price. An 'Add line' button adds
more lines; each item only once per order.
• Show the line totals and the order total automatically (quantity × price).
• Validation: name not empty, at least one line, quantity more than 0, price 0 or more.
• A new order always starts as Invoice Pending and Goods Not Dispatched (the backend sets this).
Step 7: Order details: invoice and partial dispatch (Week 5)
Where the order's statuses change.
• Show each line with: Ordered, Dispatched so far (Received so far for purchase orders), Remaining.
• Create Invoice button → confirmation → sends { "invoice_status": "Created" } to PUT
/api/orders/:id/status.
• Dispatch Goods (sales) / Receive Goods (purchase): the user types how many of each line to
send now (not more than Remaining). Confirmation: 'Dispatch 30 of 50 Globe Valves? Stock will go
down by 30.' Then send the lines with a request_id (see Person 2, Step 7).
• The backend decides the new goods status (Partially Dispatched or Dispatched) and changes the
stock. Your page waits for the reply and then shows the new numbers and badges.
• Only Admin and Manager can open orders (Workers do not see this menu item).
Step 8: Build the Order Timeline (Week 5)
Shows the journey of one order, like the tick-mark line in the tour.
• Load GET /api/orders/:id/timeline on the Order details page.
• Keep it simple — 4 stages: Order Created → Invoice Created → Partially Dispatched → Dispatched
(for purchase orders the same words mean received).
• A finished stage shows a green tick with its date and time. A stage not reached yet is a grey
circle. A partial dispatch can appear more than once, e.g. '30 of 50 on 12 Oct'.
• Show the order total on the right. (Payments and unpaid amounts are not part of our version.)
Step 9: Build the Production list (Week 6)
Shows what is being manufactured.
• Columns: Finished Good, Target Qty, Completed Qty, Progress bar (Completed ÷ Target), Status
badge, Planned Date.
• Filter by status.
• Create Production Order form (Admin, Manager): pick a finished item, target quantity and
planned date. Before saving, show the raw materials needed = BOM quantity per unit × target (the
BOM comes with each finished item in GET /api/items), next to what is in stock. Show a shortage
in red. New orders start as PLANNED.
Step 10: Production details and status updates (Week 6)
Shows the stages, the materials and the cost of one production order.
• A stage bar with the five statuses; the current one highlighted.
• Raw materials table: material, quantity needed, quantity in stock. After completion, show the
finished goods produced.
• Show Total cost after completion, e.g. 'Total cost for 10 pcs: ₹4,500' (calculated by the backend).
• Show only one button: the next status ('Move to WIP'). During WIP and IN-TESTING the user may
update Completed Qty to move the progress bar.
• Completing needs a confirmation: 'Complete this order? 10 Globe Valves will be added to stock and
the raw materials used. This cannot be undone.'
• If the backend replies 'Not enough Steel Rod in stock', show that message and do not change the
screen. Workers can update status but cannot create production orders.
Step 11: Connect to the backend, test and finish (Week 5–7)
Use fake data only until Person 4's APIs are ready, then switch to the real ones.
Order timeline
GET /api/orders/:id/timeline
Production list / create
GET /api/production, POST /api/production
Production status / progress
PUT /api/production/:id/status
Item list for dropdowns and BOM
GET /api/items
• Sales order list
• Purchase order list
• Order creation form
• Order status updates (invoice, partial dispatch/receive)
• Order timeline
• Production order list
• Production details and status updates (stages, progress, raw materials, cost)
• Working backend integration
• Login page, app layout/navigation, Modal and StatusBadge components
Orders and production screens built with fake data; help test Inventory
Orders module end to end: list, create, invoice, partial dispatch, timeline
Orders and production screens built with fake data; help test Inventory
Production module end to end: list, create, details, status updates
Orders and production screens built with fake data; help test Inventory
Fix your bugs from the bug sheet, polish, demo practice
and Reports pages plug into your layout.
• The StatusBadge is used in many places. Make it once and well.
• Copy the status words from the cheat-sheet; one wrong letter ('In Testing' instead of 'IN-TESTING')
breaks the colour.
PLANNED → PENDING → WIP → IN-TESTING → COMPLETED (one step at a time,
forward only)
API list (all agreed endpoints)
Group
Method
Address
Purpose
Who may call it
Authenticat
ion
POST
/api/auth/login
Log in, get a token
Everyone (no token
needed)
API list (all agreed endpoints)
Group
Method
Address
Purpose
Who may call it
Authenticat
ion
Inventory
GET
/api/items
List all items
Admin, Manager,
Worker
Inventory
POST
/api/items
Add a new item
Admin, Manager
Inventory
/api/items/:id/stock
Change stock quantity (+/−)
with a reason
Admin, Manager,
Worker
Inventory
limit
Admin, Manager,
Orders
Admin, Manager
POST
/api/orders
Create an order with its lines
Admin, Manager,
Orders
Admin, Manager
PUT
/api/orders/:id/status
Production
GET
/api/production
List production orders with
materials
Admin, Manager,
Worker
Production
POST
/api/production
Create a production order
(starts PLANNED)
Admin, Manager
Production
PUT
/api/production/:id/sta
tus
Move to the next status /
update progress
Admin, Manager,
Worker
Reports
GET
/api/reports/summary
Dashboard numbers and
chart data
Admin, Manager
Every API except login needs the header Authorization: Bearer <token>. List APIs may take
optional filters, for example GET
/api/orders?order_type=SALES&from=2026-09-01&to=2026-09-30&search=valve. Errors always
come back as { "error": "A clear message" }.
Roles and permissions (enforced in the backend)
Action
Admin
Manager
Worker
Log in
Yes
Worker
View items, stock history and low-stock list
Yes
Worker
Add or edit item details
Yes
No
Worker
Change stock quantity (with a reason)
Yes
Yes
View orders and order timeline
No
Create production orders
No
Update production status and progress
version
No
No — never
Hiding a button in the frontend only keeps the screen tidy. The real protection is the backend role
check, which replies 403 Forbidden when a role is not allowed.
5
Orders module working end to end, including partial dispatch and timeline
6
Production module and Dashboard/Reports working
• Login decision: no public registration. Starting users come from seed.sql with bcrypt-hashed
passwords.
• One exact permission table for Admin, Manager and Worker, enforced in the backend.
Test login
git push -u origin
feature/database-auth
Send your branch to GitHub for the first time. -u origin links
your laptop branch to the GitHub branch.
D. Ask for your work to be added to main (Pull Request)
1
Open the GitHub repository in your browser.
2
Go to the Pull requests tab.
3
Click New pull request.
4
Choose base: main and compare: feature/database-auth.
5
Write a short title and description (what you did, how to test it), then click Create pull request.
6
The project lead/repository owner reviews it and merges it. If they ask for changes, fix them on
E. Before you start new work: get the latest main
Other people's work keeps getting merged into main. Bring it into your branch so you do not fall
behind. First commit your own changes (step C), then:
git switch main
git pull origin main
git switch feature/database-auth
git merge main
• Line 1: go to main. Line 2: download the newest main from GitHub.
• Line 3: go back to your branch. Line 4: mix the newest main into your branch.
Step 1: Understand what must be remembered (Week 1)
Step 2: Draw the ER diagram (Week 1–2)
A picture of tables and how they connect.
• Use dbdiagram.io (type simple text, it draws for you).
• Show every table with its primary key (PK) and foreign keys (FK), and a line for every
relationship below.
• Show it to the whole team and get feedback. Give a copy to Person 1 for the report.
Relationship
How it works (FK column)
In simple words
roles 1 → many users
users.role_id → roles.id
Every user has exactly one role.
How it works (FK column)
In simple words
items 1 → many
stock_history
stock_history.item_id → items.id
Every change in an item's quantity is
one history row.
How it works (FK column)
In simple words
stock_history
users 1 → many
stock_history.changed_by →
users.id
We always know who changed the
stock.
orders 1 → many order_items
order_items.order_id → orders.id
One order has one or more lines.
items 1 → many order_items
order_items.item_id → items.id
Each order line is for one item.
items (FINISHED) 1 → many
bom_lines
bom_lines.finished_item_id →
items.id
The recipe card belongs to the finished
product.
items (RAW) 1 → many
bom_lines
bom_lines.raw_item_id → items.id
Each recipe line names one raw
material and how much is needed per
unit.
items (FINISHED) 1 → many
production_orders
production_orders.finished_item_
id → items.id
A production order makes one finished
item; its materials come from that
item's BOM lines.
orders 1 → many
stock_history
stock_history.order_id →
orders.id (optional)
Dispatch/receive movements point to
their order (used for the timeline).
production_orders 1 → many
stock_history
stock_history.production_order_i
d → production_orders.id (optional)
Consumption and output rows point to
their production order.
users 1 → many orders /
production_orders
created_by → users.id
We know who created each order.
Think of it like this: A BOM line is one line on a recipe card: 'To make 1 Globe Valve you need 2
kg Steel Rod and 4 Bolts.' A production order says 'make 10 Globe Valves', so the backend
multiplies the recipe by 10.
VARCHAR(64) · UNIQUE (request_id, item_id) · created_at TIMESTAMPTZ DEFAULT now()
• request_id lets the backend notice a repeated request and avoid changing stock twice (see
• unit_cost records the raw material price used at the moment of production, so production cost
stays correct even if prices change later.
Step 4: Create the tables (Week 2)
Turn the diagram into real tables.
Step 6: Build Login (Week 2–3)
The user types email and password. You check them.
• POST /api/auth/login: find the user by email, compare the password with bcrypt.compare. If
correct, create a JWT that holds the user id and role name, valid for 8 hours, signed with
JWT_SECRET from .env.
• Send back { token, user: { id, name, email, role } }. The frontend saves the token and
sends it with every request (already set up in services/api.js).
• Wrong email or wrong password → the same reply: 401 'Invalid email or password' (do not tell
which one was wrong).
• Work with Person 4 to put this in the backend (controllers and routes).
• Send back { token, user: { id, name, email, role } }. The frontend saves the token and
sends it with every request (already set up in services/api.js).
• Work with Person 4 to put this in the backend (controllers and routes).
const header = req.headers.authorization || "";
const token = header.replace("Bearer ", "");
try {
req.user = jwt.verify(token, process.env.JWT_SECRET); // { id, role }

next();
} catch (err) {
res.status(401).json({ error: "Please log in again" });
}
}
function allowRoles(...roles) {
return (req, res, next) =>
roles.includes(req.user.role)

  ? next()
: res.status(403).json({ error: "You do not have permission" });
module.exports = { requireAuth, allowRoles };
Example: router.post("/", requireAuth, allowRoles("Admin", "Manager"), createItem);
Step 8: Add roles and permissions (Week 3–4)
Different people can do different things.
• Admin: full access, including user management.
• Manager: view and manage inventory, orders and production; view reports.
• Worker: view inventory and production, change stock quantity, update production status. Cannot
create items, orders or production orders, cannot see orders or reports, and cannot delete
anything.
• The exact rule for every API is in the Roles and permissions and API list tables in the
cheat-sheet. Check with Person 4 that every route uses exactly those roles.
• Tell Persons 2 and 3 which buttons to hide — but remember the backend check is the real
protection. Test it: call a Manager-only API in Postman with a Worker token and expect 403.
• Take a backup every week (and before any big change):
pg_dump "YOUR_DATABASE_URL" > erp_backup_2026-11-10.sql
• To restore into an empty database: psql "YOUR_DATABASE_URL" < erp_backup_2026-11-10.sql.
• Store backup files in the team Google Drive, not in GitHub (they contain data).
• If pg_dump complains about a version mismatch, install the latest PostgreSQL version on your
laptop.
• Plan tables carefully. Changing them after Week 3 breaks other people's work — if you must,
update schema.sql, seed.sql and database-design.md together and tell the team.
• Weeks 7–8: create the live Neon database, run schema.sql and seed.sql there, and give the
connection string privately to Person 6 for Render.
• Working authentication (login with bcrypt)
• JWT middleware (requireAuth)
• Role-based access middleware (allowRoles)
• Database backup instructions (and weekly backups)
First weekly backup; extra seed data for orders; indexes
Seed data for production; report SQL queries with Person 6
7
Role testing with Person 6; fix your bugs
8
Live Neon database for deployment; final backup
Address
Purpose
Who may call it
Authenticat
ion
POST
/api/auth/login
Log in, get a token
Everyone (no token
needed)
Address
Purpose
Who may call it
Authenticat
ion
Inventory
GET
/api/items
List all items
Admin, Manager,
Worker
Inventory
PUT
/api/items/:id/stock
Change stock quantity (+/−)
with a reason
Admin, Manager,
Worker
Inventory
GET
/api/items/:id/history
Stock history of one item
Admin, Manager,
Worker
Orders
GET
/api/orders
List sales and purchase
orders
Admin, Manager
Orders
PUT
/api/orders/:id/status
Create invoice and/or
dispatch/receive goods
(partial allowed)
Admin, Manager
Orders
GET
/api/orders/:id/timelin
e
Dated events of one order
Admin, Manager,
Worker
Production
POST
/api/production
Create a production order
(starts PLANNED)
Admin, Manager
Production
PUT
/api/production/:id/sta
tus
Move to the next status /
update progress
Admin, Manager,
Worker
Reports
GET
/api/reports/summary
Dashboard numbers and
chart data
Every API except login needs the header Authorization: Bearer <token>. List APIs may take
optional filters, for example GET
/api/orders?order_type=SALES&from=2026-09-01&to=2026-09-30&search=valve. Errors always
come back as { "error": "A clear message" }.
Roles and permissions (enforced in the backend)
Action
Admin
Manager
Worker
Log in
Yes
View items, stock history and low-stock list
Yes
No
Create orders, create invoice, dispatch/receive goods
View production orders
Create production orders
Update production status and progress
View dashboard and reports
No
No — never
• One agreed API list for all six guides, documented in docs/api-specification.md.
• New business rules: stock history for every change, partial dispatch, BOM consumption, no
double-applying a repeated request, and database transactions.
• Login decision: no public registration — starting accounts come from seed data.
You build the 'brain' of the app. When the frontend asks 'give me all items' or 'save this order', your
code receives the request, checks it, talks to the database, and sends the answer back.
Think of it like this: You are the canteen waiter. A student (frontend) tells you the order. You
check 'Is this student allowed to order this?', go to the kitchen (database), bring back the food,
and serve it. If the kitchen is out of samosas, you say so politely instead of dropping the tray.
D. Ask for your work to be added to main (Pull Request)
The project lead/repository owner reviews it and merges it. If they ask for changes, fix them on
your branch and push again — the Pull Request updates by itself.
// src/server.js
require("dotenv").config();
const express = require("express");
const cors = require("cors");
const app = express();
app.use(cors({ origin: process.env.FRONTEND_URL }));
app.use(express.json());
app.get("/api/health", (req, res) => res.json({ status: "ok" }));
app.listen(process.env.PORT || 5000, () => console.log("Server running"));
Run npm run dev and open http://localhost:5000/api/health in the browser or Postman. You should
see {"status":"ok"}.
Step 3: Connect to the database (Week 2)
• Write src/config/db.js that creates one connection pool and exports it.
// src/config/db.js
const { Pool } = require("pg");
const pool = new Pool({ connectionString: process.env.DATABASE_URL });
module.exports = pool;
• Test it: make /api/health also run SELECT NOW() and return the time.
Step 4: Agree the API contract first (Week 2)
Your work blocks others, so write the plan before the code.
• Write docs/api-specification.md using the API reference in Section 5 of this guide: purpose,
who may call it, request body, response and errors for each endpoint.
• Send it, with sample responses, to Persons 2, 3 and 6 in Week 2 — even before you build the APIs
Step 5: Login route with Person 5 (Week 2–3)
Person 5 writes the login logic and the guards; you plug them in.
• Add POST /api/auth/login using Person 5's controller.
• Use Person 5's requireAuth on every route except login, and allowRoles(...) exactly as in the
permissions table.
Step 6: Build the Items and Stock APIs (Week 3)
These are the first real features.
• GET /api/items, POST /api/items, PUT /api/items/:id, PUT /api/items/:id/stock, GET
/api/items/:id/history, GET /api/items/low-stock.
• Write one shared function in src/services/stockService.js, for example changeStock(client,
{ itemId, changeQty, changedVia, reason, userId, orderId, productionOrderId,
requestId, unitCost }). It locks the item row (SELECT ... FOR UPDATE), refuses if stock would
go below zero, updates items.quantity, and writes one stock_history row with the balance
after the change. Manual changes, dispatch, receiving and production all use this one function, so
every change is recorded the same way.
Step 7: Build the Orders APIs (Week 4–5)
Handle sales and purchase orders, including partial dispatch.
• GET /api/orders (with optional filters) and POST /api/orders (order + its lines saved together;
the server calculates the total).
• PUT /api/orders/:id/status can do two things: create the invoice (invoice_status:
"Created") and/or dispatch/receive goods line by line.
• Sales order dispatch: stock goes down ('Sales Dispatch'). Purchase order receive: stock goes
up ('Purchase Inward').
• Partial dispatch: add the quantity to order_items.fulfilled_qty (never more than the ordered
quantity). Then set goods status: all lines complete → Dispatched; some sent → Partially
Dispatched; none → Not Dispatched.
• GET /api/orders/:id/timeline builds the dated events from the order dates and its
stock_history rows.
Step 8: Build the Production APIs (Week 6)
Handle what the factory makes.
• GET /api/production and POST /api/production (only FINISHED items that have BOM lines;
starts as PLANNED).
• PUT /api/production/:id/status moves one step forward only: PLANNED → PENDING → WIP →
IN-TESTING → COMPLETED. It can also update completed_qty for progress.
• On COMPLETED: for each BOM line, raw quantity = qty_per_unit × target quantity. Reduce each
raw material ('Production Consumption', recording its current price as unit_cost), increase the
finished item by the target quantity ('Production Output'), save total_cost = sum of (raw quantity
× unit cost), set completed_qty = target and completed_at.
• If any raw material is short, reject with 400 and change nothing.
• If it is already COMPLETED, reply 409 and change nothing — completion happens only once.
Step 9: Build the Reports summary API (Week 6)
Person 6 decides the numbers, Person 5 helps write the SQL, you turn it into one API.
• GET /api/reports/summary returns the dashboard KPIs, the chart data, the low-stock items and
the late orders (shape agreed with Person 6).
• The Reports page reuses the list APIs with filters, so no extra report APIs are needed.
Step 10: Make the API safe and tidy (all weeks)
Good APIs never crash on bad input.
• Check every input: names not empty, quantities and prices are numbers, no negative stock,
statuses are only the agreed words.
• Use correct status codes and clear messages (table below). Errors always look like { "error":
"Quantity must be a number" }.
• Wrap each route in try/catch; unexpected errors return 500 with 'Something went wrong' and the
real error goes to the console.
Code
When to use it
200 OK
Read or update worked.
201 Created
A new item, order or production order was created.
400 Bad Request
Input is wrong, or the action would break a rule (e.g. stock below zero, dispatching
more than remaining).
401 Unauthorized
No token, wrong token, or wrong email/password at login.
403 Forbidden
Logged in, but the role is not allowed (e.g. Worker creating an order).
404 Not Found
The item/order/production order id does not exist.
409 Conflict
Duplicate (same item name) or a state that does not allow the action (already
COMPLETED, wrong next status).
500 Server Error
Something unexpected broke in our code.
• Tell Persons 2 and 3 as soon as an API is ready, with a sample request.
• Raise your own Pull Requests. The project lead/repository owner reviews and merges them (you
may be asked to look at backend-related Pull Requests).
• Fix the backend bugs Person 6 assigns to you, then ask for a re-test.
Page 6 of 16
TranZact-style manufacturing ERP · Team work guide · Version 2
Rule 1: Use a transaction when several records change together
Completing production changes many items, writes many history rows and updates the production
order. If step 3 fails after steps 1 and 2 worked, the data would be half-changed. A transaction
means 'all of it or none of it'.
const pool = require("../config/db");
const client = await pool.connect();
try {
await client.query("BEGIN");
// 1. reduce raw materials 2. add finished goods
// 3. write stock_history rows 4. update the production order
await client.query("COMMIT"); // save everything together
} catch (err) {
await client.query("ROLLBACK"); // undo everything
throw err;
} finally {
client.release();
}
Use a transaction for: creating an order with its lines, changing stock, dispatch/receive, and
completing production.
Rule 2: Do not apply the same stock change twice
If a user double-clicks or the network retries, the same request can arrive twice. Stock-changing
requests (PUT /api/items/:id/stock, dispatch/receive in PUT /api/orders/:id/status,
completion in PUT /api/production/:id/status) carry a request_id made by the frontend. Before
changing anything, check whether stock_history already has that request_id. If yes, do nothing
again — just return the current result with 200. Production also cannot complete twice because
COMPLETED is the last status.
All bodies and replies are JSON. Every endpoint except login needs Authorization: Bearer <token>.
Endpoint and roles
Request body / query
Success reply
Main errors
POST /api/auth/login —
everyone. Log in.
{ email, password }
200 { token, user: { id,
name, email, role } }
400 missing fields;
401 'Invalid email
or password'
GET /api/items —
Admin, Manager, Worker.
All items.
Optional ?search=
200 list of { id, name,
item_type, unit, quantity,
price, low_stock_limit,
is_low_stock, bom } — bom
(FINISHED items only) is [ {
raw_item_id, raw_item_name,
qty_per_unit } ]
401
POST /api/items —
Admin, Manager. Add an
item.
{ name, item_type,
unit, price,
low_stock_limit,
opening_qty }
201 the new item (an 'Opening
Stock' history row is written if
opening_qty > 0)
400 invalid; 403;
409 name already
exists
PUT /api/items/:id —
Admin, Manager. Edit
details.
{ name, unit, price,
low_stock_limit }
(quantity is not allowed
here)
200 the updated item
400; 403; 404; 409
Endpoint and roles
/api/items/:id/stock —
Admin, Manager, Worker.
Request body / query
Change quantity.
{ change_qty, reason,
request_id } e.g. {
"change_qty": -10,
"reason": "Damaged",
Success reply
200 { item, history_entry }
Main errors
400 not a number,
zero, no reason, or
PUT
... }
stock would go
below zero; 404
GET
/api/items/:id/history
— Admin, Manager,
Worker.
—
200 list (newest first) of { id,
created_at, changed_via,
change_qty, balance_after,
reason, changed_by_name,
order_id,
production_order_id }
404
GET
/api/items/low-stock —
—
200 items where quantity <
low_stock_limit
GET /api/orders —
Admin, Manager. List
orders.
Optional ?order_type=&
invoice_status=&goods
_status=&search=&from
=&to=
200 list of { id, order_type,
party_name, order_date,
due_date, total_amount,
invoice_status,
goods_status, lines: [ { id,
item_id, item_name,
quantity, price,
fulfilled_qty } ] }
403
POST /api/orders —
Admin, Manager. Create
order.
{ order_type,
party_name,
order_date, due_date,
lines: [ { item_id,
quantity, price } ] }
201 the order (Invoice Pending,
Not Dispatched, total calculated)
400 no
lines/invalid; 403
Invoice and
dispatch/receive.
400 more than
remaining or not
enough stock; 403;
PUT
/api/orders/:id/status
— Admin, Manager.
{ invoice_status:
"Created" } and/or {
dispatch: [ {
order_item_id, qty }
], request_id }
200 the updated order with new
goods_status
404
GET /api/orders/:id/tim
eline — Admin, Manager.
—
200 list of { event, date,
details } — events: Order
Created, Invoice Created, Partially
Dispatched, Dispatched
GET /api/production —
Admin, Manager, Worker.
Optional
?status=&from=&to=
200 list of { id,
finished_item_id,
finished_item_name,
target_qty, completed_qty,
status, planned_date,
total_cost, completed_at,
materials: [ { raw_item_id,
raw_item_name, qty_needed,
qty_in_stock } ] }
401
POST /api/production
— Admin, Manager.
Create.
{ finished_item_id,
target_qty,
planned_date }
201 the production order (status
PLANNED)
400 not a
FINISHED item or
no BOM; 403
PUT /api/production/:i
d/status — Admin,
Manager, Worker.
{ status,
completed_qty,
request_id } (status =
the next status;
completed_qty optional)
200 the updated production order
(with total_cost when
COMPLETED)
400 skipped a step
or materials short;
404; 409 already
Endpoint and roles
Request body / query
Success reply
Main errors
GET
/api/reports/summary
— Admin, Manager.
—
200 { kpis, orders_per_month,
stock_by_item,
production_by_status,
low_stock_items, late_orders
• Working Express server
• All agreed APIs (the 15 endpoints above)
• API documentation (docs/api-specification.md)
• Postman collection
• Backend validation and error handling
• Integration with PostgreSQL and Person 5's authentication middleware
3
All six Items/Stock APIs with stock history and transactions
4
Inventory tested in Postman and working with Person 2's screens; orders APIs started
5
Orders APIs with partial dispatch, receiving and timeline
6
Production APIs (BOM consumption, costing) and reports summary
7
Fix your bugs from the bug sheet, tighten validation
8
Deployment support with Person 6, final API document
• Person 1: api-specification.md and a short summary for the report.
feature/backend-api
Page 13 of 16
TranZact-style manufacturing ERP · Team work guide · Version 2
API list (all agreed endpoints)
Group
Method
Address
Purpose
Who may call it
Authenticat
ion
POST
/api/auth/login
Log in, get a token
Everyone (no token
needed)
Inventory
GET
/api/items
List all items
Admin, Manager,
Worker
Inventory
PUT
/api/items/:id
Edit item details (not
quantity)
Admin, Manager
Inventory
PUT
/api/items/:id/stock
Change stock quantity (+/−)
with a reason
Admin, Manager,
Worker
Inventory
GET
/api/items/:id/history
Stock history of one item
Admin, Manager,
Worker
Inventory
GET
/api/items/low-stock
Items below their low-stock
limit
Admin, Manager,
Worker
Production
GET
/api/production
List production orders with
materials
Admin, Manager,
Worker
Production
POST
/api/production
Create a production order
(starts PLANNED)
Admin, Manager
Admin, Manager,
Worker
Production
Admin, Manager
PUT
/api/production/:id/sta
tus
Move to the next status /
update progress
Worker
Reports
GET
/api/reports/summary
Dashboard numbers and
chart data
Admin, Manager
Action
Admin
Manager
Worker
Log in
Yes
No
Admin
Manager
Worker
View items, stock history and low-stock list
Yes
Admin
Manager
Add or edit item details
Yes
No
Admin
Manager
Worker
Change stock quantity (with a reason)
Update production status and progress
Manage users (add users, change roles)
You are the team's architect and storyteller. Before anyone builds a house, someone must draw the
plan. That is you. You also write down everything the team does, so the project report and the final
presentation are easy.
Think of it like this: Think of a school canteen. You draw how the canteen looks (where the
counter, the menu board and the tables go). Everyone else then builds it. Later, you write the
story of how it was built.
Step 6: Design for the three roles
Different people see slightly different screens.
Role
What they see in the menu
What to hide or disable
Admin
TranZact-style ERP Group Project | Person 1 – UI/UX Designer and Documentation Lead
TranZact-style manufacturing ERP · Team work guide · Version 2
• Persons 2 and 3: give them the designs, check they are buildable, answer questions.
• Person 4: the API list and api-specification.md for the report.
• Person 5: the ER diagram, database-design.md and the role rules.
• Person 6: dashboard KPIs and charts, test results and the live links for the report.
• Everyone: half-page summaries and screenshots every 2 weeks.
Page 6 of 13
Who does what
Person
Role
Branch
Person 1
UI/UX Designer and Documentation Lead
feature/ui-documentation
Person 2
Frontend Developer – Inventory
feature/inventory
Person 3
Frontend Developer – Orders and Production
feature/orders-production
Person 4
Backend Developer – APIs
feature/backend-api
Person 5
Database, Login/Security and Roles
feature/database-auth
Person 6
Dashboard, Reports, Testing and Deployment
feature/dashboard-testing
Person 2
Frontend Developer – Inventory Module
Your work guide, explained simply
Your
branch
feature/inventory
Repository
You build the pages the user sees and clicks for everything about stock: what items we have, how
many are left, what they are worth, and who changed the quantity, when and why.
Think of it like this: You are building the shop's storeroom window. Customers (users) look
through the window and see shelves, labels and numbers. You do not keep the goods (the
database does) — you just show them nicely and pass on requests to change them.
• Person 1: ask when a design is unclear or too hard to build.
• Person 3: share common components so you do not build things twice.
• Person 4: exact API addresses, request bodies and sample responses.
• Person 5: the login token and the role rules.
• Person 6: integration testing; you fix the Inventory bugs they report.
Who does what
Person
Role
Branch
Person 1
UI/UX Designer and Documentation Lead
feature/ui-documentation
Who does what
Person
Role
Branch
Person 2
Frontend Developer – Inventory
feature/inventory
Who does what
Person
Role
Branch
Person 3
Frontend Developer – Orders and Production
feature/orders-production
Who does what
Person
Role
Branch
Person 4
Backend Developer – APIs
feature/backend-api
Person 5
Person 6
Same as Person 2, because you both work in the same frontend project.
• Person 1: designs, colours and the navigation.
• Person 2: share components and the frontend setup.
• Person 4: order and production APIs, and how they change inventory.
• Person 5: role rules (for example, a Worker cannot create an order).
• Person 6: integration testing; you fix the bugs reported in your modules. Person 6's Dashboard
Person
Role
Branch
Person 1
UI/UX Designer and Documentation Lead
feature/ui-documentation
Person 2
Frontend Developer – Inventory
feature/inventory
Database, Login/Security and Roles
feature/database-auth
Person 6
Dashboard, Reports, Testing and Deployment
feature/dashboard-testing
and every relationship explained.
You design the 'memory' of the app (the database) and the 'security guard' (login and roles).
Everything the app remembers lives in your tables, and you decide who is allowed to see or do what.
Think of it like this: You are the librarian and the gatekeeper. The librarian keeps every book
neatly on the right shelf (tables). The gatekeeper checks the ID card at the door and says
'students can read, teachers can also add books' (roles).
Who does what
Person
Role
Branch
Person 1
UI/UX Designer and Documentation Lead
feature/ui-documentation
Admin, Manager
• Person 5: tables, the development database link, login and role middleware.
• Persons 2 and 3: every API, request body and sample response; how orders and production
change inventory.
• Person 6: reports summary API, Postman collection, testing, and backend deployment on Render.
Who does what
Person
Role
Branch
Person 1
UI/UX Designer and Documentation Lead
feature/ui-documentation
Person 2
Frontend Developer – Inventory
feature/inventory
Person 3
Frontend Developer – Orders and Production
feature/orders-production
Person 4
Backend Developer – APIs
Actors: Admin, Manager, Worker. Trigger: opening the app.
pages/LoginPage.jsx), enters email and password; the app calls POST /api/auth/login (no token needed). The backend finds the user by email, compares with bcrypt.compare, and returns { token, user: { id, name, email, role } }.services/api.js.App.jsx (/login, /dashboard, /inventory, /orders, /orders/:id, /production, /reports) send a user with no token to /login; a 401 on any later request ("Please log in again") means the login has expired and returns the user to Login. There is no public registration; starting users come from seed.sql with bcrypt-hashed passwords.requireAuth/allowRoles check is the real protection (a Worker token on a Manager-only API returns 403 "You do not have permission").Actors: Admin, Manager. Trigger: sign-in or menu selection.
GET /api/reports/summary and renders the KPI cards, three charts, and the low-stock and late-orders lists.Actors: Admin, Manager (full); Worker (view and stock changes only). Trigger: menu selection or a low-stock alert.
GET /api/items), searches as they type, sorts and pages through the table (Item Name, Type, Current Stock, Unit, Price, Value).POST /api/items) or Edit Item (PUT /api/items/:id) in a pop-up; the Worker does not see these buttons. Edit changes details only, never quantity.PUT /api/items/:id/stock), enters the change amount (+/−) and a required reason, and confirms in the confirmation dialog ("Reduce Steel Rod by 10 kg? New stock will be 40 kg."). A change that would take stock below zero is not allowed.GET /api/items/:id/history), which every role can open.request_id; if stock_history already holds that id, the backend changes nothing and returns the current result with 200.Actors: Admin, Manager. Trigger: new customer or supplier order.
GET /api/orders), searches by customer/supplier name and filters (Sales only, Purchase only, Invoice Pending, Not Dispatched); each row shows Order No, Type, Customer/Supplier, Order Date, Due Date, Total, and two separate badges — Invoice (Pending/Created) and Goods (Not Dispatched/Partially Dispatched/Dispatched) — never merged. Loading, "No orders yet. Click Create Order." and an error with Retry are the list states.POST /api/orders): choose Sales or Purchase, name, order date and due date; add lines by picking an item from GET /api/items with quantity and price (each item once per order), with line and order totals computed automatically. Validation: name not empty, at least one line, quantity more than 0, price 0 or more. The new order starts Invoice Pending and Not Dispatched.GET /api/orders/:id/timeline); each line shows Ordered, Dispatched so far (Received so far for purchase orders) and Remaining.{ "invoice_status": "Created" } to PUT /api/orders/:id/status.Actors: Admin, Manager (create); all roles (view and update status). Trigger: need to manufacture stock.
POST /api/production): pick a finished item, target quantity and planned date. Before saving, the form shows the raw materials needed — BOM quantity per unit × target (the BOM comes with each finished item in GET /api/items) — next to what is in stock, with any shortage in red. The order starts PLANNED; the Worker does not see this button.GET /api/production) — Finished Good, Target Qty, Completed Qty, Progress bar (Completed ÷ Target), Status badge, Planned Date, filterable by status — and the details with stages, progress, raw materials and cost.PUT /api/production/:id/status). The details show a stage bar with the five statuses, the current one highlighted, and only one button: the next status (e.g. "Move to WIP"). During WIP and IN-TESTING the user may update Completed Qty to move the progress bar.Actors: Admin, Manager. Trigger: periodic review or management request.
Actors: each team member, project lead. Trigger: starting or finishing a work item.
git switch -c feature/orders-production; later git switch feature/orders-production).git add ., git commit -m, first push git push -u origin <branch>).docs/api-specification.md with sample responses to the frontend developers in Week 2, before building the APIs, and announces each ready API with a sample request; the tester assigns backend bugs back to the backend developer, who fixes them and asks for a re-test.8
Choose a folder on your laptop, for example Documents/projects.
9
Click Open when VS Code asks whether to open the cloned project.
10 Read the README.md file before starting. It has the project overview, technology stack and folder
structure.
Tell Git your name and email once (use the same email as your GitHub account). Open the terminal in
VS Code with Terminal → New Terminal and type:
git config --global user.name "Your Name"
git config --global user.email "you@example.com"
B. Create your own branch (only once)
Your assigned branch is feature/ui-documentation. In the VS Code terminal, inside the project
folder, type:
git switch -c feature/ui-documentation
• switch means 'go to a branch'. -c means 'create it first'. Use -c only the very first time.
• Next time, just type git switch feature/ui-documentation to come back to your branch.
• Type git branch to check. The branch with a star (*) is the one you are on now.
C. Save and share your work (every day)
Command
What it means in simple words
git status
Show which files you changed. Safe to run any time.
git add .
Put all your changed files in the 'ready to save' basket.
git commit -m "update project
workflow doc"
Save a snapshot on your laptop with a short message saying what
you did.
Keep it to about 8–10 screens. That is enough:
Screen
Main users
1
Login
Everyone
2
• Link the screens in Figma's Prototype mode so clicking a button opens the next screen or pop-up.
9
Choose a folder on your laptop, for example Documents/projects.
10 Click Open when VS Code asks whether to open the cloned project.
11 Read the README.md file before starting. It has the project overview, technology stack and folder
structure.
Tell Git your name and email once (use the same email as your GitHub account). Open the terminal in
VS Code with Terminal → New Terminal and type:
git config --global user.name "Your Name"
git config --global user.email "you@example.com"
B. Create your own branch (only once)
Your assigned branch is feature/inventory. In the VS Code terminal, inside the project folder, type:
git switch -c feature/inventory
• switch means 'go to a branch'. -c means 'create it first'. Use -c only the very first time.
• Next time, just type git switch feature/inventory to come back to your branch.
• Type git branch to check. The branch with a star (*) is the one you are on now.
C. Save and share your work (every day)
Command
What it means in simple words
git status
Show which files you changed. Safe to run any time.
D. Ask for your work to be added to main (Pull Request)
1
Open the GitHub repository in your browser.
2
Go to the Pull requests tab.
3
Click New pull request.
4
Choose base: main and compare: feature/inventory.
5
Write a short title and description (what you did, how to test it), then click Create pull request.
6
The project lead/repository owner reviews it and merges it. If they ask for changes, fix them on
your branch and push again — the Pull Request updates by itself.
E. Before you start new work: get the latest main
Other people's work keeps getting merged into main. Bring it into your branch so you do not fall
behind. First commit your own changes (step C), then:
git switch main
git pull origin main
git switch feature/inventory
git merge main
• Line 1: go to main. Line 2: download the newest main from GitHub.
• Line 3: go back to your branch. Line 4: mix the newest main into your branch.
Step 1: Set up your laptop (Day 1)
Install what you need.
• Follow Section 3: install Git, VS Code and Node.js (LTS), clone the existing repository, read
README.md.
• Create your branch: git switch -c feature/inventory.
8
Paste the existing repository URL (the project lead shares it in the team group).
9
Choose a folder on your laptop, for example Documents/projects.
10 Click Open when VS Code asks whether to open the cloned project.
B. Create your own branch (only once)
Your assigned branch is feature/orders-production. In the VS Code terminal, inside the project
folder, type:
git switch -c feature/orders-production
• switch means 'go to a branch'. -c means 'create it first'. Use -c only the very first time.
• Next time, just type git switch feature/orders-production to come back to your branch.
• Type git branch to check. The branch with a star (*) is the one you are on now.
Step 1: Set up your laptop (Day 1)
4
Accept the GitHub collaboration invitation (check your email or github.com/notifications). The
project lead sends it.
5
Open VS Code.
6
Press Cmd + Shift + P on Mac or Ctrl + Shift + P on Windows.
7
Search for Git: Clone and select it. If VS Code asks you to sign in to GitHub, allow it.
8
Paste the existing repository URL (the project lead shares it in the team group).
9
B. Create your own branch (only once)
Your assigned branch is feature/backend-api. In the VS Code terminal, inside the project folder,
type:
git switch -c feature/backend-api
• switch means 'go to a branch'. -c means 'create it first'. Use -c only the very first time.
• Next time, just type git switch feature/backend-api to come back to your branch.
• Type git branch to check. The branch with a star (*) is the one you are on now.
C. Save and share your work (every day)
Command
What it means in simple words
git status
Show which files you changed. Safe to run any time.
send it.
E. Before you start new work: get the latest main
D. Ask for your work to be added to main (Pull Request)
1
Open the GitHub repository in your browser.
2
Go to the Pull requests tab.
3
Click New pull request.
4
Choose base: main and compare: feature/backend-api.
5
Write a short title and description (what you did, how to test it), then click Create pull request.
6
Other people's work keeps getting merged into main. Bring it into your branch so you do not fall
behind. First commit your own changes (step C), then:
git switch main
git pull origin main
git switch feature/backend-api
git merge main
• Line 1: go to main. Line 2: download the newest main from GitHub.
• Line 3: go back to your branch. Line 4: mix the newest main into your branch.
• If Git says CONFLICT, do not panic and do not delete anything. Message the person who changed
the same file, or ask the project lead to help.
Step 1: Clone the project (Day 1)
The repository already exists. You join it — you do not create a new one.
• Follow Section 3: install Git, VS Code and Node.js, accept the invitation, clone the existing
[Design proposal; unspecified choices are defaults.]
Muse: MARQ by Garmin — “Every item, order and batch in one view”
Topaz Infini uses a dark precision-instrument visual system across Admin, Manager and Worker screens: calm, dense, trustworthy and readable at factory-floor scale.
#16181A (titanium dark ground at 80%); primary surface #202326.#F2EFE9; muted labels and metadata #8C8F93.#C9A227 marks primary actions, active navigation and instrument needles; teal #2FB3A6 marks live counters and charts.72/48/32/22/16/14px 1.25 modular scale with viewport-safe clamp() sizing. Use tabular numerals for all counts, quantities and values, with tight tracking in data rows.Pending — bg-blue-100 text-blue-800; Created — bg-green-100 text-green-800; Goods Not Dispatched — bg-red-100 text-red-800; Partially Dispatched — bg-orange-100 text-orange-800; Dispatched — bg-green-100 text-green-800; Production PLANNED — bg-blue-100 text-blue-800, PENDING — bg-red-100 text-red-800, WIP — bg-yellow-100 text-yellow-800, IN-TESTING — bg-gray-200 text-gray-800, COMPLETED — bg-green-100 text-green-800. Each badge is a compact capsule with a 2px left instrument bar in its exact status colour; unknown words use grey. Status words are copied exactly from the cheat-sheet — one wrong letter (“In Testing” instead of “IN-TESTING”) breaks the colour. Invoice and goods statuses remain separate badges.• New design work: screens for each role (Admin, Manager, Worker),
loading/empty/error/success states, form validation, confirmation dialogs and phone-width
layouts.
Step 3: Choose the look — the design system (Week 1)
A project looks professional when every page looks like it belongs together.
• Pick 1 main colour (teal, for example Tailwind teal-600), 1 accent colour (green) and white/grey
backgrounds. Choosing Tailwind's own colour names means developers can copy them directly.
• Pick one font, for example Inter. Decide sizes: page title, section title, body text, table text.
• Design the basic parts once: buttons (main, secondary, danger), input boxes, tables, pop-ups
(modals), cards and status badges.
• Use the status colours table in the team cheat-sheet for every badge. Use the exact words (for
example 'Partially Dispatched', 'IN-TESTING').
• Put all of this on a Style Guide page in Figma and share it with Persons 2, 3 and 6.
10
UI states page (loading, empty, error, success, confirm dialog)
Reference for developers
• Show the sketches to the team and ask: 'Is anything missing? Can you build this?'
• Fix the sketches based on feedback.
Step 5: Make the real designs in Figma (Week 1–2)
Now turn the sketches into clean screens.
• Make one frame (page) in Figma for each screen. Laptop size: 1440 × 1024.
• Use tables with a header row, a search box and rows of data, like in the TranZact tour.
• Phone-width version: make phone frames (390 × 844) for at least Login, Inventory list, Orders
list and Dashboard. On a phone the left menu becomes a menu button (☰), cards stack one under
another, and wide tables scroll sideways.
• Draw all these once on a UI States page in Figma so Persons 2, 3 and 6 reuse the same look.
Status colours (one StatusBadge for the whole app)
Group
Exact word
Colour
Tailwind classes
Invoice status
Pending
Blue
bg-blue-100 text-blue-800
Tailwind classes
Invoice status
Created
Green
bg-green-100 text-green-800
Tailwind classes
Goods status
Not Dispatched
Red
bg-red-100 text-red-800
Tailwind classes
Goods status
Partially Dispatched
Orange
bg-orange-100 text-orange-800
Goods status
Dispatched
Green
bg-green-100 text-green-800
Production status
PLANNED
Blue
bg-blue-100 text-blue-800
Production status
PENDING
Red
bg-red-100 text-red-800
Production status
WIP
Yellow
bg-yellow-100 text-yellow-800
Production status
IN-TESTING
Grey
bg-gray-200 text-gray-800
COMPLETED
Green
bg-green-100 text-green-800
• Show plus numbers in green and minus numbers in red. Newest change first.
Status colours (one StatusBadge for the whole app)
Group
Exact word
Colour
Tailwind classes
Invoice status
Pending
Blue
bg-blue-100 text-blue-800
Created
Green
bg-green-100 text-green-800
Goods status
Not Dispatched
Red
bg-red-100 text-red-800
Goods status
Partially Dispatched
Orange
bg-orange-100 text-orange-800
Goods status
Dispatched
Green
bg-green-100 text-green-800
Production status
PLANNED
Blue
bg-blue-100 text-blue-800
Production status
PENDING
Red
bg-red-100 text-red-800
Production status
WIP
Yellow
bg-yellow-100 text-yellow-800
Production status
IN-TESTING
Grey
bg-gray-200 text-gray-800
Production status
COMPLETED
Green
bg-green-100 text-green-800
• Status words, always in this order: PLANNED (blue), PENDING (red), WIP (yellow), IN-TESTING
(grey), COMPLETED (green).
Status colours (one StatusBadge for the whole app)
Group
Exact word
Colour
Tailwind classes
Invoice status
Pending
Blue
bg-blue-100 text-blue-800
Created
Green
bg-green-100 text-green-800
Goods status
Not Dispatched
Red
bg-red-100 text-red-800
Goods status
Partially Dispatched
Orange
bg-orange-100 text-orange-800
Goods status
Dispatched
Green
bg-green-100 text-green-800
Production status
PLANNED
Blue
bg-blue-100 text-blue-800
Production status
PENDING
Red
bg-red-100 text-red-800
Production status
WIP
Yellow
bg-yellow-100 text-yellow-800
Production status
IN-TESTING
Grey
bg-gray-200 text-gray-800
Production status
COMPLETED
Green
bg-green-100 text-green-800
Status colours (one StatusBadge for the whole app)
Group
Exact word
Colour
Tailwind classes
Invoice status
Pending
Blue
bg-blue-100 text-blue-800
Created
Green
bg-green-100 text-green-800
Goods status
Not Dispatched
Red
bg-red-100 text-red-800
Goods status
Partially Dispatched
Orange
bg-orange-100 text-orange-800
Dispatched
Green
bg-green-100 text-green-800
Production status
PLANNED
Blue
bg-blue-100 text-blue-800
Invoice status
Created
Green
bg-green-100 text-green-800
Goods status
Not Dispatched
Red
bg-red-100 text-red-800
Production status
PENDING
Red
bg-red-100 text-red-800
Production status
WIP
Yellow
bg-yellow-100 text-yellow-800
Production status
IN-TESTING
Grey
bg-gray-200 text-gray-800
Production status
COMPLETED
Green
bg-green-100 text-green-800
[Design proposal; unspecified choices are defaults.]
The signature public entry for Topaz Infini is a full-width dark instrument panel. A large circular total-stock-value gauge occupies the left portion of the hero at 40% of its width — dark dial, fine amber ticks, tabular value and amber needle — over a restrained macro-metal or topographic ground that supports the precision-instrument character without obscuring content.
The right side carries the accepted entry copy in a condensed uppercase hierarchy, headline at clamp(40px, 6vw, 96px):
Every item, order and batch in one view
“Topaz Infini shows your factory stock, orders, production and reports in one calm place.”
The amber Open dashboard control pins beneath the headline, using a sharp 2px-corner instrument treatment rather than a rounded pill. The entry presents accepted product information and dashboard access only; it introduces no new destination or behaviour.
Within the application the same language carries across Admin, Manager and Worker screens, including loading, empty, error, success, validation and confirmation states. Reuse Button, Table, SearchBox, Modal and StatusBadge consistently. Tables use search, sortable headers, tabular numerals and hairline row rules. Dashboard KPI cards use four circular gauges alongside the accepted charts for orders per month, stock by category and production progress. Use the defined messages and states — “Loading items...”, “No items yet. Click Add Item.”, retryable errors (400, 401, 403, network), green success toasts, field-level validation, and Cancel/Confirm dialogs for stock changes, invoice creation, dispatching or receiving goods, and completing production. Never change a badge or number until the backend confirms. The Order details timeline shows four stages — Order Created → Invoice Created → Partially Dispatched → Dispatched (for purchase orders the same words mean received) — with a green tick, date and time on finished stages, a grey circle on unreached stages, repeated partial entries such as “30 of 50 on 12 Oct”, and the order total on the right.
[Design proposal; unspecified choices are defaults.]
Interaction Model: Animated Motion Tempo: restrained Hero Dimensionality: dimensional_css
prefers-reduced-motion, show the final gauge value and settled needle immediately, with no counter animation or sweep; keep the hero static and usable and retain horizontal scrolling for accepted wide tables.• One consistent navigation for Inventory, Orders, Production and Reports.
Step 7: Design the 'in-between' moments (UI states, forms, confirmations)
Real apps are not always full of data. Design what the user sees while waiting, when there is nothing,
and when something fails.
State
What it looks like (example)
Loading
A small spinner or grey placeholder rows with 'Loading items...'.
Step 7: Design the 'in-between' moments (UI states, forms, confirmations)
Real apps are not always full of data. Design what the user sees while waiting, when there is nothing,
and when something fails.
State
What it looks like (example)
Empty
A friendly message and a next step: 'No items yet. Click Add Item.'
Every API except login needs the header Authorization: Bearer <token>. List APIs may take
optional filters, for example GET
/api/orders?order_type=SALES&from=2026-09-01&to=2026-09-30&search=valve. Errors always
come back as { "error": "A clear message" }.
Integration testing, bug fixing and polishing
Testing is continuous from Week 3: each developer tests their own module before every Pull Request,
and Person 6 runs integration tests every week.
• Check on a laptop screen and a phone-width window (browser developer tools → device toolbar).
• Try bad inputs: empty name, letters in quantity, −5, a reduction larger than the stock,
double-clicking Confirm.
Every API except login needs the header Authorization: Bearer <token>. List APIs may take
/api/orders?order_type=SALES&from=2026-09-01&to=2026-09-30&search=valve. Errors always
come back as { "error": "A clear message" }.
Roles and permissions (enforced in the backend)
Action
Admin
Hiding a button in the frontend only keeps the screen tidy. The real protection is the backend role
check, which replies 403 Forbidden when a role is not allowed.
Testing is continuous from Week 3: each developer tests their own module before every Pull Request,
and Person 6 runs integration tests every week.
• Use the shared api from services/api.js. Show loading and error messages everywhere (400,
401, 403, network error — same rules as Person 2).
• Never change a badge or number until the backend confirms.
• Test your own pages first (bad inputs, dispatching more than remaining, double-clicking Confirm,
logging in as Worker), then raise the Pull Request.
• When Person 6 logs a bug against Orders or Production, you fix it and ask Person 6 to re-test.
7
Integration testing, bug fixing and polishing
• Weekly backups with pg_dump, plus restore instructions.
First weekly backup; extra seed data for orders; indexes
• Always use placeholders in SQL: pool.query("SELECT * FROM items WHERE id = $1", [id]).
Never glue user input into SQL text.
— so their fake data has the same shape as the real data.
• If you must change an API later, update the document and tell the people who use it.
• Never send password_hash back in any reply. Never log passwords or tokens.
Step 11: Support the team (all weeks)
Be quick and clear, because others wait for you.
• Test every API in Postman before telling anyone it is ready. Save your requests in a Postman
collection and share it with Person 6.
• Test every API in Postman before telling anyone it is ready.
• Never put passwords or the database link in the code. Use .env.
• Use clear names: getItems, createOrder, not func1.
Tool
What it is for
Figma (free)
Draw the screens and make a clickable prototype. Works in the browser.
draw.io (diagrams.net)
Draw the use case diagram, flowchart and system architecture diagram.
Google Docs
Write the project report.
Google Slides
Make the final presentation.
Trello (free)
Keep the team's to-do board.
VS Code + Git + GitHub
Edit and share the Markdown files in the docs/ folder.
Markdown (.md) is plain text with simple marks: # Heading, - bullet, bold. GitHub shows it nicely
formatted. You do not need to write any code.
• Draw diagrams in draw.io: Use case diagram (actors Admin, Manager, Worker), Flowchart (for
example: create sales order → create invoice → dispatch part → stock goes down → dispatch rest),
and System architecture (React frontend on Vercel → Express backend on Render → PostgreSQL
on Neon).
Technology stack (final — no alternatives)
Area
Technology
Technology
Frontend
React + Vite
API testing
Postman
Programming language
JavaScript
UI/UX design
Figma
UI styling
Tailwind CSS
Version control
Git + GitHub
Backend
Node.js + Express.js
Frontend deployment
Vercel
Backend deployment
Database
PostgreSQL
Neon (PostgreSQL)
Render
Database language
SQL
Database hosting
API communication
Axios
Charts
Recharts
Frontend routing
React Router
Code editor
VS Code
HTML and CSS are used as frontend fundamentals, but JavaScript is our only programming
language. We do not add any other languages, frameworks, databases, chart libraries or hosting
services.
Project folder structure
tranzact-erp/
│
├── frontend/
│ └── src/
│ ├── components/
│ ├── pages/
│ ├── modules/
│ │ ├── inventory/
│ │ ├── orders/
│ │ ├── production/
│ │ └── dashboard/
│ ├── services/
│ ├── hooks/
│ └── App.jsx
│
├── backend/
│ └── src/
│ ├── config/
│ ├── controllers/
│ ├── routes/
│ ├── middleware/
│ ├── services/
│ └── server.js
├── database/
│ ├── schema.sql
│ └── seed.sql
│
├── docs/
│ ├── architecture.md
│ ├── api-specification.md
│ ├── database-design.md
│ └── project-workflow.md
├── .gitignore
└── README.md
• database/ (Person 5) holds schema.sql (creates the tables) and seed.sql (adds sample data).
Deployment (Neon, Render, Vercel), final documentation and presentation practice
• Fixed stack: React + Vite, JavaScript and Tailwind CSS only.
Tool
What it is for
VS Code
Your code editor
Node.js (LTS)
Needed to run React tools on your laptop
React (with Vite)
To build the pages. Vite makes the project start fast.
JavaScript
The programming language (plus HTML and CSS basics)
Tailwind CSS
Styling with ready-made classes like p-4 or bg-teal-600
Axios
To talk to the backend
React Router
To move between pages
Git + GitHub
To share your code
Figma
To see Person 1's designs
Postman
To look at what an API returns before you write code for it
Install Node.js (the LTS version): https://nodejs.org/ — needed to run the frontend and backend on
your laptop.
Step 2: Learn the basics you need (Week 1)
You do not need to learn everything. Just these:
• HTML and CSS refresher (boxes, tables, colours).
• JavaScript: variables, functions, arrays, map and filter, async/await.
• React: components, props, useState, useEffect.
• Tailwind: how classes like flex, p-4, text-sm, bg-red-100 style an element.
• Watch one beginner React course on YouTube and make a small to-do app to practise.
Step 3: Create the frontend project (Week 2)
You set this up once for both frontend developers. Person 3 and Person 6 will build on it.
cd frontend
npm create vite@latest . -- --template react
npm install
npm install axios react-router-dom
npm install tailwindcss @tailwindcss/vite
npm run dev
• If Vite asks about files already in the folder, choose to ignore them and continue.
• npm run dev prints a link like http://localhost:5173 — open it and you should see the page.
• Tailwind: add tailwindcss() to the plugins list in vite.config.js (import it from
@tailwindcss/vite), and put @import "tailwindcss"; at the top of src/index.css.
• Create the agreed folders inside src/: components, pages, modules/inventory, modules/orders,
modules/production, modules/dashboard, services, hooks.
export default api;
• Create frontend/.env with VITE_API_URL=http://localhost:5000/api (your laptop only), and a
frontend/.env.example with the same line for the team.
Technology stack (final — no alternatives)
Area
Technology
Frontend
React + Vite
API testing
Postman
Programming language
JavaScript
UI/UX design
Figma
UI styling
Tailwind CSS
Version control
Git + GitHub
Backend
Node.js + Express.js
Vercel
Database
PostgreSQL
Backend deployment
Database language
SQL
Database hosting
Neon (PostgreSQL)
Code editor
VS Code
Project folder structure
tranzact-erp/
│
├── frontend/
│ └── src/
│ ├── components/
│ ├── pages/
│ ├── modules/
│ │ ├── inventory/
│ │ ├── orders/
│ │ ├── production/
│ │ └── dashboard/
│ ├── services/
│ ├── hooks/
│ └── App.jsx
│
├── backend/
│ └── src/
│ ├── config/
│ ├── controllers/
│ ├── routes/
│ ├── middleware/
│ ├── services/
│ └── server.js
│
├── database/
│ ├── schema.sql
│ └── seed.sql
│
├── docs/
│ ├── architecture.md
│ ├── api-specification.md
│ ├── database-design.md
│ └── project-workflow.md
├── .gitignore
└── README.md
• frontend/ (Persons 2, 3, 6) is the React app the user sees. backend/ (Persons 4, 5) is the Express
server. They are separate parts of the same application and talk to each other only through APIs
(the frontend sends a request with Axios, the backend replies with JSON).
• docs/ (owner Person 1): architecture.md and project-workflow.md by Person 1,
api-specification.md by Person 4, database-design.md by Person 5.
Database tables
users, roles, items, stock_history, orders, order_items, production_orders,
bom_lines
JSON field style
snake_case, same as the database columns, e.g. low_stock_limit, goods_status
Tool
What it is for
VS Code
Code editor
Node.js (LTS)
Runs React tools
React (with Vite)
Build the pages
JavaScript
The programming language (plus HTML and CSS basics)
Tailwind CSS
Styling
Axios
Talk to the backend (through the shared services/api.js)
React Router
Page navigation
Git + GitHub
Share code
Figma
See designs
Postman
Look at API replies before you code for them
Install VS Code: https://code.visualstudio.com/
3
Install Node.js (the LTS version): https://nodejs.org/ — needed to run the frontend and backend on
your laptop.
5
Open VS Code.
6
Press Cmd + Shift + P on Mac or Ctrl + Shift + P on Windows.
7
Search for Git: Clone and select it. If VS Code asks you to sign in to GitHub, allow it.
Step 2: Learn the basics (Week 1)
Learn only what you need.
• HTML, CSS and JavaScript basics (arrays, map, filter, async/await).
• React: components, props, useState, useEffect. React Router: routes and links.
• Tailwind basics.
• Practise by making a small app that shows a list with coloured status tags.
• The five shared components are Button, Table, Modal, SearchBox and StatusBadge. You build
Modal and StatusBadge; Person 2 builds Button, Table and SearchBox.
• Put them in src/components/ and agree the file names together.
You need
API (from Person 4)
Login
POST /api/auth/login
Order list / create
GET /api/orders, POST /api/orders
Invoice, dispatch, receive
PUT /api/orders/:id/status
Technology stack (final — no alternatives)
Area
Technology
Frontend
React + Vite
API testing
Postman
Programming language
JavaScript
Frontend deployment
Vercel
Database
PostgreSQL
Backend deployment
Render
Database hosting
Neon (PostgreSQL)
Project folder structure
tranzact-erp/
│
├── frontend/
│ └── src/
│ ├── components/
│ ├── pages/
│ ├── modules/
│ │ ├── inventory/
│ │ ├── orders/
│ │ ├── production/
│ │ └── dashboard/
│ ├── services/
│ ├── hooks/
│ └── App.jsx
├── backend/
│ └── src/
│ ├── config/
│ ├── controllers/
│ ├── routes/
│ ├── middleware/
│ ├── services/
│ └── server.js
│
├── database/
│ ├── schema.sql
│ └── seed.sql
│
├── docs/
│ ├── architecture.md
│ ├── api-specification.md
│ ├── database-design.md
│ └── project-workflow.md
│
├── .gitignore
└── README.md
8
Deployment (Neon, Render, Vercel), final documentation and presentation practice
Database, Login/Security and Roles
branch
feature/database-auth
Repository
The existing team repository (already
What is new in this version
• PostgreSQL is the only database. We use pgAdmin to look at tables and Neon to host the
database.
database.
• Full table design with primary keys, foreign keys, data types, constraints and timestamps —
Tool
What it is for
PostgreSQL
The database. Install it on your laptop to get pgAdmin, psql and pg_dump.
Neon
Hosts our PostgreSQL database online (one development database now, one
live database at deployment).
pgAdmin
A friendly screen to see and edit tables
dbdiagram.io
Draw the database diagram (ER diagram) by typing simple text
SQL
The language for creating tables and asking questions
bcrypt
Scramble (hash) passwords so no one can read them
jsonwebtoken (JWT)
Make login tickets (tokens)
Node.js + Express.js
Where your login code and guards run (in the backend, with Person 4)
Table
Columns (type and rules)
roles
id SERIAL PK · name VARCHAR(20) UNIQUE NOT NULL — 'Admin', 'Manager', 'Worker'
users
id SERIAL PK · name VARCHAR(100) NOT NULL · email VARCHAR(150) UNIQUE NOT NULL ·
password_hash TEXT NOT NULL · role_id INT NOT NULL FK → roles · created_at
TIMESTAMPTZ DEFAULT now()
items
id SERIAL PK · name VARCHAR(150) UNIQUE NOT NULL · item_type VARCHAR(10) CHECK IN
('RAW','FINISHED') · unit VARCHAR(20) NOT NULL · quantity NUMERIC(12,2) DEFAULT 0
CHECK (quantity >= 0) · price NUMERIC(12,2) CHECK (price >= 0) · low_stock_limit
NUMERIC(12,2) DEFAULT 0 CHECK (>= 0) · created_at, updated_at TIMESTAMPTZ
bom_lines
id SERIAL PK · finished_item_id INT NOT NULL FK → items · raw_item_id INT NOT NULL FK
→ items · qty_per_unit NUMERIC(12,3) CHECK (> 0) · UNIQUE (finished_item_id,
raw_item_id) · CHECK (finished_item_id <> raw_item_id)
orders
id SERIAL PK · order_type VARCHAR(10) CHECK IN ('SALES','PURCHASE') · party_name
VARCHAR(150) NOT NULL · order_date DATE NOT NULL · due_date DATE · invoice_status
VARCHAR(20) DEFAULT 'Pending' CHECK IN ('Pending','Created') · invoice_created_at
TIMESTAMPTZ · goods_status VARCHAR(25) DEFAULT 'Not Dispatched' CHECK IN ('Not
Dispatched','Partially Dispatched','Dispatched') · total_amount NUMERIC(14,2) ·
created_by FK → users · created_at, updated_at
order_items
id SERIAL PK · order_id INT NOT NULL FK → orders ON DELETE CASCADE · item_id INT NOT
NULL FK → items · quantity NUMERIC(12,2) CHECK (> 0) · price NUMERIC(12,2) CHECK
(>= 0) · fulfilled_qty NUMERIC(12,2) DEFAULT 0 CHECK (fulfilled_qty BETWEEN 0 AND
quantity) · UNIQUE (order_id, item_id)
production_or
ders
id SERIAL PK · finished_item_id INT NOT NULL FK → items · target_qty NUMERIC(12,2)
CHECK (> 0) · completed_qty NUMERIC(12,2) DEFAULT 0 CHECK (completed_qty BETWEEN
0 AND target_qty) · status VARCHAR(15) DEFAULT 'PLANNED' CHECK IN
('PLANNED','PENDING','WIP','IN-TESTING','COMPLETED') · planned_date DATE · total_cost
NUMERIC(14,2) · created_by FK → users · created_at, updated_at, completed_at
TIMESTAMPTZ
stock_history
id SERIAL PK · item_id INT NOT NULL FK → items · change_qty NUMERIC(12,2) NOT NULL
CHECK (<> 0) · balance_after NUMERIC(12,2) NOT NULL · changed_via VARCHAR(30)
CHECK IN ('Opening Stock','Manual Adjustment','Sales Dispatch','Purchase
Inward','Production Consumption','Production Output') · reason TEXT · unit_cost
NUMERIC(12,2) · order_id FK → orders (nullable) · production_order_id FK →
production_orders (nullable) · changed_by INT NOT NULL FK → users · request_id
VARCHAR(64) · UNIQUE (request_id, item_id) · created_at TIMESTAMPTZ DEFAULT now()
• TIMESTAMPTZ stores date and time with the time zone; DEFAULT now() fills it automatically.
• Install PostgreSQL (latest version, includes pgAdmin) from https://www.postgresql.org/download/
• Write database/schema.sql with CREATE TABLE commands in this order (a table must exist before
another points to it): roles, users, items, bom_lines, orders, order_items, production_orders,
stock_history.
• Run it in pgAdmin's Query Tool (connected to Neon) or in Neon's SQL Editor. Add indexes on
columns we search a lot: stock_history(item_id, created_at), order_items(order_id),
orders(order_date).
CREATE TABLE items (
id SERIAL PRIMARY KEY,
name VARCHAR(150) NOT NULL UNIQUE,
item_type VARCHAR(10) NOT NULL CHECK (item_type IN ('RAW', 'FINISHED')),
unit VARCHAR(20) NOT NULL,
quantity NUMERIC(12,2) NOT NULL DEFAULT 0 CHECK (quantity >= 0),
price NUMERIC(12,2) NOT NULL CHECK (price >= 0),
low_stock_limit NUMERIC(12,2) NOT NULL DEFAULT 0 CHECK (low_stock_limit >= 0),
created_at TIMESTAMPTZ NOT NULL DEFAULT now(),
updated_at TIMESTAMPTZ NOT NULL DEFAULT now()
);
Step 5: Write the sample data — seed.sql (Week 2, extend in Weeks 4–5)
Everyone needs realistic data to build and test with.
• 3 roles and 3 users: one Admin, one Manager, one Worker (test passwords only).
• About 12 items: 8 raw materials and 4 finished goods, with 2–3 items already below their low-stock
limit.
• BOM lines for every finished good.
• About 6 orders (3 sales, 3 purchase) in different statuses, including one Partially Dispatched and
one late (due date passed, not fully dispatched).
• About 4 production orders in different statuses, including one COMPLETED.
• Matching stock_history rows, so the quantities in items agree with the history.
Step 7: Build the login guard and role guard (Week 3)
Small pieces of code that run before protected routes. Put them in backend/src/middleware/auth.js.
const jwt = require("jsonwebtoken");
function requireAuth(req, res, next) {
module.exports = { requireAuth, allowRoles };
• database/seed.sql
• docs/database-design.md (tables, relationships, test logins)
Live Neon database for deployment; final backup
Technology stack (final — no alternatives)
Area
Technology
Frontend
React + Vite
API testing
Postman
Programming language
JavaScript
UI/UX design
Figma
UI styling
API communication
Axios
Charts
Recharts
Frontend routing
React Router
Code editor
VS Code
Project folder structure
tranzact-erp/
│
├── frontend/
│ └── src/
│ ├── components/
│ ├── pages/
│ ├── modules/
│ │ ├── inventory/
│ │ ├── orders/
│ │ ├── production/
│ │ └── dashboard/
│ ├── services/
│ ├── hooks/
│ └── App.jsx
│
├── backend/
│ └── src/
│ ├── config/
│ ├── controllers/
│ ├── routes/
│ ├── middleware/
│ ├── services/
│ └── server.js
├── database/
│ ├── schema.sql
│ └── seed.sql
├── docs/
│ ├── architecture.md
│ ├── api-specification.md
│ ├── database-design.md
│ └── project-workflow.md
API list (all agreed endpoints)
Group
Method
Person 4
Backend Developer – APIs
Your work guide, explained simply
The project in one line: We are building a small version of TranZact: a web app where a factory
can see its stock, track what it is making, follow its orders, and read simple reports, all in one
place.
Your
branch
feature/backend-api
Repository
The existing team repository (already
created by the project lead)
What is new in this version
• You do not create the repository. The project lead already did. You clone it and work in the
backend/ folder.
• Fixed stack: Node.js, Express.js, JavaScript, PostgreSQL with the pg library, dotenv and
Postman. Nothing else is added.
Tool
What it is for
VS Code
Code editor
Node.js + Express.js
The backend runtime and framework
JavaScript
The programming language
PostgreSQL
The database, designed by Person 5
pg
The library that lets Node.js talk to PostgreSQL
dotenv
Reads secrets from a hidden .env file
cors
Lets the frontend (another address) call your API
Postman
Test your APIs without a frontend
Git + GitHub
Share code (in the existing repository)
Axios is used by the frontend developers to call your APIs. You do not need it in the backend.
A. One-time setup (Day 1)
1
Install Git: https://git-scm.com/ (keep the default options while installing).
2
Install VS Code: https://code.visualstudio.com/
3
C. Save and share your work (every day)
Command
What it means in simple words
git add .
Put all your changed files in the 'ready to save' basket.
C. Save and share your work (every day)
Command
What it means in simple words
git commit -m "add items routes"
Save a snapshot on your laptop with a short message saying what
you did.
C. Save and share your work (every day)
Command
What it means in simple words
git push -u origin
feature/backend-api
Send your branch to GitHub for the first time. -u origin links
your laptop branch to the GitHub branch.
C. Save and share your work (every day)
Command
What it means in simple words
git push
Every push after the first one. Git already remembers where to
Step 2: Set up the backend (Week 2)
Make a server that says hello.
cd backend
npm init -y
npm install express cors dotenv pg bcrypt jsonwebtoken
• Install bcrypt and jsonwebtoken now too (Person 5 uses them), so only one person edits
package.json at the start and you avoid conflicts.
• In package.json add scripts: "start": "node src/server.js" and "dev": "node --watch
src/server.js" (restarts by itself when you save).
• Use the agreed folders inside backend/src/: config (database connection), routes (addresses),
controllers (what each address does), middleware (guards like login), services (shared logic
like changing stock), and server.js.
• In routes, write /low-stock before /:id. Otherwise Express thinks 'low-stock' is an id.
Technology stack (final — no alternatives)
Area
Technology
Frontend
React + Vite
API testing
Postman
Page 11 of 16
TranZact-style manufacturing ERP · Team work guide · Version 2
Project folder structure
tranzact-erp/
│
├── frontend/
│ └── src/
│ ├── components/
│ ├── pages/
│ ├── modules/
│ │ ├── inventory/
│ │ ├── orders/
│ │ ├── production/
│ │ └── dashboard/
│ ├── services/
│ ├── hooks/
│ └── App.jsx
├── backend/
│ └── src/
│ ├── config/
│ ├── controllers/
│ ├── routes/
│ ├── middleware/
│ ├── services/
│ └── server.js
├── database/
│ ├── schema.sql
│ └── seed.sql
├── docs/
│ ├── architecture.md
│ ├── api-specification.md
│ ├── database-design.md
│ └── project-workflow.md
│
├── .gitignore
└── README.md
Git rules
• Before starting new work: git switch main, git pull origin main, git switch
<your-branch>, git merge main.
• First push of a new branch: git push -u origin <your-branch>. After that: git push.
• Open a Pull Request (base: main, compare: your branch). The project lead/repository owner
reviews and merges it.
Person 1
UI/UX Designer and Documentation
Lead
Your work guide, explained simply
Your
branch
feature/ui-documentation
Repository
The existing team repository (already
created by the project lead)
What is new in this version
• The GitHub repository already exists (created by the project lead). You no longer ask anyone to
create one.
• You keep the project documentation in the docs/ folder of the repository, on branch
feature/ui-documentation.
Your job in measurable terms: about 8–10 designed screens (plus their pop-ups), one style guide,
three diagrams, the docs/ folder, the project report and the final presentation.
Tools you will use
Set up your laptop and the project (Git, step by step)
The project lead has already created our GitHub repository. You do not create a new one. All six of
us use the same repository, and each person works on their own branch.
Think of it like this: The repository is one shared class notebook. The main branch is the clean
master copy. Your branch is your own photocopy where you can write freely. When your pages are
ready, you ask the project lead (a Pull Request) to paste them into the master copy.
project lead sends it.
Paste the existing repository URL (the project lead shares it in the team group).
Never do this: Never push directly to main, never commit a .env file, and never put real
passwords in GitHub.
Step 4: Draw rough sketches on paper (Week 1)
Paper is faster than a computer. Sketch first, polish later.
Nothing. (User management is done through seed
data in our version, so no extra screen is needed.)
The exact rules are in the roles and permissions table in the cheat-sheet. Hiding buttons is only for
neatness; the backend (Person 5) does the real blocking.
Step 8: Hand over to developers and check it can be built (Week 2)
Developers need to know exactly what to build — and it must be buildable.
• Before finishing, sit with Persons 2 and 3 for each screen and ask: 'Can you build this with
Tailwind and our shared components in about 2 days?' If not, simplify it.
• Share the Figma link with view access and hold a 30-minute walkthrough meeting.
• Keep fixing small things when they ask questions. Freeze the design at the end of Week 2;
after Week 3 change it only if really needed.
Step 9: Write the documentation (Week 2–8)
This part matters a lot for marks. Write as you go, not at the end.
• Report chapters: 1. Introduction 2. Problem statement 3. Objectives 4. Literature/Existing systems
• Look after the docs/ folder in the repository:
• architecture.md and project-workflow.md — you write these.
• api-specification.md — Person 4 writes it; database-design.md — Person 5 writes it. You
review them so all four look consistent.
• Every 2 weeks collect from each member: a half-page summary, screenshots of their working
screens, and from Person 6 the latest test results.
• Final presentation slides
Your weekly targets
Week
Target
1
Product tour notes, Trello board, screen list, paper sketches, style guide started
2
All Figma screens, role differences, UI states page, prototype, walkthrough meeting — design frozen
3–4
Architecture diagram, architecture.md, project-workflow.md, report chapters 1–4
5–6
Use case diagram, flowchart, first screenshots and summaries collected, report chapters 5–6
7
Testing chapter using Person 6's test sheet; design touch-ups only if needed
8
Final report, slides, two timed practice rounds
• Do not make 30 screens. 8 to 10 good ones are enough.
• Keep designs simple. If a developer cannot build it in 2 days, simplify it.
• Save a copy (version) of the Figma file every week.
• Use the exact status words from the cheat-sheet in every design.
Team cheat-sheet (same for everyone)
This part is identical in all six guides. If two guides ever disagree, this page wins — tell the project lead.
• docs/ (owner Person 1): architecture.md and project-workflow.md by Person 1,
api-specification.md by Person 4, database-design.md by Person 5.
• Each person keeps a .env file on their own laptop for secrets. .env is listed in .gitignore, so it
never goes to GitHub. Share a .env.example file with empty values instead.
JSON field style
snake_case, same as the database columns, e.g. low_stock_limit, goods_status
Admin, Manager
Orders
No
Delete records
No delete APIs in our
version
No
No — never
TranZact-style ERP Group Project | Person 1 – UI/UX Designer and Documentation Lead
Page 12 of 13
TranZact-style manufacturing ERP · Team work guide · Version 2
8-week plan
Week
Team goal
1
2
3–4
5
6
7
8
Git rules
• Everyone uses the one existing repository. Nobody creates another repository.
• Work only on your own branch (see the table above). Never push directly to main.
• Commit small and often, with clear messages like add stock history pop-up.
• Before starting new work: git switch main, git pull origin main, git switch
<your-branch>, git merge main.
• First push of a new branch: git push -u origin <your-branch>. After that: git push.
• Open a Pull Request (base: main, compare: your branch). The project lead/repository owner
reviews and merges it.
• Never commit .env, passwords, database connection strings or node_modules.
Remember: Do not copy the whole of TranZact. A smaller working app (Inventory + Orders +
Production + Dashboard/Reports) is better than a big app that is half finished.
The existing team repository (already
created by the project lead)
• The screen shows a stock change only after the backend confirms it. Fake data is only for the
first days.
A. One-time setup (Day 1)
1
Install Git: https://git-scm.com/ (keep the default options while installing).
2
Install VS Code: https://code.visualstudio.com/
3
• Raise a Pull Request quickly so Persons 3 and 6 can start from the same project.
• At first use fake data in modules/inventory/sampleItems.js, shaped exactly like Person 4's
sample response. This is only so you can build the screen before the backend is ready.
You need
API (from Person 4)
Step 11: Test your own module, polish, then raise a Pull Request
You test your own work first. Person 6 then tests how everything works together.
Target
1
Laptop set up, branch created, React/Tailwind basics practised
2
Frontend project created and merged; api.js; Button, Table, SearchBox
5–6
Polish; help Person 3 reuse components; fix Inventory bugs from the bug sheet
7–8
Final bug fixes, phone-width check, demo practice
• Commit your code at least once a day with a clear message like add inventory table.
• Always work on your own branch (feature/inventory), never directly on main.
• Get the latest main before starting new work (Section 3, part E).
• If stuck for more than 30 minutes, ask the team.
User accounts
No public registration page. Starting accounts (one Admin, one Manager, one
Worker) come from seed.sql. Later users are added by the Admin through seed data
or pgAdmin.
No delete APIs in our
version
No
No — never
8-week plan
Week
Team goal
1
Understand the project, finalise scope, everyone clones the existing repository and creates their
branch, Figma sketches, database planning
2
Finalise designs, database schema and seed data, backend setup, login working, frontend project
set up
3–4
5
6
7
8
Git rules
• Everyone uses the one existing repository. Nobody creates another repository.
• Work only on your own branch (see the table above). Never push directly to main.
• Commit small and often, with clear messages like add stock history pop-up.
• Before starting new work: git switch main, git pull origin main, git switch
• Never commit .env, passwords, database connection strings or node_modules.
Person 3
Frontend Developer – Orders and
Production Modules
Your work guide, explained simply
Your
branch
feature/orders-production
Repository
The existing team repository (already
created by the project lead)
supported.
The project lead has already created our GitHub repository. You do not create a new one. All six of
us use the same repository, and each person works on their own branch.
Think of it like this: The repository is one shared class notebook. The main branch is the clean
master copy. Your branch is your own photocopy where you can write freely. When your pages are
ready, you ask the project lead (a Pull Request) to paste them into the master copy.
A. One-time setup (Day 1)
1
Install Git: https://git-scm.com/ (keep the default options while installing).
2
4
Accept the GitHub collaboration invitation (check your email or github.com/notifications). The
project lead sends it.
• Tell Persons 2 and 6 where to put their pages so the menu links work.
Step 4: Build shared parts with Person 2 (Week 2–3)
Sit together for one hour and decide the shared pieces.
• Agree with Person 4 exactly how dispatch and receiving change inventory, so your confirmation
messages tell the truth.
Your weekly targets
Week
Target
1
Laptop set up, branch created, React basics practised
2
Login page, routes, layout and menu, Modal, StatusBadge
3–4
• Start with fake data so you are never blocked — but replace it as soon as the API is ready.
TranZact-style ERP Group Project | Person 3 – Frontend Developer – Orders and Production
Page 7 of 13
TranZact-style manufacturing ERP · Team work guide · Version 2
Team cheat-sheet (same for everyone)
This part is identical in all six guides. If two guides ever disagree, this page wins — tell the project lead.
Who does what
HTML and CSS are used as frontend fundamentals, but JavaScript is our only programming
language. We do not add any other languages, frameworks, databases, chart libraries or hosting
services.
No
Manage users (add users, change roles)
Yes (through seed data /
pgAdmin in our version)
Delete records
No delete APIs in our
TranZact-style ERP Group Project | Person 3 – Frontend Developer – Orders and Production
Page 12 of 13
TranZact-style manufacturing ERP · Team work guide · Version 2
8-week plan
Week
Team goal
1
Understand the project, finalise scope, everyone clones the existing repository and creates their
branch, Figma sketches, database planning
2
Finalise designs, database schema and seed data, backend setup, login working, frontend project
set up
3–4
Inventory module working end to end (screen + API + database). Testing begins (Week 3)
Git rules
• Everyone uses the one existing repository. Nobody creates another repository.
• Work only on your own branch (see the table above). Never push directly to main.
• Commit small and often, with clear messages like add stock history pop-up.
• Before starting new work: git switch main, git pull origin main, git switch
<your-branch>, git merge main.
• First push of a new branch: git push -u origin <your-branch>. After that: git push.
• Open a Pull Request (base: main, compare: your branch). The project lead/repository owner
reviews and merges it.
created by the project lead)
Git + GitHub
The project lead has already created our GitHub repository. You do not create a new one. All six of
us use the same repository, and each person works on their own branch.
Think of it like this: The repository is one shared class notebook. The main branch is the clean
master copy. Your branch is your own photocopy where you can write freely. When your pages are
ready, you ask the project lead (a Pull Request) to paste them into the master copy.
A. One-time setup (Day 1)
1
Install Git: https://git-scm.com/ (keep the default options while installing).
2
Share your SQL files and code
Install VS Code: https://code.visualstudio.com/
3
Install Node.js (the LTS version): https://nodejs.org/ — needed to run the frontend and backend on
your laptop.
Tell Git your name and email once (use the same email as your GitHub account). Open the terminal in
VS Code with Terminal → New Terminal and type:
git config --global user.name "Your Name"
git config --global user.email "you@example.com"
B. Create your own branch (only once)
Your assigned branch is feature/database-auth. In the VS Code terminal, inside the project folder,
type:
git switch -c feature/database-auth
• switch means 'go to a branch'. -c means 'create it first'. Use -c only the very first time.
• Next time, just type git switch feature/database-auth to come back to your branch.
• Type git branch to check. The branch with a star (*) is the one you are on now.
Page 2 of 15
TranZact-style manufacturing ERP · Team work guide · Version 2
C. Save and share your work (every day)
git status
Show which files you changed. Safe to run any time.
git add .
Put all your changed files in the 'ready to save' basket.
git commit -m "add schema.sql"
Save a snapshot on your laptop with a short message saying what
you did.
Every table has an id primary key. Links to other tables use that id (foreign key). Use lowercase names
with underscores.
• Create a free Neon project and a development database. Send the connection string privately to
each teammate who runs the backend (never in the group chat, never in GitHub).
• Passwords in seed data must be bcrypt hashes, never plain text. Make a hash once in the
backend folder:
node -e "console.log(require('bcrypt').hashSync('Admin@123', 10))"
Write the three test logins (email and test password) in docs/database-design.md so the team can
log in. They are test accounts only.
Login decision: There is no registration endpoint in our version. The starting accounts come
from seed.sql. The Admin adds new users by adding rows (with hashed passwords) through
pgAdmin or seed data. This is how we resolve the 'registration vs login' question: login only.
Step 9: Keep data safe and healthy (all weeks)
Small habits that avoid big trouble.
• Keep all secrets in .env: DATABASE_URL, JWT_SECRET. Never share the real database password on
WhatsApp or GitHub.
Your weekly targets
Week
Target
1
Entity list, first ER diagram
2
schema.sql, seed.sql, Neon development database shared, login working
3
requireAuth and allowRoles on all routes with Person 4; database-design.md
4
5–6
• Person 4: tables, development database link and the login middleware — as early as possible.
• Persons 2 and 3: the role rules and the login reply.
• Person 6: SQL for reports, role testing and the live database for deployment.
• Person 1: the ER diagram and database-design.md for the report.
• Finish the tables in Week 2. Everyone else depends on you.
• Plan tables carefully. Changing them later breaks other people's work.
• Use lowercase names with underscores, like stock_history.
• Spell role names exactly: Admin, Manager, Worker.
Page 14 of 15
TranZact-style manufacturing ERP · Team work guide · Version 2
8-week plan
Week
Team goal
1
Understand the project, finalise scope, everyone clones the existing repository and creates their
branch, Figma sketches, database planning
2
Finalise designs, database schema and seed data, backend setup, login working, frontend project
set up
3–4
Inventory module working end to end (screen + API + database). Testing begins (Week 3)
5
Orders module working end to end, including partial dispatch and timeline
6
Production module and Dashboard/Reports working
7
Integration testing, bug fixing and polishing
8
Deployment (Neon, Render, Vercel), final documentation and presentation practice
Git rules
• Everyone uses the one existing repository. Nobody creates another repository.
• Work only on your own branch (see the table above). Never push directly to main.
• Commit small and often, with clear messages like add stock history pop-up.
• Before starting new work: git switch main, git pull origin main, git switch
<your-branch>, git merge main.
11 Read the README.md file before starting. It has the project overview, technology stack and folder
structure.
repository, read README.md.
• Create your branch: git switch -c feature/backend-api.
• All your code goes inside the backend/ folder.
TranZact-style ERP Group Project | Person 4 – Backend Developer – APIs
Page 3 of 16
TranZact-style manufacturing ERP · Team work guide · Version 2
• Create backend/.env (never committed) and backend/.env.example (committed, empty values):
PORT=5000, DATABASE_URL=, JWT_SECRET=, FRONTEND_URL=http://localhost:5173.
Person 5 gives you the tables and the private development database link.
• Person 5 creates a shared development database on Neon and sends you its connection string
privately. Put it in your .env as DATABASE_URL.
Login decision: There is no public registration in our version. The first Admin, Manager and
Worker accounts come from database/seed.sql (with bcrypt-hashed passwords, made by Person
5). New users are added by the Admin through seed data or pgAdmin. This keeps login simple and
safe. A registration API is not part of the agreed MVP.
Your weekly targets
Week
Target
1
Laptop set up, branch created, Express basics practised, Person 5's table plan read
2
Server running, database connected, api-specification.md draft with sample replies, login route
• Do not add features outside the agreed list. A smaller, correct API is better.
This part is identical in all six guides. If two guides ever disagree, this page wins — tell the project lead.
Yes (through seed data /
pgAdmin in our version)
Delete records
No delete APIs in our
version
No
No — never
8-week plan
Week
Team goal
1
Understand the project, finalise scope, everyone clones the existing repository and creates their
branch, Figma sketches, database planning
8-week plan
Week
Team goal
2
Finalise designs, database schema and seed data, backend setup, login working, frontend project
set up
3–4
5
6
7
8
Inventory module working end to end (screen + API + database). Testing begins (Week 3)
Orders module working end to end, including partial dispatch and timeline
• Everyone uses the one existing repository. Nobody creates another repository.
• Work only on your own branch (see the table above). Never push directly to main.
• Commit small and often, with clear messages like add stock history pop-up.
Word
Meaning
UI
User Interface: what the user sees on screen.
UX
User Experience: how easy and pleasant the app feels to use.
Wireframe
A rough black and white sketch of a screen.
Prototype
A clickable demo of the design that has no real code behind it.
Design system
The shared colours, fonts and parts (buttons, tables, badges) every screen uses.
Responsive
A layout that adjusts itself to laptop and phone screens.
Empty state
What a screen shows when there is no data yet.
Markdown
Plain text with simple marks (#, -, **) that GitHub shows nicely formatted.
Names we all agree to use
What
Agreed names
Database tables
users, roles, items, stock_history, orders, order_items, production_orders,
bom_lines
Item types
RAW (raw material) and FINISHED (finished good)
Order types
SALES and PURCHASE
Invoice status
Pending, Created
Goods status
Not Dispatched, Partially Dispatched, Dispatched (for purchase orders the same
words mean goods received from the supplier)
Production status
PLANNED → PENDING → WIP → IN-TESTING → COMPLETED (one step at a time,
forward only)
Stock change types
Opening Stock, Manual Adjustment, Sales Dispatch, Purchase Inward, Production
Consumption, Production Output
Roles
Admin, Manager, Worker (spelled exactly like this everywhere)
Command
What it means in simple words
git add .
Put all your changed files in the 'ready to save' basket.
Command
What it means in simple words
git commit -m "add inventory table"
Save a snapshot on your laptop with a short message saying what
you did.
Command
What it means in simple words
git push -u origin feature/inventory
Send your branch to GitHub for the first time. -u origin links
your laptop branch to the GitHub branch.
Command
What it means in simple words
git push
Every push after the first one. Git already remembers where to
send it.
Word
Meaning
Component
A small reusable piece of a page, like a button or a table.
Props
Information you pass into a component, like the rows for a table.
State
Data that the page remembers and can change, like the typed text in a search box.
API
A door through which the frontend asks the backend for data.
Modal
A pop-up box on top of the page.
Validation
Checking the user's input before sending it.
Pagination
Showing a long list a page at a time (for example 10 rows per page).
Token
The login ticket the backend gives after login; sent with every request.
Names we all agree to use
What
Agreed names
Item types
RAW (raw material) and FINISHED (finished good)
Order types
SALES and PURCHASE
Command
What it means in simple words
Word
Meaning
Sales order
An order from a customer who buys from us.
PO
Purchase Order: a request we send to a supplier to buy goods.
Invoice
The bill for an order. Our statuses: Pending or Created.
Dispatch
Sending goods out. 'Partially Dispatched' means only some have gone.
WIP
Work In Progress: being made right now.
FG
Finished Goods: the final product ready to sell.
BOM
Bill of Materials: the list of raw materials needed to make one product.
Route
A page address in the app, like /orders.
Database tables
users, roles, items, stock_history, orders, order_items, production_orders,
bom_lines
Production status
Word
Meaning
Table
A grid of rows and columns that stores one type of thing.
Primary key (PK)
A unique id for each row.
Foreign key (FK)
A column that points to a row in another table.
Constraint
A rule the database enforces, like 'quantity cannot be negative'.
Hash
A one-way scramble of a password.
JWT
A digital ticket that proves a user logged in.
Role
A label (Admin, Manager, Worker) that decides what a user may do.
Backup
A saved copy of the whole database you can restore later.
Stock change types
Opening Stock, Manual Adjustment, Sales Dispatch, Purchase Inward, Production
Consumption, Production Output
Admin, Manager, Worker.
COMPLETED
Word
Meaning
API
A set of web addresses the frontend can call to get or save data.
Route
One API address, like /api/items.
Controller
The code that decides what to do for a route.
Middleware
A guard that checks something (like login) before the route runs.
JSON
A simple text format for sending data, like {"name": "Keyboard", "quantity":
200}.
Transaction
A group of database changes that are saved all together or not at all.
Status code
A number in the reply that says what happened (200, 400, 404...).
Page 12 of 16
TranZact-style manufacturing ERP · Team work guide · Version 2
Names we all agree to use
What
Agreed names
Goods status
Not Dispatched, Partially Dispatched, Dispatched (for purchase orders the same
words mean goods received from the supplier)
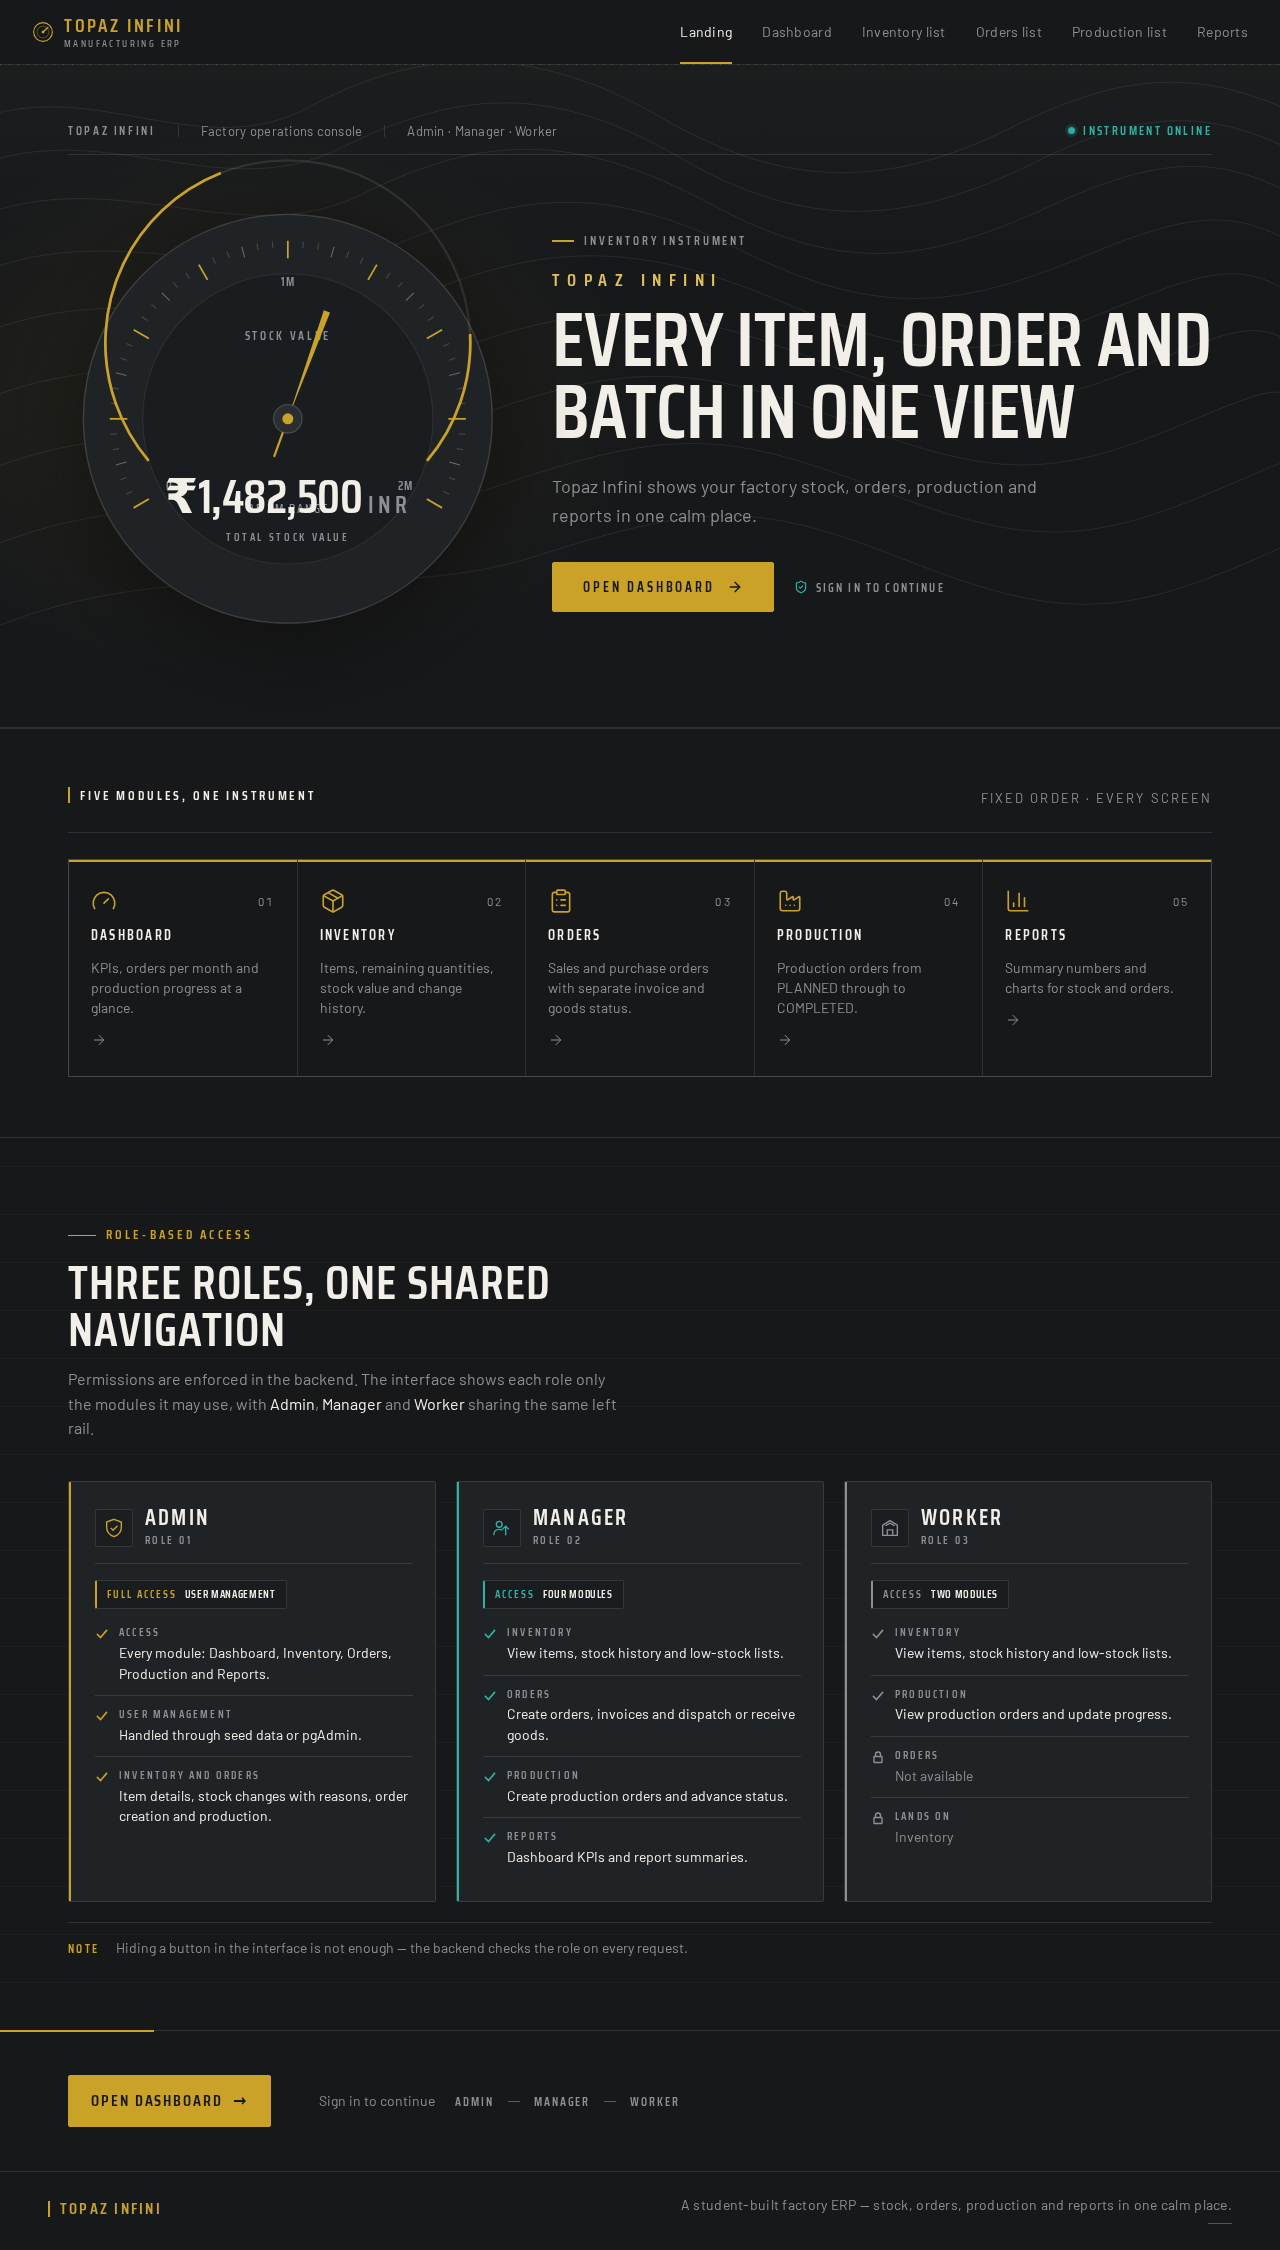
₹0INR
Total stock valueTopaz Infini
Topaz Infini shows your factory stock, orders, production and reports in one calm place.
Role-based access
Permissions are enforced in the backend. The interface shows each role only the modules it may use, with Admin, Manager and Worker sharing the same left rail.
NoteHiding a button in the interface is not enough — the backend checks the role on every request.
₹0INR
Total stock valueTopaz Infini
Topaz Infini shows your factory stock, orders, production and reports in one calm place.
Role-based access
Permissions are enforced in the backend. The interface shows each role only the modules it may use, with Admin, Manager and Worker sharing the same left rail.
NoteHiding a button in the interface is not enough — the backend checks the role on every request.
No comments yet. Be the first!