SHORT RECORDINGMODE 01
Create from a Short Video
Turn one short recording into a professionally edited reel.
 Polandbyvpn
Make this full website with dark white mode and colours change of app


Sign in to leave a comment
CLIPVERSE AI — COMPLETE PRODUCT REQUIREMENTS DOCUMENT (PRD)
Product Name: CLIPVERSE AI
Product Type: AI-Powered Video Clipping, Editing and Short-Form Content Generation Platform
Primary Goal: Convert long-form videos, gaming streams, podcasts, interviews and other recordings into multiple high-quality short videos automatically.
CLIPVERSE AI should allow users to paste a video link, inspect the source, select their preferred clip settings, find the most interesting moments using AI, generate captions, create professionally formatted clips and export the finished videos.
FINAL PRODUCT EXPECTATION
The application should contain the following primary sections:
Make
My Clips
Projects
AI Settings
Storage
Account and Preferences
Frontend responsibilities:
User interface.
Project creation.
Configuration.
Video preview.
Editor controls.
Processing status.
Results.
Settings.
Backend
Backend responsibilities:
<!-- planning-notes:v1:start -->Planning resolved these page and owner names itself instead of stopping. Review them before building.
Name changes
CLIPVERSE AI should allow users to paste a video link, inspect the source, select their preferred clip settings, find the most interesting moments using AI, generate captions, create professionally formatted clips and export the finished videos.
Make: Start a new video project.
Clips: View generated clips, previews and exports.
Projects: Continue previously created projects and recover unfinished jobs.
Settings: Configure AI providers, storage, preferences and processing options.
Create a clean, modern home screen with a professional visual identity.
The screen should have:
CLIPVERSE AI logo.
Settings icon.
Short welcome heading.
Storage or processing information.
Main video creation options.
Recent projects section.
Quick access to generated clips.
Main creation cards
A. Create from a Short Video
Description: Turn one short recording into a professionally edited reel.
Features:
Select a video file.
Choose the required section.
Select an aspect ratio.
Add captions.
Apply visual styles.
Export the finished video.
B. Find Clips from a Long Video
Description: Let AI analyze a long recording and automatically identify its most interesting moments.
Features:
Paste a supported video link or select an authorized video file.
Configure clip settings.
Analyze the full recording.
Find interesting moments.
Generate multiple clips.
Rank the generated clips.
C. Create from a Video Link
Description: Paste a supported video URL and turn the source into short-form content.
Support:
YouTube URLs where authorized media access is available.
Direct video URLs.
Supported cloud storage sources.
User-authorized provider integrations.
Other supported media providers through modular connectors.
D. Gaming Video Mode
Description: Create gaming shorts with gameplay, facecam and professional layouts.
Features:
Detect facecam regions.
Detect gameplay activity.
Identify exciting gameplay moments.
Create split-screen layouts.
Keep the streamer and gameplay visible.
Generate captions.
Apply blurred background layouts.
E. Podcast and Interview Mode
Description: Turn long conversations into engaging clips.
Features:
Detect speakers.
Identify interesting statements.
Detect questions and answers.
Find emotional or informative sections.
Generate speaker-aware captions.
Create multiple clips.
When the user selects Create from a Video Link, open a dedicated screen.
Screen layout
Heading: From a Link
Show:
Video URL input field.
Paste button.
Look It Up button.
Instructions explaining how to copy a supported video link.
Recently used sources, if available.
Video information card
Display:
Video thumbnail.
Video title.
Channel or creator name.
Video duration.
Source platform.
Publication information when available.
Media access status.
Available caption languages.
Estimated media size when a reliable estimate is available.
If media access is unavailable, show a clear explanation and offer supported alternatives, such as selecting an authorized file or connecting a permitted source.
Never show a fake successful download.
URL validation errors
Handle:
Invalid URL.
Unsupported provider.
Private or unavailable source.
Deleted video.
Region-restricted video.
Expired link.
Unsupported live stream.
Metadata unavailable.
Media access not authorized.
Provider rate limit.
Every error should include a useful recovery action.
After the source is verified and the user confirms processing, open the source preparation screen.
The application must show the source video card and available processing options.
Download quality
Where the authorized source supports multiple resolutions, offer:
480p
720p
1080p
Original quality
Auto
For each option, display:
Resolution.
Estimated file size.
Expected processing requirements.
A short quality explanation.
Never invent file sizes. Calculate estimates using available source metadata or actual media information.
Recommended quality behavior
480p: Smaller processing footprint.
720p: Balanced quality and processing requirements.
1080p: Higher visual quality.
Original: Preserve the source resolution where supported.
Auto: Choose a suitable quality based on source availability and user preferences.
YouTube captions option
Add a setting:
Use YouTube's Captions
Description: Use the source video's available captions when authorized.
If enabled:
Retrieve available captions through an authorized source.
Display the detected language.
Preserve available timestamps.
Convert captions into the internal transcript format.
Detect whether punctuation and timing need improvement.
If disabled:
If captions are unavailable, automatically offer transcription instead.
Download confirmation
Before processing, show:
Video title.
Selected resolution.
Estimated source size.
Available storage or processing capacity.
Estimated processing requirements.
Source access status.
Button: Continue
Download progress screen
Show a dedicated progress card:
Preparing Your Video
Display:
Downloading or acquiring source media.
Progress bar.
Percentage.
Current transfer speed, when available.
Downloaded size.
Total estimated size.
Remaining time, when reliable.
Pause or Stop action.
The progress must reflect real backend or local processing events.
If a transfer cannot be resumed, do not show a fake Resume button.
Storage handling
Support:
Temporary processing storage.
Automatic cleanup of expired temporary media.
User-controlled deletion.
Storage usage information.
Failed-job cleanup.
Protection against accidental deletion of completed projects.
For long videos, prefer reliable cloud or server-side processing rather than forcing users to download several gigabytes onto their phones.
Provide optional local processing for supported files and devices.
After successful source preparation, show two main actions.
Option 1: Find the Best Moments
Description: AI analyzes the recording and finds multiple interesting moments that can become short videos.
This is the main automated workflow.
After successful source preparation, show two main actions.
Option 2: Make One Reel Myself
Description: Choose a specific section of the video and create one customized reel.
Features:
Timeline selection.
Start and end timestamps.
Preview selected section.
Caption customization.
Aspect ratio settings.
Layout settings.
Export settings.
When the user taps Find the Best Moments, open a configuration screen.
This is one of the most important screens in the application.
All selected settings must be saved to the project before processing starts.
7.1 Number of clips
Allow users to choose how many clips they want.
Options:
3 clips
5 clips
10 clips
15 clips
20 clips
Custom number
Auto-select the best available clips
The application must respect the user's requested number when enough suitable moments exist.
If fewer high-quality moments are available, explain why rather than generating repetitive or meaningless clips.
7.2 Clip duration
Allow users to select the desired clip length.
Suggested options:
15 seconds
30 seconds
45 seconds
60 seconds
90 seconds
2 minutes
Custom duration
Add a setting:
Allow AI to Adjust Duration
When enabled, the AI may slightly adjust clip boundaries to preserve a complete sentence, reaction, story or meaningful moment.
The selected duration should be treated as a target, not a reason to cut off important dialogue.
7.3 Content category
Allow the user to select the type of content.
Options:
Gaming
Podcast
Interview
Educational
Entertainment
Commentary
Reaction
Storytelling
Vlog
Sports commentary
General video
Add an Auto Detect option.
The selected category should influence moment detection and clip scoring.
7.4 Aspect ratio
Offer:
9:16 — Vertical
Reels.
YouTube Shorts.
TikTok.
Vertical mobile content.
1:1 — Square
Social media feed posts.
Square video content.
16:9 — Landscape
YouTube videos.
Desktop video.
Landscape content.
4:5 — Portrait Feed
Show a live preview that changes when the user selects a ratio.
7.5 Video layout
The application must provide several layout presets.
Layout A: Original Video
Use the original video without adding additional regions.
Layout B: Facecam on Top, Gameplay Below
Detect the facecam region.
Place the facecam in the upper area.
Place gameplay in the lower area.
Keep both regions synchronized.
Allow the user to change their relative sizes.
Layout C: Gameplay on Top, Facecam Below
Reverse the previous layout.
Layout D: Facecam and Gameplay Side by Side
Layout E: Streamer Plus Gameplay with Blurred Background
This is a key preset.
Keep the streamer visible in the main video region.
Keep gameplay visible in the second region.
Fill unused space using an enlarged, blurred background derived from the video.
Do not stretch the original content unnaturally.
Allow the user to adjust blur strength.
Allow the user to adjust the main video region sizes.
Layout F: Gameplay Only
Use gameplay footage without the facecam region.
Layout G: Facecam Only
Use the detected facecam region as the main content.
Layout H: Smart Auto Layout
Let AI determine the most suitable layout based on the detected source content.
Layout customization
Provide:
Facecam position.
Gameplay position.
Region width and height.
Border radius.
Spacing.
Background blur.
Background zoom.
Crop position.
Safe margins.
Preview controls.
If automatic facecam detection fails, ask the user to select the facecam region manually.
Provide the following fitting modes.
Fill
Fill the output frame using the selected video region.
Some source content may be cropped.
Provide the following fitting modes.
Fit
Preserve the complete video with empty space where necessary.
Provide the following fitting modes.
Fit + Blur
Preserve the original video and fill unused areas using a blurred background.
Provide the following fitting modes.
Custom
Allow the user to manually control:
Zoom.
Position.
Crop.
Horizontal alignment.
Vertical alignment.
Background color.
Blur intensity.
Display a real-time preview for each mode.
Offer:
Auto
1080p
720p
480p
The output should respect the selected aspect ratio.
Resolution rules
Do not upscale low-quality media unnecessarily.
Display a warning if the selected output resolution exceeds the source's practical quality.
Preserve the source frame rate where suitable.
Allow an advanced frame-rate setting if the encoder supports it.
Display estimated output file size when possible.
Captions are a major part of the final result.
Add a main toggle:
Captions
When enabled, generate synchronized captions.
When disabled, export without subtitles.
Caption language
Allow:
Auto Detect
English
Hindi
Hinglish
Spanish
French
German
Portuguese
Arabic
Caption generation requirements
Accurate speech recognition.
Word-level timestamps where supported.
Sentence segmentation.
Punctuation.
Speaker identification where available.
Proper handling of mixed-language speech.
Timing correction.
Avoid captions appearing too early or too late.
Caption styles
Provide multiple original caption presets:
Clean White
Bold Creator
Word Highlight
Karaoke
Minimal
Gaming Highlight
Podcast
Color Emphasis
Subtitle Box
Custom
Caption customization
Allow users to change:
Font family.
Font size.
Font weight.
Text color.
Highlight color.
Outline.
Shadow.
Background.
Alignment.
Position.
Maximum words per line.
Number of lines.
Animation style.
Highlight timing.
Word highlighting
Support:
Current spoken word highlighting.
Phrase highlighting.
Keyword emphasis.
Optional color changes for selected words.
Safe positioning
Captions must remain inside platform-safe areas.
Avoid placing captions over:
Important faces.
Essential gameplay information.
Important UI elements.
Platform interface overlays.
Add a safe-area preview.
Create a separate AI Writing settings screen.
Users can choose an AI provider to help identify engaging moments, generate titles and improve clip descriptions.
Provider options
OpenRouter
Groq
OpenAI
Claude
DeepSeek
Qwen
Custom compatible API
Provider connection
Each provider should support:
Each provider should support:
API key entry.
Secure key storage.
Show or hide key.
Each provider should support:
Each provider should support:
Model selection
Allow:
Each provider should support:
Each provider should support:
Each provider should support:
Disconnect action.
Manually selected model.
Fallback model.
The backend must use the configured provider and model.
Do not display a provider as connected unless the connection has actually been tested successfully.
AI responsibilities
The text model may:
Analyze transcript segments.
Identify promising moments.
Evaluate context.
Generate clip titles.
Generate descriptions.
Suggest hooks.
Produce hashtags.
Explain scoring.
Add a dedicated Listening settings screen.
Listening modes
Auto Detect
Automatically determine the best audio analysis configuration.
Listening modes
Balanced
Balance speed and transcript accuracy.
Listening modes
High Accuracy
Prefer better transcription quality where the selected provider supports it.
Listening modes
Fast
Use a faster transcription configuration where available.
Audio analysis
Detect:
Spoken words.
Speaker changes.
Pauses.
Silence.
Laughter.
Excitement.
Shouting.
Audience reactions.
Important sound events.
Music and background noise.
Do not treat loud audio alone as proof that a moment is interesting.
Cut the Pauses
Add a toggle:
When enabled:
Detect unnecessary silence.
Remove suitable pauses.
Preserve natural speech rhythm.
Avoid cutting breaths or important reactions.
Avoid cutting the beginning or end of words.
Provide a sensitivity control:
Conservative
Balanced
Aggressive
Default: Balanced.
Always allow users to undo automatic pause removal.
This is the core intelligence of CLIPVERSE AI.
The system must analyze the entire accessible recording, not simply select random sections.
Processing stages
Stage 1: Source validation
Confirm:
Source access.
Duration.
Resolution.
Audio availability.
Frame rate.
Processing eligibility.
Processing stages
Stage 2: Audio extraction
Extract audio using the configured media processing system.
Prepare it for transcription and audio analysis.
Processing stages
Stage 3: Full transcription
Generate the complete transcript.
Store:
Start timestamp.
End timestamp.
Speaker ID, when available.
Language.
Confidence score, when available.
The transcript must cover the full accessible recording.
Stage 4: Visual analysis
Analyze selected video frames.
Detect:
Faces.
Facecam regions.
Gameplay regions.
Scene changes.
Important visual events.
On-screen text where supported.
Reactions.
Camera changes.
Use efficient frame sampling and targeted higher-resolution analysis where needed.
Stage 5: Audio and emotion analysis
Identify:
Interesting statements.
Questions and answers.
Strong reactions.
Exciting moments.
Surprising statements.
Funny moments.
Useful explanations.
Emotional storytelling.
Memorable dialogue.
Emotion labels must be treated as estimates, not objective facts.
Stage 6: Transcript-based context analysis
The AI should analyze transcript segments in context.
It must understand:
What happened before a statement.
Whether a sentence is complete.
Whether the moment has a clear beginning.
Whether the moment has a satisfying ending.
Whether the clip makes sense without watching the entire source.
Stage 7: Candidate moment generation
Generate candidate time ranges.
Each candidate should include:
Start timestamp.
End timestamp.
Suggested title.
Short explanation.
Main topic.
Hook.
Relevant transcript.
Audio signals.
Visual signals.
Suggested caption language.
Stage 8: Candidate ranking
Score candidate clips using multiple factors.
Suggested scoring model:
Factor| Weight
Hook strength| 20%
Content interest| 20%
Context completeness| 15%
Emotional or entertainment value| 15%
Audio engagement| 10%
Visual engagement| 10%
Ending quality| 5%
Clip suitability| 5%
Weights should be configurable by the backend.
Avoid giving high scores to:
Incomplete sentences.
Repeated content.
Long periods of silence.
Random camera changes.
Moments with no meaningful context.
Clips that begin or end abruptly.
Stage 9: Duplicate removal
Compare candidate ranges.
Remove or merge:
Overlapping clips with nearly identical content.
Repeated reactions.
Duplicate stories.
Multiple clips with the same hook.
Stage 10: Final selection
Select the requested number of best candidates.
Prefer variety and quality over repetitive clips.
Stage 11: Clip generation
Pass the selected timestamps and user settings to the video rendering system.
Stage 12: Quality verification
Check every generated clip for:
Valid video output.
Correct duration.
Audio synchronization.
Correct aspect ratio.
Caption synchronization.
No accidental black frames.
No missing media.
No unintended empty sections.
If a clip fails, retry the render or mark it as failed with a useful explanation.
The main workflow must follow this order:
User enters a video link or selects an authorized file.
Validate the source.
Retrieve available metadata.
Display video information.
User selects source quality.
User chooses whether to use available source captions.
User selects Find the Best Moments.
User configures clip count and duration.
User selects aspect ratio.
User selects video layout.
User selects fitting mode.
User selects output resolution.
User configures captions.
User configures audio settings.
User confirms all settings.
The system acquires the authorized source media.
The system extracts audio.
The system generates the full transcript.
The system analyzes the complete video.
The system finds candidate moments.
The system ranks the candidates.
The system removes duplicates.
The system selects the best clips.
The system renders each clip.
The system adds captions and layouts.
The system verifies every output.
The system displays the completed clips and their scores.
LIVE PROCESSING DASHBOARD
During processing, display a dedicated progress screen.
Processing stages
Show these stages:
Checking source
Preparing video
Downloading or acquiring authorized media
Extracting audio
Generating transcript
Analyzing visuals
Finding best moments
Ranking candidates
Creating clips
Adding captions
Rendering video
Verifying output
Completed
Progress interface
Display:
Current stage.
Overall percentage.
Stage-specific progress.
Elapsed time.
Estimated remaining time when reliable.
Number of clips found.
Number of clips rendered.
Number of failed clips.
Cancel action.
Real progress requirement
Progress must come from actual job state and worker events.
Background jobs
If a user closes the browser or changes screens:
Continue eligible background jobs.
Preserve job state.
Allow the user to return to the project.
Display current status.
Recover completed clips.
Show failure details when a job stops.
The system must not lose a project just because the user refreshed the page.
After processing, open a results screen.
Heading: Your Clips Are Ready
Show:
Total clips generated.
Source video title.
Processing completion time.
Selected output settings.
Number of successful clips.
Number of failed clips, if any.
Clip cards
Each clip should have:
Video thumbnail.
Play preview.
Clip title.
Start and end timestamps from the original video.
Clip duration.
Viral-potential score.
Score category.
Short explanation.
Caption language.
Aspect ratio.
Resolution.
Download action.
Edit action.
Example card layout
Clip 01 — The Unexpected Reaction
Duration: 00:42
Original timestamp: 01:24:10–01:24:52
Performance Potential: 86/100
Category: Strong Hook
Reason: Starts with a surprising statement and has a clear payoff.
Buttons:
Edit
Download
More
These are illustrative labels only. Real values must come from the analysis and render results.
Every generated clip should receive an estimated performance-potential score between 0 and 100.
The score must not be presented as a guarantee of going viral.
Score categories
90–100: Very Strong Potential
80–89: Strong Potential
70–79: Good Potential
60–69: Moderate Potential
Below 60: Needs Improvement
Scoring factors
Evaluate:
Opening hook.
Audience interest.
Clarity.
Story completeness.
Emotional or entertainment value.
Visual engagement.
Audio engagement.
Caption readability.
Ending and payoff.
Platform suitability.
Score explanation
Every score must include a short explanation.
Example:
86/100 — Strong Potential
Why:
Interesting opening.
Clear context.
Strong reaction.
Good short-form duration.
Satisfying ending.
Possible improvement:
Important scoring rules
Every generated clip must be editable.
When the user taps Edit, open a dedicated editor.
Timeline
Support:
Video track.
Audio track.
Caption track.
Optional overlay tracks.
Allow:
Trimming.
Splitting.
Moving clip boundaries.
Deleting sections.
Previewing selected sections.
Undo and redo.
Caption editor
Allow:
Editing individual words.
Correcting spelling.
Changing timing.
Changing caption styles.
Moving captions.
Changing highlight colors.
Crop editor
Allow:
Dragging the visible crop region.
Zooming.
Repositioning.
Switching between Fill, Fit, Fit + Blur and Custom.
Layout editor
Allow:
Facecam position changes.
Gameplay position changes.
Region resizing.
Background blur adjustment.
Border customization.
Safe-area preview.
Audio editor
Allow:
Volume adjustment.
Mute.
Audio fade in.
Audio fade out.
Optional background music from authorized sources.
Original audio preservation.
Editing actions
Undo
Redo
Reset
Preview
Save Changes
Edits must be saved to the project so the user can reopen them later.
Step 1: Select section
Display the source video timeline.
Allow:
Start time.
End time.
Drag handles.
Video preview.
Play and pause.
Duration display.
Step 2: Choose shape
9:16
1:1
16:9
4:5
Step 3: Choose layout
Use the same layout presets from the automated clipping workflow.
Step 4: Configure captions
Enable or disable.
Choose language.
Choose style.
Configure position and size.
Step 5: Editing options
Cut pauses.
Adjust audio.
Add authorized music.
Apply background blur.
Step 6: Export
Generate the final video using the user's selected settings.
After generating each clip, allow AI to generate optional publishing information.
Title generator
Generate:
Short attention-grabbing titles.
Informative titles.
Curiosity-based titles.
Gaming titles.
Podcast titles.
Educational titles.
Avoid misleading titles that do not represent the clip.
Description generator
Generate a short description based on the actual clip content.
Hashtag generator
Generate relevant hashtags based on:
Category.
Language.
Target platform.
Allow the user to edit all generated text.
Add Copy buttons for:
Title.
Description.
Hashtags.
Provide export options for each clip.
Resolution
480p
720p
1080p
Auto
Provide export options for each clip.
Format
MP4
Other supported formats, if the encoder is configured.
Provide export options for each clip.
Encoding options
H.264.
H.265, if supported.
Audio codec selection where appropriate.
Frame-rate selection.
Quality preset.
Export actions
Export Current Clip.
Export All Clips.
Download Selected Clips.
Save to Project.
Export Without Captions.
Export With Captions.
Export verification
Before marking an export complete, verify:
The file exists.
The output can be opened.
Duration is correct.
Audio is present when expected.
Captions are included when enabled.
The selected aspect ratio is correct.
Create a dedicated Clips library.
Display:
Clip thumbnail.
Title.
Creation date.
Duration.
Performance-potential score.
Export status.
Source project.
Filters
All Clips
Recently Created
Highest Score
Downloaded
Not Downloaded
Edited
Actions
Play.
Edit.
Rename.
Download.
Delete.
Open Project.
Support search by clip title and project name.
Every video processing session must create a persistent project.
Project information
Store:
Project ID.
Owner ID or anonymous session ID.
Source URL.
Source metadata.
Source access status.
Selected configuration.
Transcript reference.
Candidate moments.
Selected moments.
Generated clips.
Export settings.
Processing state.
Creation time.
Last updated time.
Project states
Draft
Source Checking
Preparing
Downloading
Transcribing
Analyzing
Selecting Moments
Rendering
Completed
Partially Completed
Failed
Cancelled
Project actions
Continue.
Retry.
Duplicate.
Rename.
Delete.
View Results.
Recovery
If a user refreshes the application:
Load the project from the backend.
Restore its latest state.
Restore saved settings.
Display completed results.
Reconnect to active processing jobs.
A project must not disappear because of an expired temporary browser session.
Create a Storage screen.
Display:
Available storage, where measurable.
Temporary source media.
Generated clips.
Exported files.
Project data.
Storage actions
Delete temporary source media.
Delete selected exports.
Delete old failed-job files.
Clear expired temporary files.
View storage usage.
Include the following categories:
AI Settings
AI provider.
API key management.
Model selection.
Fallback model.
Connection test.
Include the following categories:
Processing Settings
Processing mode.
Maximum concurrent jobs.
Preferred resolution.
Automatic retry behavior.
Background processing preferences.
Include the following categories:
Caption Settings
Default language.
Default caption style.
Default caption position.
Default font size.
Video Settings
Default aspect ratio.
Default fitting mode.
Default resolution.
Default layout.
Storage Settings
Temporary storage limit.
Automatic cleanup.
Project retention.
Export retention.
Privacy Settings
Project visibility.
Source media retention.
AI provider data sharing information.
Delete project data.
Delete account data.
Support two usage modes:
Guest Mode
Allow users to try the application without creating an account, subject to configured usage limits.
Guest projects should be tied to a secure anonymous session and recoverable for an appropriate session period.
Clearly explain when guest projects may expire.
Clearly explain when guest projects may expire.
Registered Accounts
Allow users to:
Register.
Log in.
Log out.
Recover their account.
View their projects across devices.
Manage preferences.
Delete their account.
Support secure authentication using an established authentication service.
Create a protected admin dashboard.
Dashboard overview
Display:
Total registered users.
Active users.
Total projects.
Processing jobs.
Completed jobs.
Failed jobs.
Total generated clips.
Storage consumption.
Processing service health.
User management
Allow authorized administrators to:
View users.
Search users.
View usage.
Suspend accounts.
Restore accounts.
Review project metadata where permitted.
Job management
Display:
Job ID.
Project ID.
User.
Source provider.
Current stage.
Progress.
Worker.
Started time.
Duration.
Error information.
Actions:
Retry failed job.
Cancel active job.
Inspect logs.
Requeue eligible jobs.
AI provider management
Allow authorized administrators to configure:
Available providers.
Default models.
Fallback models.
Usage limits.
Provider availability.
Connection status.
System configuration
Allow management of:
Maximum source duration.
Maximum output resolution.
Maximum clip count.
Temporary storage policy.
Processing timeout.
Retry count.
Backend responsibilities:
Backend responsibilities:
Backend responsibilities:
Backend responsibilities:
Backend responsibilities:
Backend responsibilities:
Transcript management.
AI integration.
AI integrations
Create provider adapters for:
OpenAI.
Gemini.
Clip generation.
Export management.
Real-time progress
Use WebSockets or Server-Sent Events to report job updates.
The frontend should also support polling as a fallback.
created_at
updated_at
projects
id
user_id
title
source_url
source_provider
source_status
source_metadata
project_status
configuration
created_at
updated_at
processing_jobs
project_id
status
current_stage
progress
retry_count
worker_id
error_code
error_message
started_at
completed_at
transcripts
id
project_id
language
full_text
transcript_data
provider
ai_provider_settings
id
user_id
provider
model
encrypted_credentials_reference
connection_status
created_at
exports
id
clip_id
format
resolution
file_url
status
created_at
audit_logs
id
actor_id
action
target_type
Implement real API endpoints.
Suggested endpoints:
Source
POST /api/sources/inspect
GET /api/sources/{source_id}
POST /api/sources/{source_id}/prepare
Implement real API endpoints.
Suggested endpoints:
Source
Projects
POST /api/projects
GET /api/projects
GET /api/projects/{project_id}
PATCH /api/projects/{project_id}
DELETE /api/projects/{project_id}
Processing
POST /api/projects/{project_id}/process
GET /api/jobs/{job_id}
POST /api/jobs/{job_id}/cancel
POST /api/jobs/{job_id}/retry
Transcript
GET /api/projects/{project_id}/transcript
PATCH /api/projects/{project_id}/transcript
Moments
GET /api/projects/{project_id}/moments
PATCH /api/projects/{project_id}/moments/{moment_id}
Clips
GET /api/projects/{project_id}/clips
GET /api/clips/{clip_id}
PATCH /api/clips/{clip_id}
DELETE /api/clips/{clip_id}
Rendering
POST /api/clips/{clip_id}/render
GET /api/clips/{clip_id}/render-status
Exports
POST /api/clips/{clip_id}/export
GET /api/exports/{export_id}
AI providers
POST /api/ai/providers/connect
POST /api/ai/providers/test
DELETE /api/ai/providers/{provider_id}
Video processing can take several minutes or longer.
Use a background job queue.
Requirements
Persist jobs before processing begins.
Assign jobs to workers.
Report progress.
Retry recoverable failures.
Prevent duplicate processing.
Support cancellation.
Store error details.
Recover jobs after worker restarts.
Clean up temporary files.
Prevent multiple workers from generating the same clip unintentionally.
Retry behavior
Retry temporary failures such as:
Temporary provider outages.
Worker restarts.
Temporary storage errors.
Do not endlessly retry:
Unsupported sources.
Invalid media.
Unauthorized source access.
Invalid API credentials.
Permanent provider errors.
Timeouts
Configure independent timeouts for:
Source inspection.
Media acquisition.
Audio extraction.
Transcription.
AI analysis.
Rendering.
Export.
Display a specific error when a stage exceeds its allowed time.
Never leave a job stuck indefinitely in "Reading video information."
The system must only process content the user is authorized to use.
Every selectable card must respond.
Every toggle must save its value.
Every button must perform its stated action.
Forms must validate input.
Loading screens must show real states.
The user must be able to navigate backward without losing saved settings.
Reuse an existing transcript when the source has not changed.
Avoid re-rendering clips when only metadata changes.
Candidate selection.
Duplicate detection.
Context completeness.
Score explanations.
Caption timing.
Rendering tests
9:16.
1:1.
16:9.
4:5.
Fill.
Fit.
Fit + Blur.
Facecam and gameplay layouts.
Caption styles.
Audio synchronization.
A user can create a project from a supported source.
The application can identify the source and display real metadata.
Source media access is verified before acquisition.
The user can select available quality options.
The user can configure clip count and duration.
The user can select aspect ratio and layout.
The user can configure captions and audio processing.
The backend can acquire authorized source media.
The complete accessible recording can be transcribed.
The system can analyze audio and video.
The system can identify candidate moments.
Candidate moments receive explainable scores.
Duplicate moments are removed.
The system can generate multiple clips.
Captions are synchronized.
Layouts render correctly.
The user can preview and edit clips.
The user can export valid video files.
Projects persist after refreshing the application.
Processing jobs recover from eligible interruptions.
Failed jobs show useful errors and retry options.
Users can manage their projects and clips.
Configure authentication.
Create responsive navigation.
Build the design system.
Phase 2 — Project and source workflow
Build URL input.
Implement source inspection.
Add source-provider adapters.
Implement authorized media acquisition.
Create persistent projects.
Add source preparation progress.
Phase 3 — AI analysis
Implement transcript storage.
Implement visual analysis.
Implement moment detection.
Implement candidate ranking.
Implement duplicate detection.
Phase 4 — Video generation
Integrate FFmpeg.
Build clip rendering workers.
Implement aspect ratios.
Implement facecam and gameplay layouts.
Implement blurred backgrounds.
Implement captions.
Implement output verification.
Phase 5 — Editing and results
Build results screen.
Build clip preview.
Build timeline editor.
Implement caption editing.
Implement crop and layout editing.
Implement exports.
Add persistent job queues.
Add retries and cancellation.
Add recovery.
Add storage management.
Add admin dashboard.
Add logs and monitoring.
Test complete user workflows.
Fix mobile layout issues.
Verify all API integrations.
Verify real video processing.
Verify storage and recovery.
Deploy the frontend and backend.
If a provider integration is not configured, show exactly what is missing.
If a feature requires an external service, implement its adapter interface and clearly document the required credentials.
The final result should feel like a professional AI video editing product.
A user should be able to:
Paste a supported video link → Inspect the video → Select quality → Choose Find the Best Moments → Configure clip count and duration → Choose video layout → Configure captions → Start processing → Let AI transcribe and analyze the complete recording → Find and rank the best moments → Generate multiple clips → Preview and edit them → See their performance-potential scores → Export the finished videos.
Every stage must work with real data, persistent backend state and actual media processing.
Build the complete product, not just its appearance.
The product serves people who turn a source recording into short videos, with a first-time user as the design baseline: the whole workflow must stay simple enough for someone using it for the first time.
| Role | Responsibilities and goals | Inputs | Decisions | Access |
|---|---|---|---|---|
| Creator (guest or registered) | Start a project from a supported source; choose the automated "Find the Best Moments" path or select a specific part to make one reel themselves; preview and edit clips; export valid video files; manage projects and clips | A video link or an authorized file; AI provider choice for moment detection, titles and clip descriptions | Which creation path to use; which moments and clips to keep; which provider to use | Guest mode with configured usage limits and an anonymous session; registered accounts add registration, login, logout, account recovery and cross-device project viewing |
| Administrator | Keep the platform usable and accountable: view, search and suspend or restore users, review usage and permitted project metadata, and configure available AI providers with default and fallback models | User and usage records; provider configuration | Account suspension or restoration; provider and model defaults | Protected admin dashboard only |
Guest projects are tied to a secure anonymous session and recoverable for an appropriate session period; the interface must clearly explain when they may expire. Registered creators gain durable, cross-device access to their projects. Administrators act through the protected dashboard and do not take part in clip creation.
Supporting actors, not personas: the AI analysis and writing services behind the selected provider (OpenRouter, Groq, OpenAI or Claude), and the session and account services that scope guest and registered access.
Actor: Creator. Trigger: Selecting Create from a Short Video on the Make screen.
Result: A professionally edited reel is exported. The project and its clips remain available for later return.
Actor: Creator. Trigger: Selecting Create from a Video Link.
Branches and recovery: Invalid URL, unsupported provider, private/unavailable/deleted/region-restricted/expired source, unsupported live stream, missing metadata, unauthorized media access and provider rate limits each show a clear explanation with a recovery action. When media access is unavailable, supported alternatives are offered (authorized file selection or a permitted source connection). If captions are unavailable, transcription is offered automatically. If a transfer cannot be resumed, no Resume button is shown. If a provider integration is not configured, the screen states exactly what is missing.
Actor: Creator. Trigger: Tapping Find the Best Moments after source preparation.
Result: The results screen Your Clips Are Ready shows total clips generated, source video title, processing completion time, selected output settings and number of successful clips. Each clip card shows thumbnail, play preview, title, start/end timestamps from the original video, duration, viral-potential score with category and short explanation (e.g. 86/100 — Strong Potential, with reasons and a possible improvement), caption language, aspect ratio, resolution, Download and Edit. If fewer high-quality moments exist than requested, the app explains why rather than generating repetitive or meaningless clips.
Actor: Creator. Trigger: Tapping Make One Reel Myself.
Actor: Creator. Trigger: Choosing Gaming Video Mode.
Recovery: If automatic facecam detection fails, the Creator selects the facecam region manually.
Actor: Creator. Trigger: Choosing Podcast and Interview Mode.
Actor: Creator. Trigger: Adjusting output framing during clip setup.
Actor: Creator. Trigger: Confirming settings and starting processing.
Actor: Creator. Trigger: Tapping Edit on a clip card.
Actor: Creator. Trigger: Opening the text tools for a clip.
Actor: Creator. Trigger: Choosing an export action for a clip or selection.
Result: Verified video files are available for download and remain saved to the project.
Actor: Creator. Trigger: Opening Projects or My Clips.
Result: Work is preserved across sessions; unfinished jobs can be resumed.
Actor: Creator. Trigger: Opening the AI Writing or Listening settings screens.
Actor: Creator. Trigger: Opening the Storage screen or account settings.
Actor: Administrator. Trigger: Signing in to the protected admin dashboard.
Result: Account and job state changes are reflected for affected users on their next project load.
User flow
User pastes a video URL.
User taps Look It Up.
Frontend validates the URL.
Backend identifies the source provider.
The source connector attempts to retrieve authorized public metadata.
Display the video information.
MAKE ONE REEL MYSELF
This workflow is for users who want to select a specific part of the source video.
[Design proposal; unspecified choices are defaults.]
Muse and headline. MARQ by Garmin — a precision instrument for a video clipping studio. Headline: Turn one long video into many sharp clips.
Mode switch. The app ships in two modes and flips between them in one transition: graphite (dark) and paper white (light). Amber and teal survive both modes.
| Role | Dark (graphite) | Light (paper white) |
|---|---|---|
| Background | #121416 | #F2F0EB |
| Surface | #1C1F22 | #FFFFFF |
| Text | #ECEDEA | #17191B |
| Primary (actions) | #E2A03F | #E2A03F |
| Accent (scores, gauges) | #4FB3A6 | #4FB3A6 |
| Muted (secondary controls) | #8B9095 | #8B9095 |
| Success | green | green |
| Error / warning | red | red |
Amber is reserved for primary actions (Look It Up, Find the Best Moments, Create Clips, Export, Save Changes); secondary buttons (Make One Reel Myself, Preview, Edit, Cancel) use muted purple-grey. Success states are green, errors and warnings red. Selection states are explicit and high-contrast in both modes.
Typography. Headings: Saira Condensed, 600 weight, uppercase, wide tracking for labels. Body: Barlow, 400 and 500. Modular scale 1.25 — 56/44/34/24/18/16 — with display clamp(56px, 9vw, 128px).
Shape and spacing. Corners stay at 8px or less, like a machined case — no pill buttons. Thin hairline bezels, ruled data rows with label aligned to value like an instrument panel, circular gauges. Professional, generous spacing; soft neutral surfaces and subtle borders; rounded cards within the 8px limit.
Imagery. Macro frames of video stills, topographic line overlays and dial gauges. No stock people, no gradient blobs, no blue-indigo on white.
Layout. Desktop: fixed sidebar navigation, editor with preview left, timeline bottom, controls right. Mobile: fixed bottom navigation bar, editor with preview top, controls below, timeline, fixed Save and Export actions. The experience is designed mobile-first and scales to tablet and desktop.
Readability. Headlines, wordmarks, labels, numbers, card text and controls stay whole inside the viewport and their container at 375px, 768px and 1280px, wrapping or scaling via clamp(...). Imagery and decoration may crop or bleed; readable text and controls never do.
Defaults (labelled). Exact green and red hex values are not source-specified; use accessible defaults (#3E9B6B success, #C4453C error) and verify contrast in both modes.
On desktop, use a sidebar navigation layout.
Editor layout
Mobile:
Video preview at the top.
Editing controls below.
Timeline.
Fixed Save and Export actions.
Desktop:
Preview on the left.
Timeline at the bottom.
Editing controls on the right.
Create an original visual design inspired by modern creator tools.
Do not copy another application's branding, name, assets or exact screen design.
Visual direction
Light background.
Warm orange primary accent.
Dark readable typography.
Soft neutral surfaces.
Subtle borders.
Rounded cards.
Clear selection states.
Professional spacing.
Minimal decorative animation.
Primary color direction
Dark charcoal: headings.
Light neutral: backgrounds.
Muted purple or grey: secondary controls.
Green: successful states.
Red: errors and warnings.
Buttons
Primary buttons:
Look It Up
Find the Best Moments
Create Clips
Export
Save Changes
Secondary buttons:
Make One Reel Myself
Preview
Edit
Cancel
Use consistent button sizes and visible loading states.
Build the full website for project onyx-full. Provide dark mode and white mode, with the app's colours changing between modes.
[Design proposal; unspecified choices are defaults.]
The instrument panel for clipping. Every screen reads like a professional gauge cluster: real job state, ruled rows, one amber accent. The public entry is a dark graphite first screen — a condensed headline at clamp(56px, 9vw, 128px) stacks left over the URL input row, the amber "Paste a link" CTA sits under the input, and a 320px circular clip-count gauge anchors the right. Subline: Paste a link, find the best moments, and export formatted shorts with real progress.
Signature moves.
Applied across the product. The home screen carries the CLIPVERSE AI logo, settings icon, short welcome heading, storage/processing information, main creation options, recent projects and quick access to generated clips. The live processing dashboard shows current stage, overall percentage, stage-specific progress, elapsed and estimated remaining time, clips found/rendered/failed and Cancel — all driven by real worker events. The editor's timeline (video, audio, caption, optional overlay tracks) and layout customization (facecam/gameplay position, region size, border radius, spacing, background blur/zoom, crop, safe margins) use the same ruled-row, gauge language. Caption presets (Clean White, Bold Creator, Word Highlight, Karaoke, Minimal, Gaming Highlight, Podcast, Color Emphasis, Subtitle Box, Custom) preview in real time.
Avoid. Gradient-blob heroes, floating glass cards, pill buttons over 8px radius, the word "viral" or view guarantees, blue-indigo on white.
[Design proposal; unspecified choices are defaults.]
Interaction Model: Animated Motion Tempo: restrained Hero Dimensionality: layered_2d
Landing Hero Motion Brief. Focal subject: the 320px circular clip-count gauge at right, layered over macro video-still frames with topographic line overlays. Thesis: the user pastes a link → the amber needle sweeps the dial as real job state arrives → the gauge settles on the true clip count and the CTA hands off to the processing dashboard. Motion vocabulary: needle sweeps, counting numbers on stage cards, one-transition mode flip — precise, never playful. Composed first frame: graphite ground, condensed headline stacked left, URL input row and amber CTA beneath, gauge at rest at zero with hairline bezel and ruled index. Reduced-motion state: gauge renders as a static dial showing the current percentage with tabular figures; no sweep, no counting animation; all content and controls remain fully visible and operable.
Throughout the app. Progress dials and stage cards animate only from real backend or local events — no fake progress, no fake Resume. Loading states are visible and honest; failed jobs show useful errors with retry. Every selectable card responds, every button performs its stated action, and backward navigation preserves saved settings. Decorative animation stays minimal.
Bottom navigation
On mobile, use a fixed bottom navigation bar:
Interaction quality
The application must not be a basic video trimmer or a static UI demonstration. Every visible feature must be connected to a working frontend, backend, processing service or clearly explained unavailable state.
Main product principles
Main product principles
Main product principles
Never claim a clip is viral or guarantee views. Show an estimated performance score with transparent factors.
Design the experience primarily for mobile screens while supporting desktop and tablet.
Build a genuine working product, not a frontend prototype with fake progress bars.
Gameplay in the remaining area.
Responsive scaling.
Preserve important visual content.
The language model should not be expected to download, decode or render video by itself.
Video processing, speech recognition, face tracking and encoding must use dedicated services or processing workers.
Privacy information
Show what information is sent to each provider.
Where possible, send only transcript text and necessary metadata to AI writing providers rather than the complete video.
Never expose API keys in frontend code, browser logs or public project data.
Do not simulate progress by slowly increasing a percentage in the frontend.
Storage safety
Never delete completed clips without the user's consent unless the user has explicitly enabled an automatic retention policy.
Temporary source media may be deleted after successful processing according to the configured retention policy.
Show storage warnings before starting jobs that exceed available capacity.
Do not store plain-text passwords.
All administrative actions must be permission-checked on the backend.
Temporary local worker storage for intermediate processing.
target_id
metadata
created_at
Use appropriate indexes, foreign keys and retention policies.
All endpoints must validate user permissions and request data.
Implement:
Secure authentication.
Backend authorization.
Encrypted provider credentials.
Environment-based secrets.
Rate limiting.
Request validation.
Upload validation.
Secure file access.
Signed media URLs where appropriate.
User data isolation.
Audit logging.
Secure deletion.
Protection against malicious URLs and server-side request forgery.
Never expose:
API keys.
Database credentials.
Internal storage paths.
Private media URLs.
Worker credentials.
Mobile layouts must not overflow horizontally.
Fixed navigation must not cover content.
The system should:
The system should:
Avoid loading entire videos into browser memory.
Use video streaming or controlled preview ranges where supported.
The system should:
The system should:
Support large video files within configured limits.
Use resumable transfer mechanisms where the source and storage provider support them.
Generate thumbnails efficiently.
Paginate large project and clip libraries.
Cache appropriate metadata.
Avoid unnecessary repeated AI calls.
Processing limits must be configurable rather than hardcoded into the frontend.
Test the complete application, not just individual screens.
Source tests
Valid supported URL.
Invalid URL.
Unsupported provider.
Private video.
Deleted video.
Expired URL.
Metadata available but media inaccessible.
Source with captions.
Source without captions.
Processing tests
Short video.
Long video.
Video with no audio.
Video with multiple speakers.
Video with mixed languages.
Gaming recording.
Facecam and gameplay.
Low-resolution video.
High-resolution video.
AI tests
Transcript accuracy.
Timestamp accuracy.
Reliability tests
Refresh during processing.
Close browser during processing.
Worker restart.
Network interruption.
Provider timeout.
Storage exhaustion.
Failed rendering.
Retry.
Cancel.
Restore project.
AI provider credentials remain secure.
No major feature relies on fake data or simulated processing.
The application works on mobile, tablet and desktop.
Phase 6 — Reliability and administration
Phase 7 — Testing and deployment
The final result should feel like a professional AI video editing product.
Every stage must work with real data, persistent backend state and actual media processing.
Build the complete product, not just its appearance.
The application must use a modular architecture.
Frontend
Recommended:
React.
TypeScript.
Tailwind CSS.
shadcn/ui.
Framer Motion.
Responsive mobile-first design.
Recommended:
Python FastAPI.
PostgreSQL.
Redis.
Background job workers.
Object storage.
FFmpeg.
Video processing
Use:
FFmpeg for media extraction, trimming, resizing, compositing and encoding.
OpenCV for supported visual analysis and frame processing.
A suitable face detection and tracking system.
A speech-to-text provider.
Optional speaker diarization.
A dedicated rendering worker.
DeepSeek.
Qwen.
Claude.
Groq.
OpenRouter.
Custom compatible endpoints.
Use a separate adapter for each capability:
Transcription.
Language-model analysis.
Visual analysis.
Face detection.
Speaker identification.
Do not tie the entire application to one AI provider.
Storage
Use:
PostgreSQL for persistent records.
Redis for queues and temporary coordination.
Object storage for source and output media.
Create the following core tables.
users
id
password_hash or external_auth_id
account_status
status
created_at
transcript_segments
id
transcript_id
speaker_id
start_time
end_time
text
confidence
candidate_moments
id
project_id
start_time
end_time
title
explanation
category
score
score_details
selected
clips
id
project_id
candidate_moment_id
title
start_time
end_time
duration
output_url
thumbnail_url
aspect_ratio
resolution
performance_score
render_status
created_at
clip_edits
id
clip_id
edit_configuration
timeline_data
caption_data
updated_at
Set up backend.
Configure database.
Document required environment variables and external services.
Main product principles
Main product principles
Main product principles
Main product principles
Main product principles
Important source access rules
Metadata access and video media access must be treated as separate capabilities.
For example, YouTube metadata or thumbnail availability does not mean that the application has permission or technical access to download the actual video.
The application must use official APIs, authorized provider integrations, user-owned files or media sources that explicitly permit downloading and processing.
Do not bypass DRM, access controls, login restrictions or platform download restrictions.
Do not assume that every YouTube video has captions.
Never invent a facecam region or silently crop away important content.
Do not start clip rendering before the moment selection and configuration stages are complete, except when a clearly labelled preview render is explicitly requested.
Do not claim that the system knows future views.
Do not invent audience-retention statistics.
Do not claim access to platform analytics unless connected to a real authorized analytics source.
Scores should represent estimated content suitability, not guaranteed performance.
Use sensible defaults for mobile social media publishing.
The application is not considered complete until all of the following work.
Build CLIPVERSE AI as a complete, functional application.
Do not stop after designing the homepage.
Follow this implementation order:
Phase 1 — Foundation
Strict development rules
Do not create fake AI results.
Do not use placeholder progress for real processing.
Do not mark a source as downloaded unless media acquisition succeeded.
Do not mark a clip as completed unless the rendered file exists and passes verification.
Do not store all processing state only in frontend memory.
Do not expose API keys in the browser.
Do not build buttons that have no action.
Do not silently replace unavailable source access with fabricated video data.
Do not pretend that an AI text model performs video decoding or rendering.
Do not build a mock backend and describe it as production-ready.
Clip — A short video generated by CLIPVERSE AI from a selected moment of a long-form source recording, with captions and professional formatting applied, ready for export.
Source — The long-form video, gaming stream, podcast, interview or other recording supplied to the platform, identified by a source URL and source metadata, and carrying a source access status.
Source access status — The recorded condition of whether the supplied source URL could be reached and inspected during source checking.
Candidate moment — A point or segment in the source transcript identified by AI analysis as potentially interesting, before the user's selection is applied.
Selected moment — A candidate moment the user has chosen for clip generation.
Transcript reference — The stored pointer to the transcript produced from the source, used for moment analysis and caption generation.
Viral-potential score — An estimated performance-potential value between 0 and 100 assigned to every generated clip. It represents estimated content suitability only; it is not a prediction of future views and is not derived from platform analytics unless a real authorized analytics source is connected.
Score categories:
Project — The unit of work holding a Project ID, Owner ID or anonymous session ID, source URL, source metadata, source access status, selected configuration, transcript reference, candidate moments, selected moments, generated clips, export settings, processing state, creation time and last updated time.
Project state — The processing stage of a project: Draft, Source Checking, Preparing, Downloading, Transcribing, Analyzing, Selecting Moments, Rendering, Completed, Partially Completed, Failed or Cancelled.
Download state — The per-item download condition of a clip: Not Downloaded, Edited or Failed.
AI provider — The external service selected on the AI Writing settings screen to help identify engaging moments, generate titles and improve clip descriptions. Supported options are OpenRouter, Groq, OpenAI, Claude, DeepSeek, Qwen and a custom compatible API; each provider supports its own connection settings.
Owner ID / anonymous session ID — The identifier that associates a project with a signed-in owner or with an anonymous session.
Export settings — The stored configuration applied when finished clips are exported.
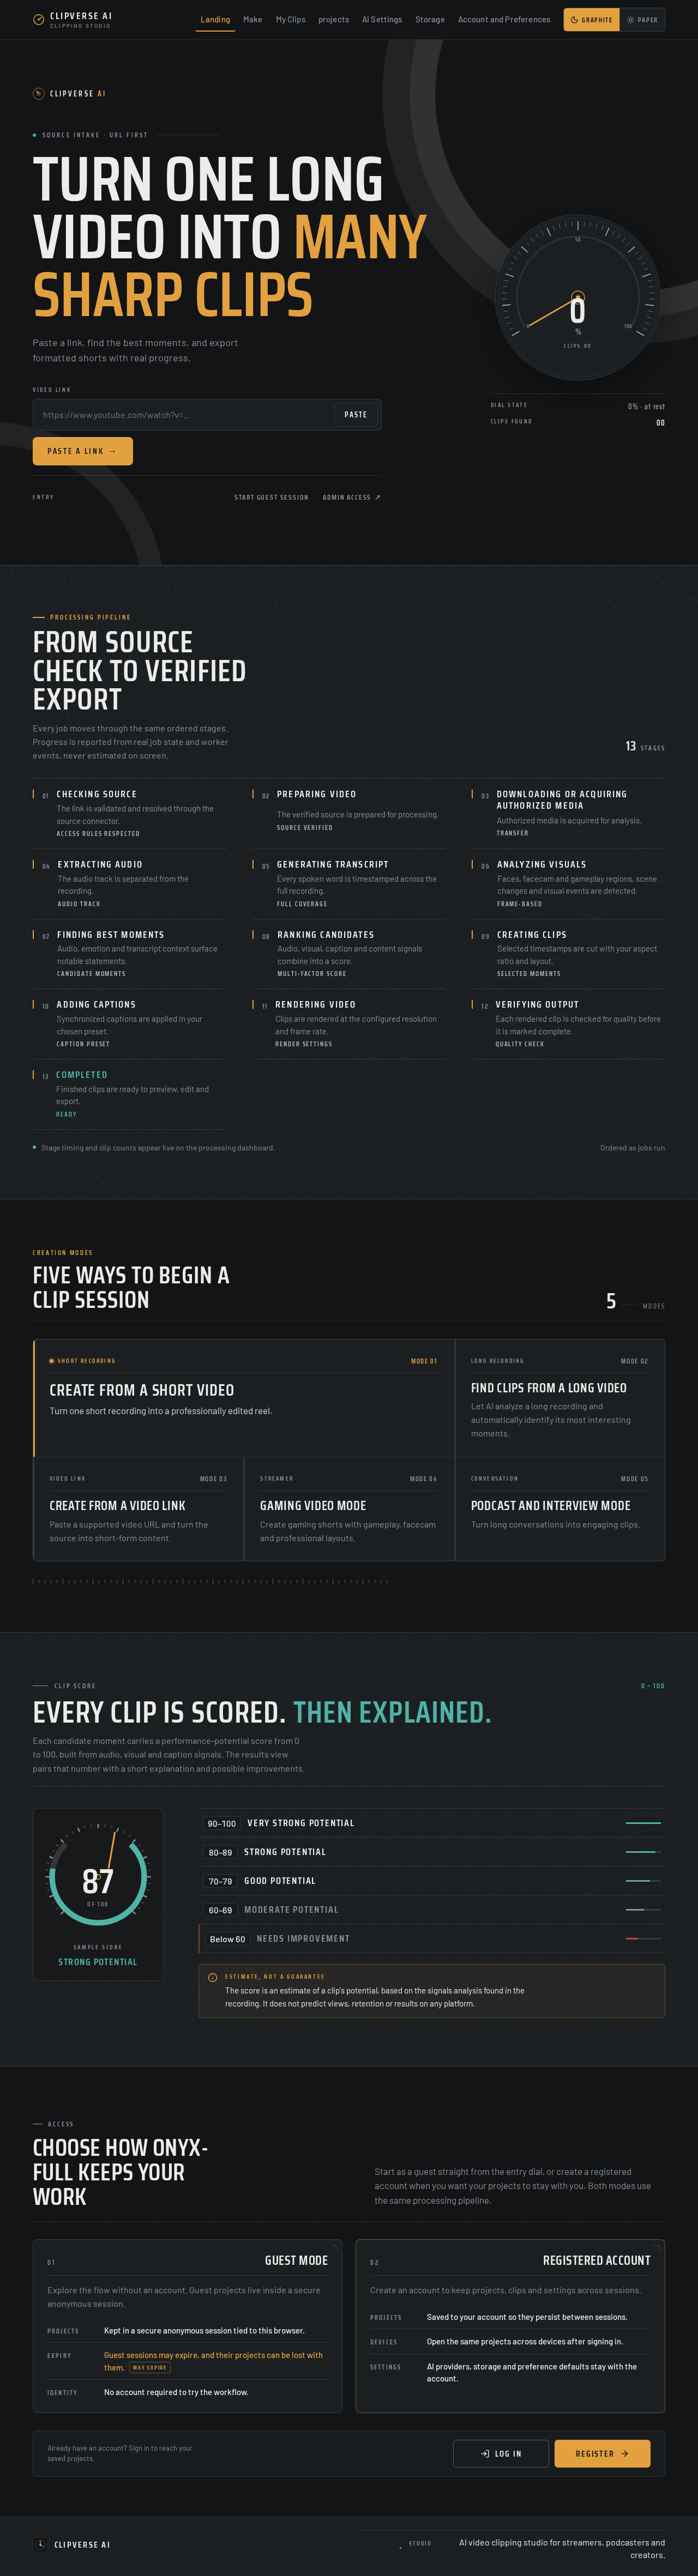
CLIPVERSE AI
Source intake · URL first
Paste a link, find the best moments, and export formatted shorts with real progress.
Processing pipeline
Every job moves through the same ordered stages. Progress is reported from real job state and worker events, never estimated on screen.
13 stages
Turn one short recording into a professionally edited reel.
Let AI analyze a long recording and automatically identify its most interesting moments.
Paste a supported video URL and turn the source into short-form content.
Create gaming shorts with gameplay, facecam and professional layouts.
Turn long conversations into engaging clips.
Clip score0 – 100
Each candidate moment carries a performance-potential score from 0 to 100, built from audio, visual and caption signals. The results view pairs that number with a short explanation and possible improvements.
Estimate, not a guarantee
The score is an estimate of a clip's potential, based on the signals analysis found in the recording. It does not predict views, retention or results on any platform.
Start as a guest straight from the entry dial, or create a registered account when you want your projects to stay with you. Both modes use the same processing pipeline.
Explore the flow without an account. Guest projects live inside a secure anonymous session.
Create an account to keep projects, clips and settings across sessions.
Already have an account? Sign in to reach your saved projects.
CLIPVERSE AI
Source intake · URL first
Paste a link, find the best moments, and export formatted shorts with real progress.
Processing pipeline
Every job moves through the same ordered stages. Progress is reported from real job state and worker events, never estimated on screen.
13 stages
Turn one short recording into a professionally edited reel.
Let AI analyze a long recording and automatically identify its most interesting moments.
Paste a supported video URL and turn the source into short-form content.
Create gaming shorts with gameplay, facecam and professional layouts.
Turn long conversations into engaging clips.
Clip score0 – 100
Each candidate moment carries a performance-potential score from 0 to 100, built from audio, visual and caption signals. The results view pairs that number with a short explanation and possible improvements.
Estimate, not a guarantee
The score is an estimate of a clip's potential, based on the signals analysis found in the recording. It does not predict views, retention or results on any platform.
Start as a guest straight from the entry dial, or create a registered account when you want your projects to stay with you. Both modes use the same processing pipeline.
Explore the flow without an account. Guest projects live inside a secure anonymous session.
Create an account to keep projects, clips and settings across sessions.
Already have an account? Sign in to reach your saved projects.
No comments yet. Be the first!